1. In this video tutorial, we will show you how to complete the initial load from Snowflake to Oracle using Striim’s Flow Designer.
2. To get started, we will go to the Create App page in Striim and click Start from Scratch using the Flow Designer. Next, you will name your new application and begin to design your initial load application.
3. In the components panel, Search for database as a source and drag it over to the right. With this component, we will connect to Snowflake as our source database.
4. Setting up Snowflake as a Source requires your connection URL, Username, and Password. Under Advanced settings, you will enter in which tables you are going to move and any other necessary details. Select New Output and enter in a name for the data stream.
5. Now that you have your source configured, you will drag a database as a target component over to configure your Oracle connection. The same information is required when setting up your target. Under Advanced Settings, be sure to enter your batch and commit policy.
6. Once you have Snowflake and Oracle configured, we will deploy your application.
7. Before running your application, you can preview the data stream by clicking on the blue eye icon or by going directly into Snowflake and Oracle. Let’s take a look at what is happening in our source and target.
8. In Snowflake we can see that we have read 1,000 events, and Oracle has not received any data at this point since the application is not yet running.
9. Now we will start the application and can watch as the initial load is completed in real-time. Our Striim Application Progress screen shows that 1,000 events have been moved from Snowflake to Oracle.
10. In Oracle, we will double-check that all 1,000 events were written by running a query. You can view additional details about your initial load by reviewing the Monitoring page in Striim.
11. In this video, you have seen an initial load application from Snowflake to Oracle created and running in just a few minutes. Thanks for watching!
Striim is excited to introduce to you our fully-managed and purpose-driven service for Databricks. In this demo, you will see how simple overall data pipeline configuration is between Oracle to Databricks. You will be able to set up a pipeline in under 5 minutes and watch the data in Databricks in real-time.
Striim for Databricks is the first fully-managed and purpose-built streaming service for Databricks in the industry. Designed for everyone, you do not need to have any prior E T L expertise, and the simplified user experience requires little to no coding. This solution also offers reduced Total cost of ownership with consumption based metering and billing.
In this demo, we will demonstrate creating an Oracle to Databricks pipeline and moving your data in a few simple steps. In addition to this video, we have added inline documentation to help you understand the on screen information.
When you launch the service, you will be brought to the Create a Pipeline screen. On this screen, you will enter in a Data Pipeline Name.
Then, you will connect to Databricks. Connection details to Databricks are saved so you can reuse it for future pipeline configurations. In this demo, we will create a new connection to Databricks that requires the account keys to be entered. The Service automatically validates the connection and checks for all the necessary prerequisites.
Introducing Striim for Databricks
Similar to the target, the service will save the source connection details for future use. Prerequisite checks are run against the source as well and the report will be shown to you.
If the connection is valid, the service identifies the schema on the Oracle source and presents the list for you to select the correct one.
The service then checks for the compatibility of the source schema with Databricks and presents the table list for your selection. While selecting your tables, you can also choose the transformation per table that will be applied as the data flows through the pipeline in real time. For this demo, let’s choose to mask this specific column’s data.
Striim for Databricks also offers intelligent performance optimization with parallel data processing by grouping the tables.
A summary is shown in case you choose to make modifications before running the pipeline. In this demo, we reviewed it and started the first pipeline. As you can see, within a few seconds the pipeline was created and started to move the initial load automatically.
Striim for Databricks also has an intuitive overview dashboards and monitoring screens. The source and target statuses are displayed here on the Overview screen. In this case, Oracle is online and green, and Databricks is Paused which means the data is not flowing yet between the source and target. We will review our Oracle data and Databricks to ensure the data flow is going to move smoothly.
Let’s check what’s happening in our source and target. First, we will go into Oracle to check the number of records that have been moved through change data capture (cdc) for each table. Then we will check in Databricks that the same number of records have been updated for each table. We can also review the tables and columns that we have masked to ensure it processed correctly.
We will also use the Manage Tables in Pipeline feature to remove any tables that we no longer want to stream.
Next, we will use the Optimize Pipeline Performance screen which will show us which tables in the pipeline may be causing issues in the data stream. We can then pause the pipeline to optimize performance by creating table groupings and reducing the time spent between batches being sent to Databricks.
Now we will go back to the Oracle database and insert values into the source table. As you can see, the pipeline immediately recognizes the changes on Oracle and starts capturing the changes in real time. If we run a query on Databricks now to check the changes made to that table, we will see the C D C events are already available.
Thanks for watching! You have now seen our seamless, automated, and real time data capture using Striim for Databricks service.
Striim for Snowflake: Real-time streaming ingest for Snowflake
Turn Snowflake into a real-time source of truth with Striim
Benefits
Operational Analytics Use non-intrusive CDC to Kafka to create persistent streams that can be accessed by multiple consumers and automatically reflect upstream schema changes
Empower Your TeamsGive teams across your organization a real-time view of your Oracle database transactions.Get Analytics-Ready DataGet your data ready for analytics before it lands in the cloud. Process and analyze in-flight data with scalable streaming SQL.
On this page
Introduction
Striim for Snowflake combines the power of fast data streaming with the simplicity of fully automated, ELT (Extract-Load-Transform) data integration to replicate databases to Snowflake in real-time.
Striim for Snowflake is also the only automated data integration product that leverages Snowflake’s new Snowpipe Streaming API to provide fast, cost-optimized data ingest.
You can try Striim for Snowflake yourself by signing up for a 14-day free trial with $1,000 worth of free credits included.
Follow this step-by-step guide to configure your data streaming pipeline in snowflake for Striim.
Step 1: Configure your snowflake target connection
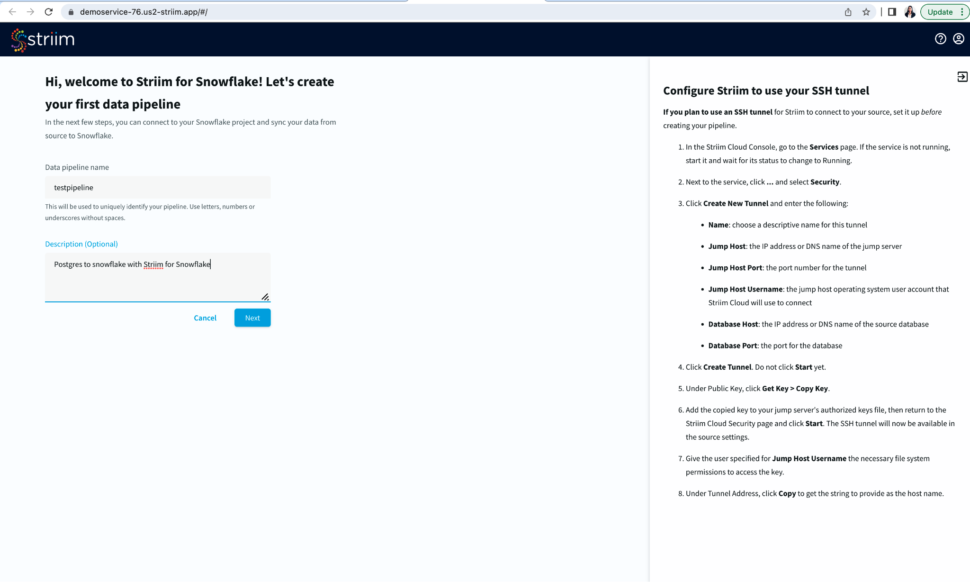
To start building your data pipeline, first name your pipeline, and optionally add a description.
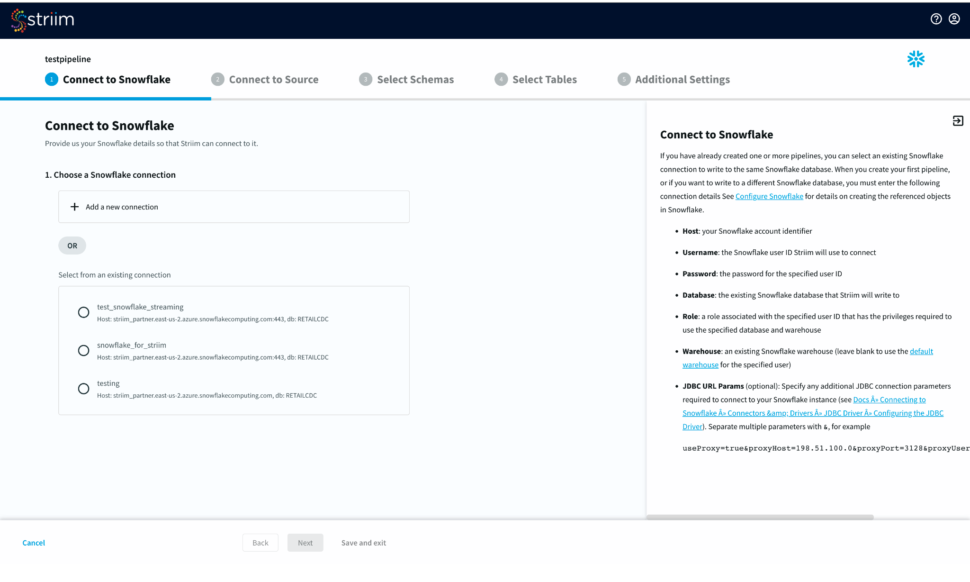
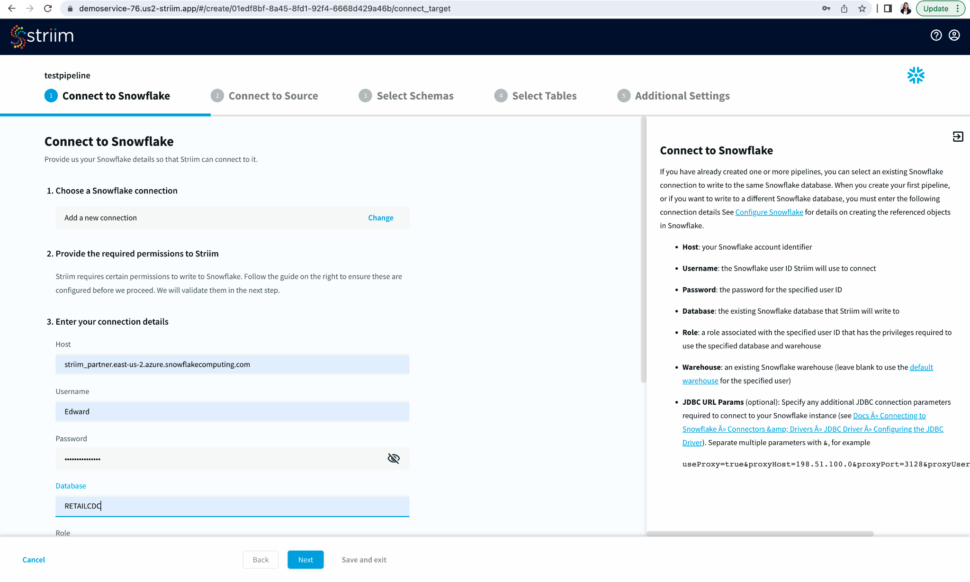
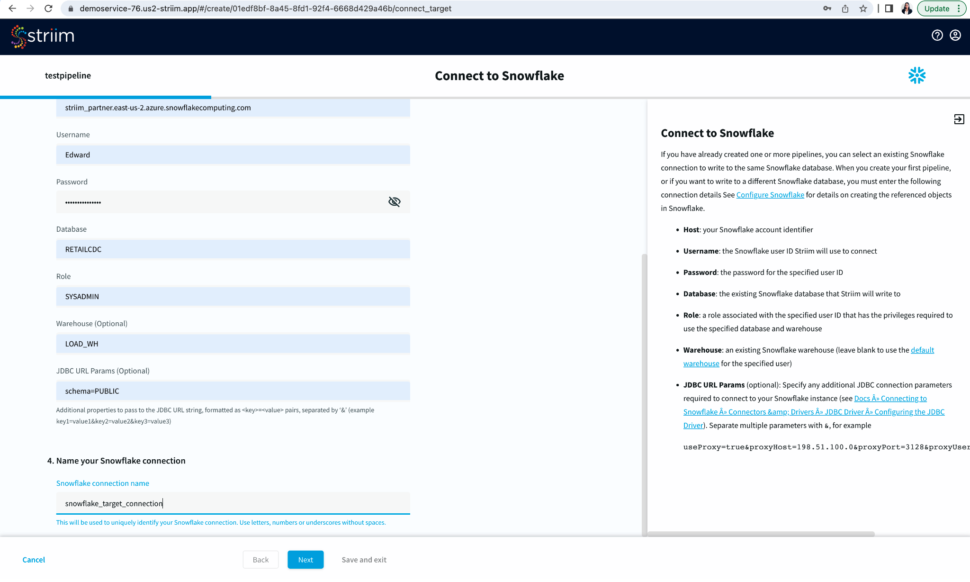
Select an existing connection or add a new connection from scratch by adding hostname or account identifier, username and password for your snowflake account, target database, role associated with the user id, snowflake warehouse associated with the specified user, and any additional properties in the jdbc string in <key>=<value> format separated by ‘&’.
Name your snowflake connection. Striim saves these connection details under the connection name for future use.
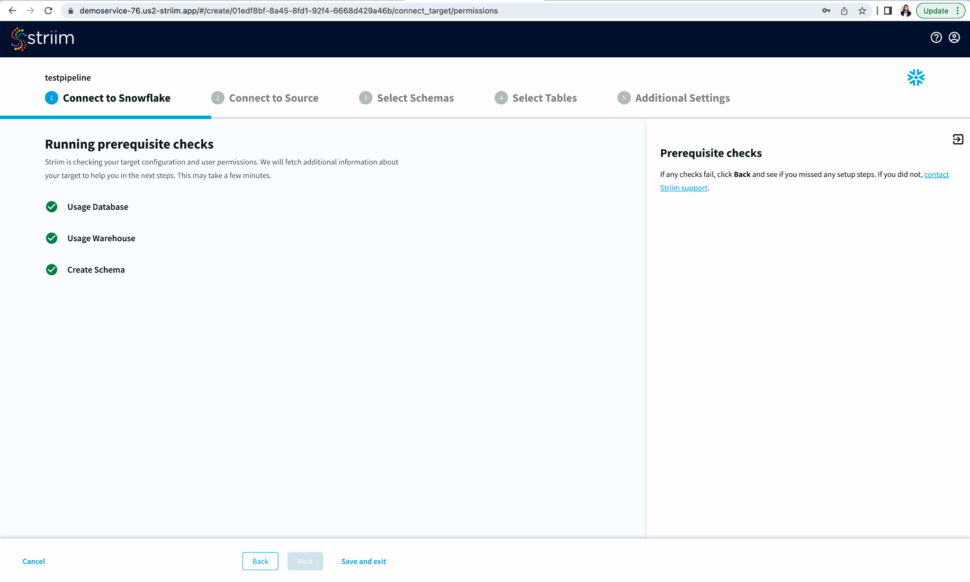
After you have entered your connection details, click Next. Striim will check if all the prerequisites have been met.
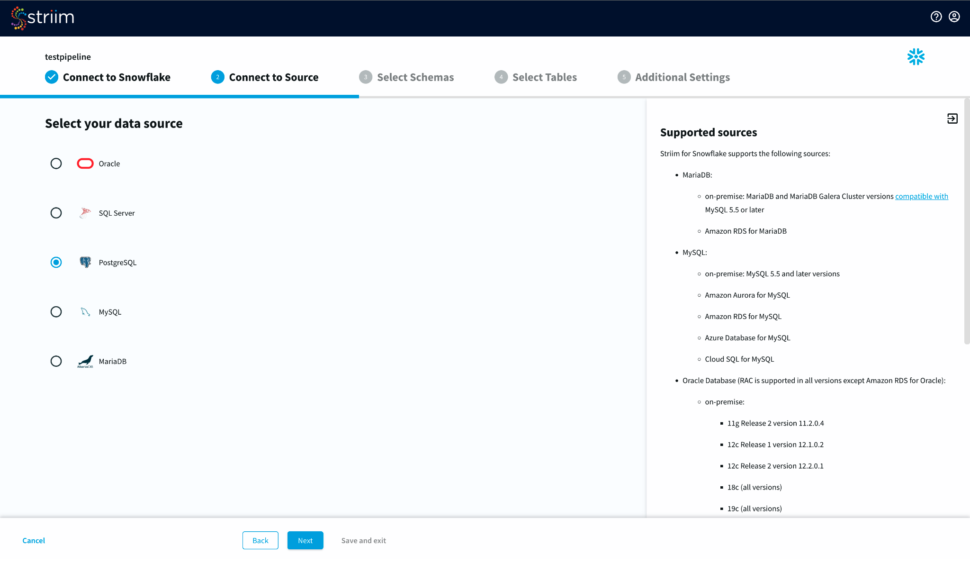
Step 2: Configure your Source connection
Once your target connection is verified, configure your source connection by selecting your source database. Here, we have selected postgreSQL as our data source.
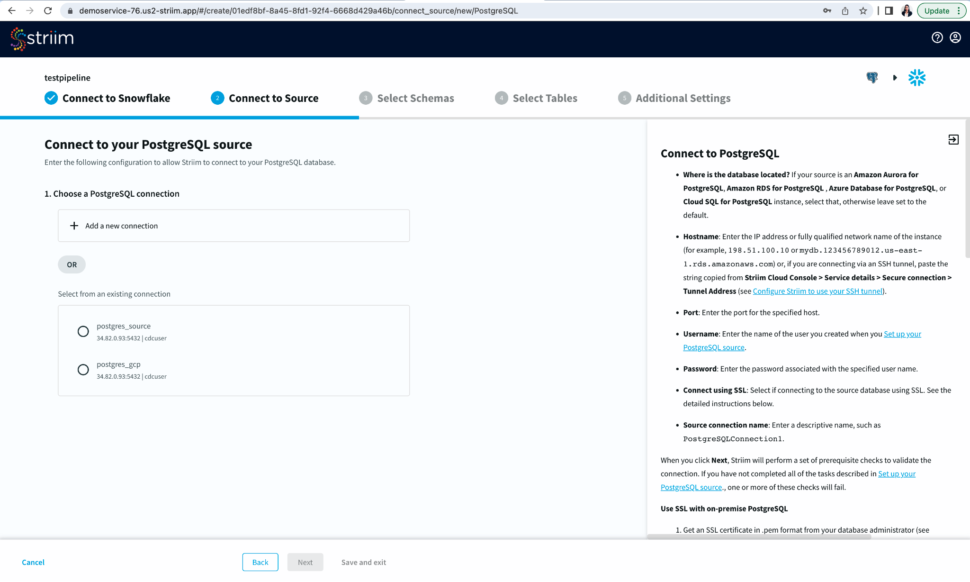
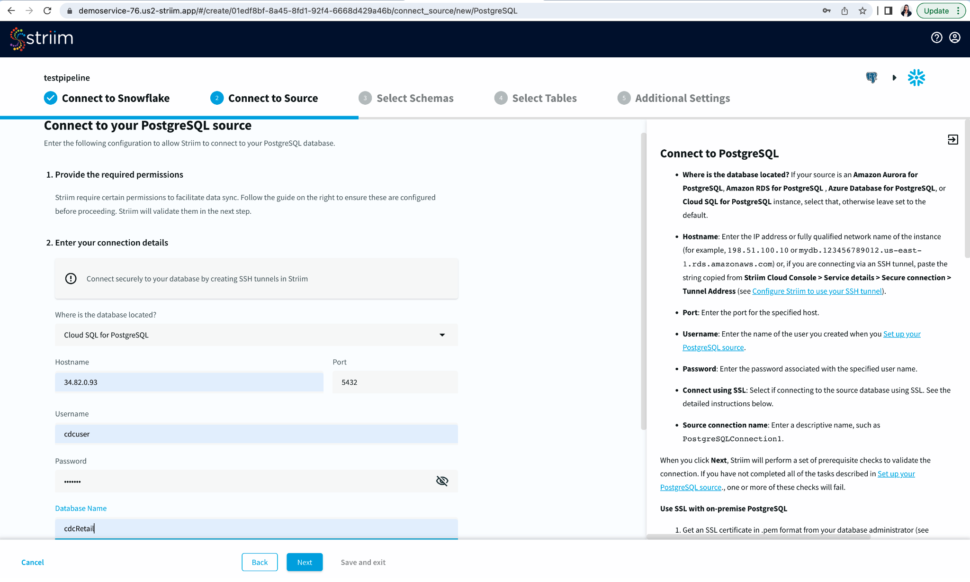
Select an existing connection or add a new connection. Enter the hostname, username, password and database name. You can also connect securely by using SSH tunnel
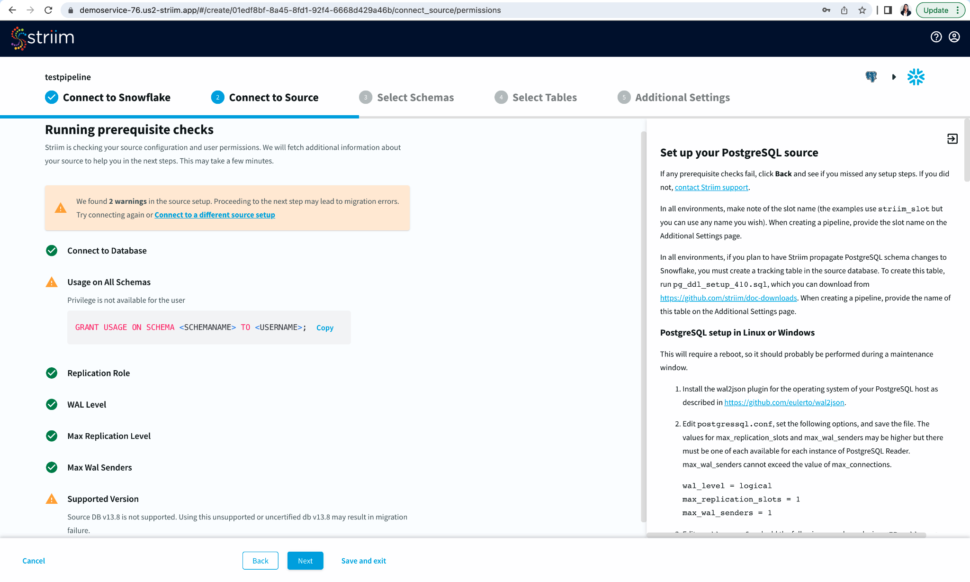
Now Striim will run prerequisite checks to verify source configuration and user permissions.
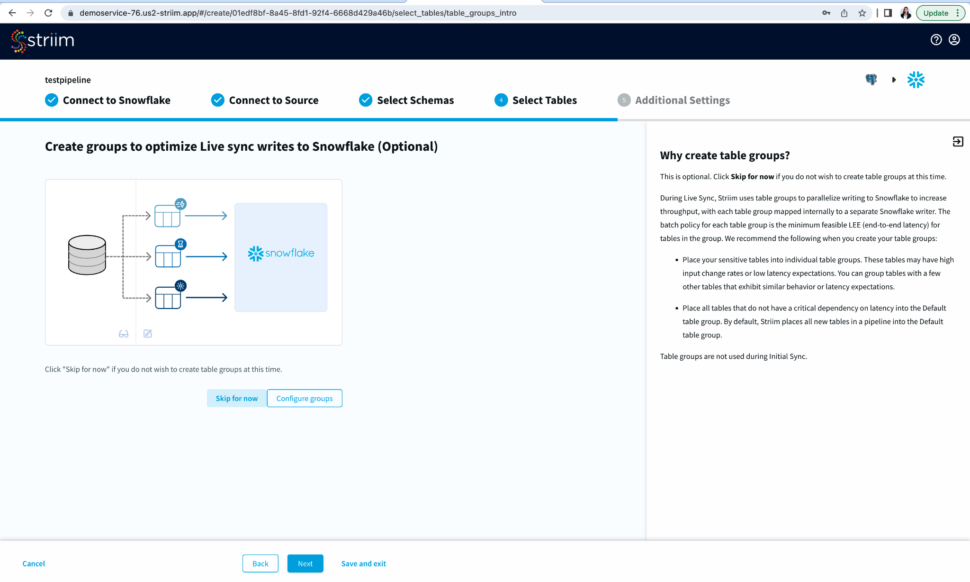
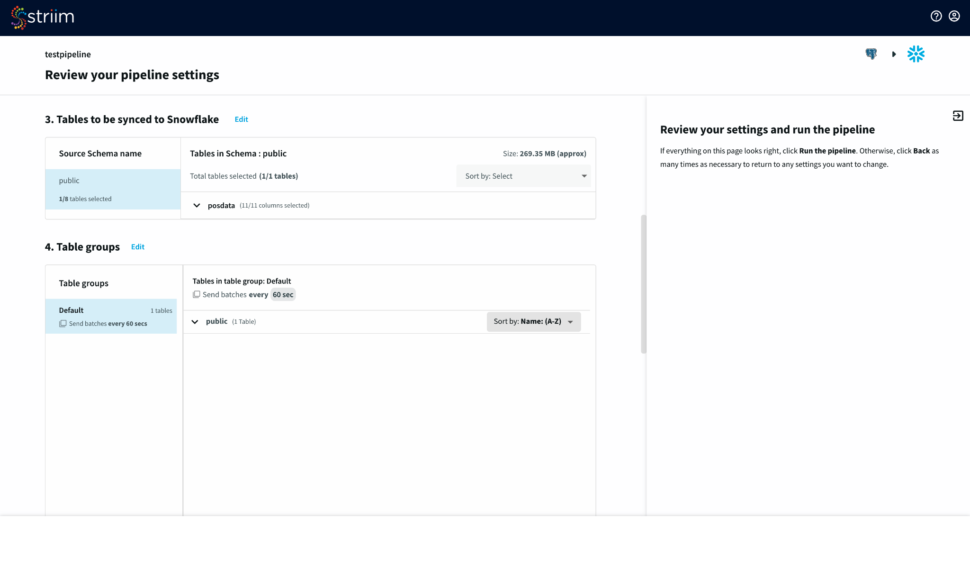
Step 3: Select Schema and Tables to move into the target
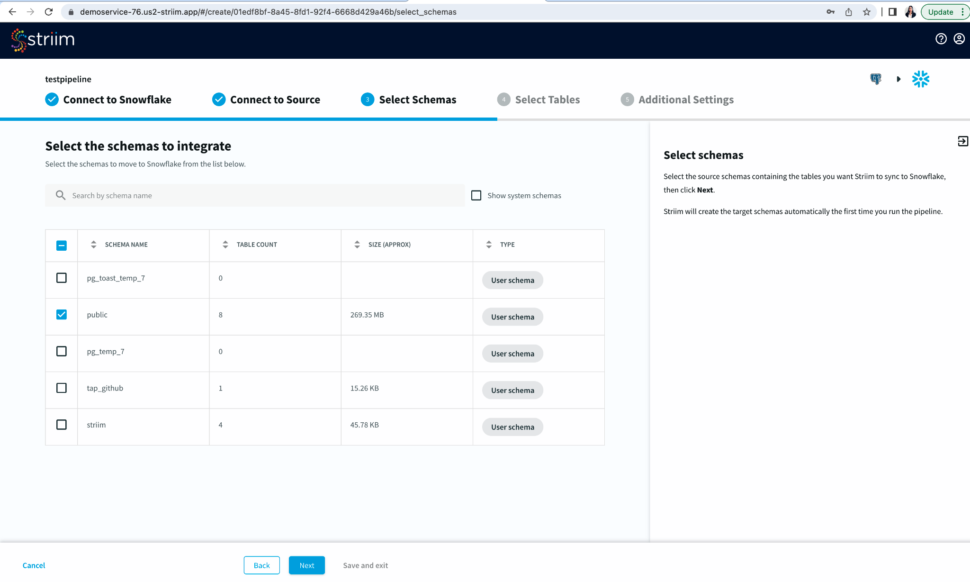
Select the source schemas containing the tables you want to sync with Snowflake.
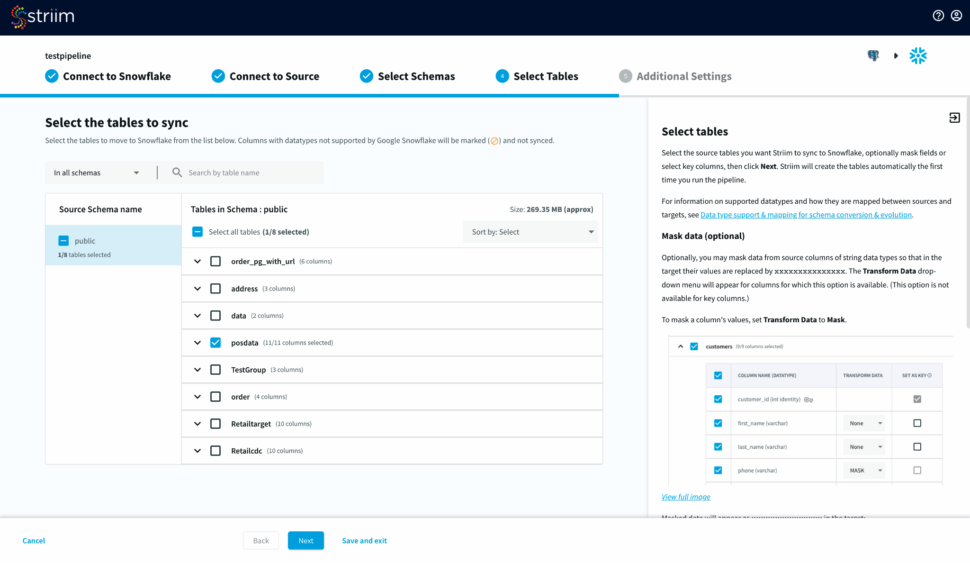
Next, select the tables, optionally you can mask fields or select key columns.
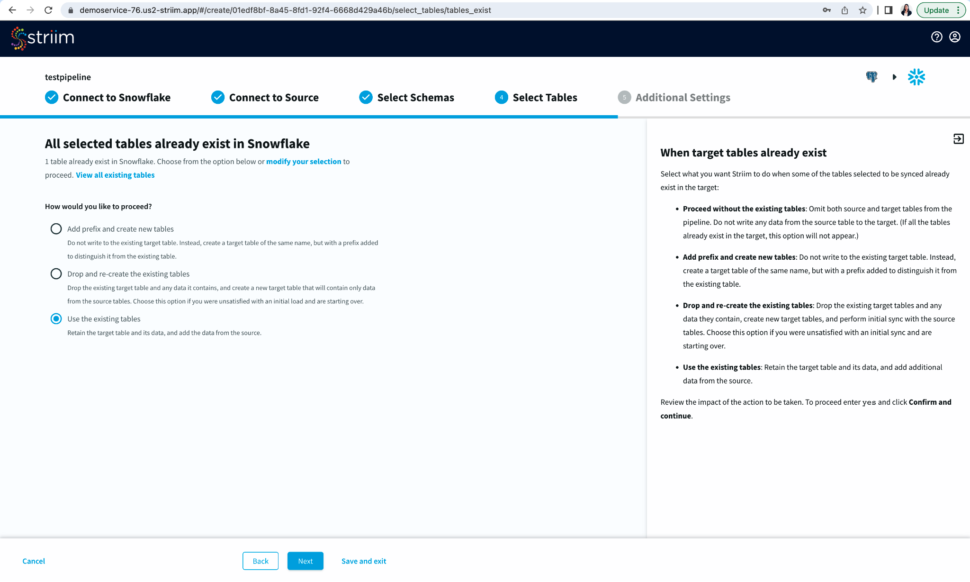
Striim will now check the target warehouse and give you the option to sync with existing tables or create a new table.
You have the option to create table groups based on input change rates and low latency expectations.
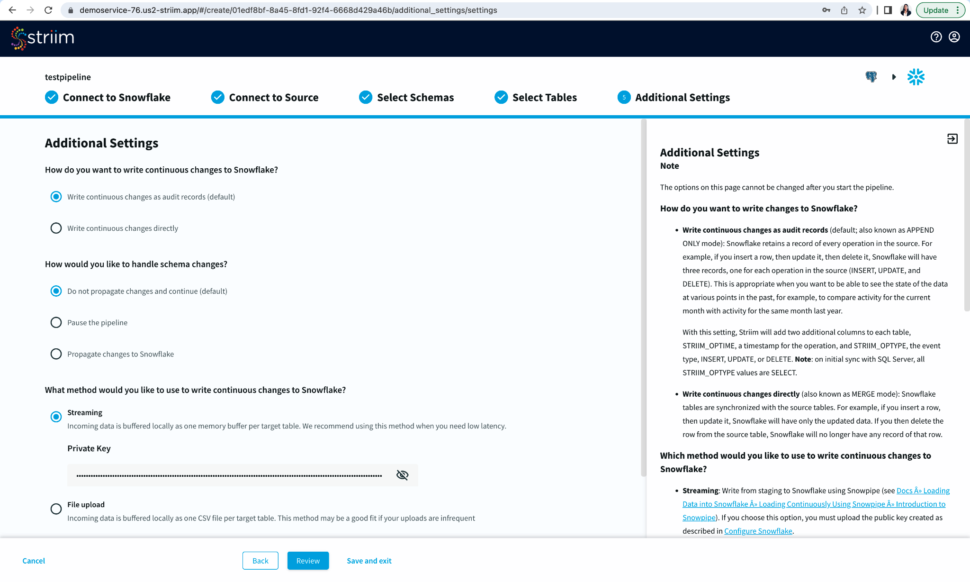
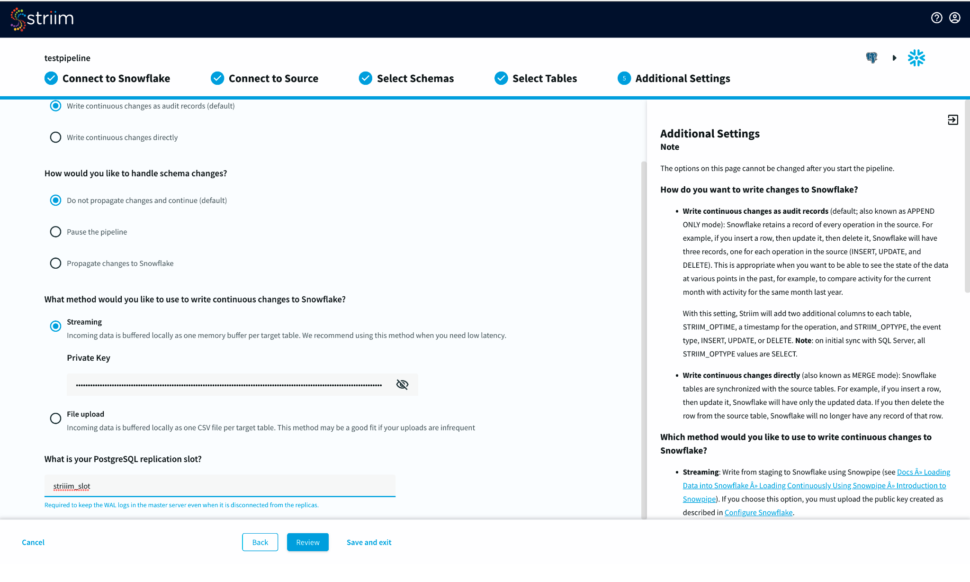
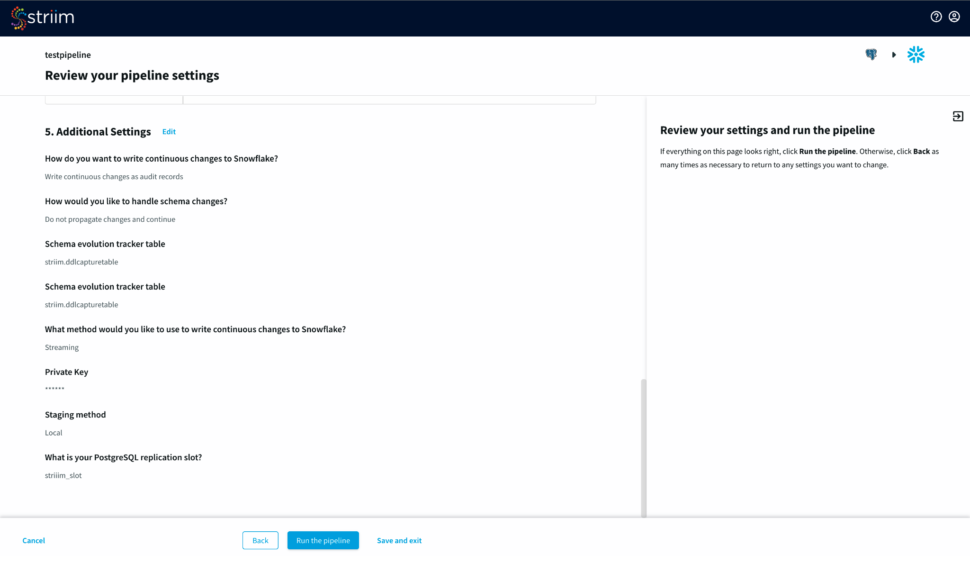
Step 4: Input Additional Settings to complete your CDC pipeline
You have options to write changes as audit records or directly to your target table. You can specify how you want to handle schema changes. For streaming option, enter the private key associated to the public key of your Snowflake user id.
For the source database, enter your postgreSQL replication slot that is required to keep the WAL logs in the master server.
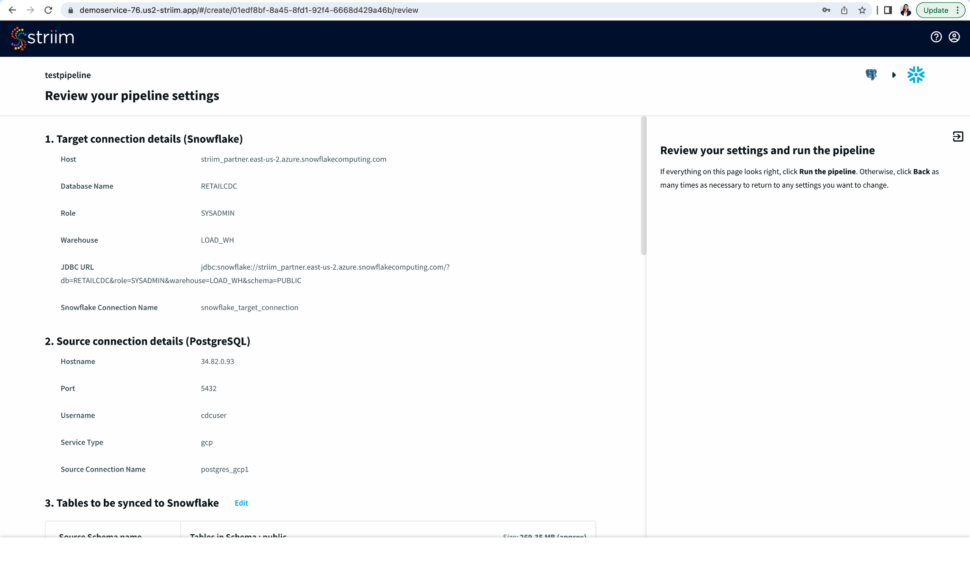
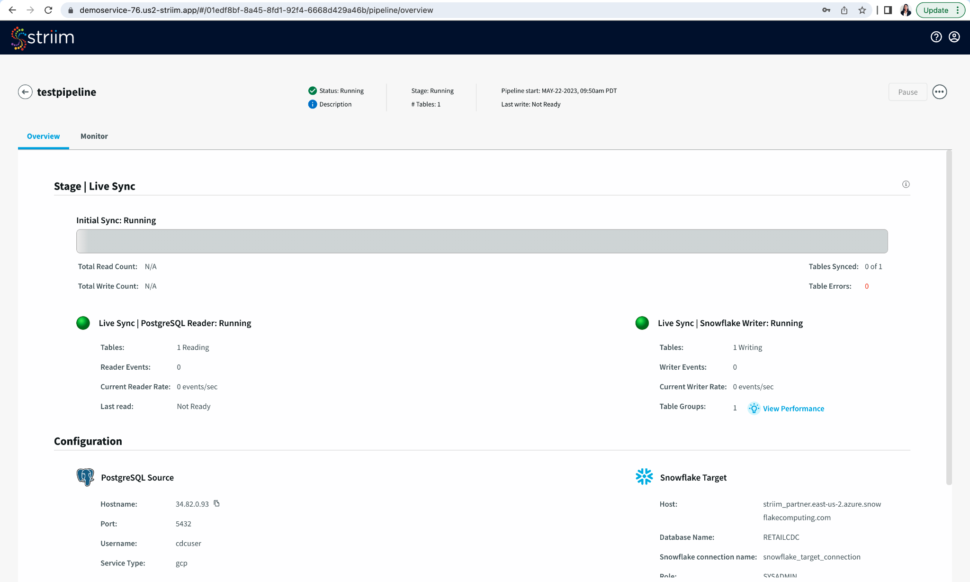
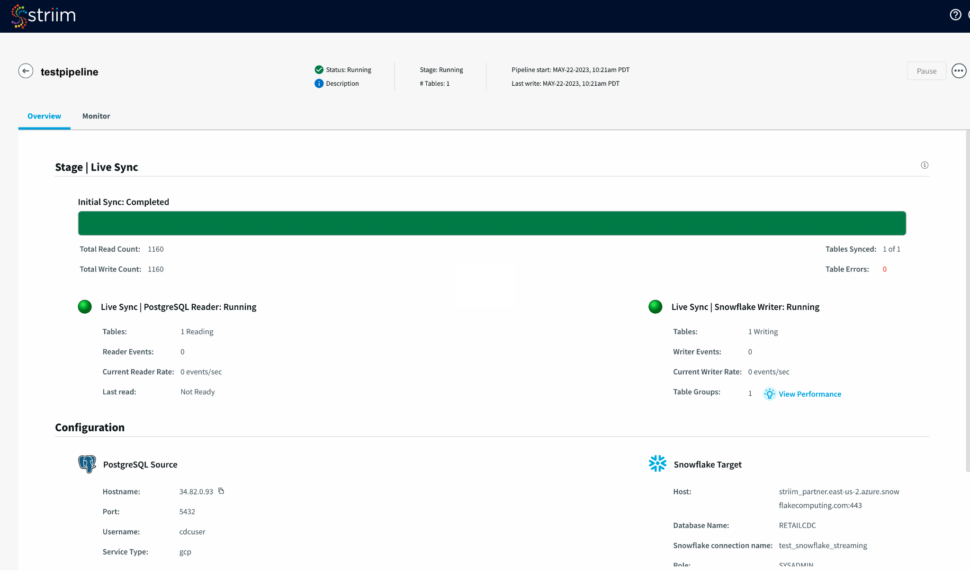
Step 5: Review your Pipeline
Review your source and target connection before running the pipeline. Make sure that your source and target connection details, selected tables and additional settings are correct.
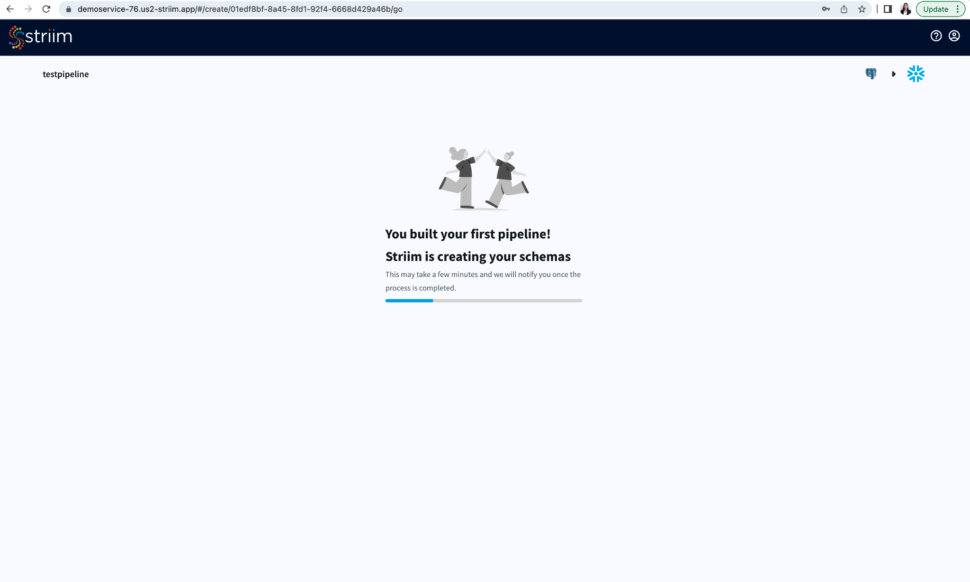
Step 6: Run your pipeline to sync the source and target tables and stream data from your source
After you have reviewed your pipeline, run your pipeline to sync the table from your source with the target followed by data streaming.
Tools you need
Striim
Striim’s unified data integration and streaming platform connects clouds, data and applications.
Oracle Database
Oracle is a multi-model relational database management system.
Apache Kafka
Apache Kafka is an open-source distributed streaming system used for stream processing, real-time data pipelines, and data integration at scale.
Azure Cosmos
Azure Cosmos is a fully managed NoSQL database.
Azure Blob Storage
Azure Blob Storage is an object store designed to store massive amounts of unstructured data.
Using Microsoft Fabric, we created real time dashboards in minutes using CDC from MongoDB. See how simple it is!
This data pipeline continuously takes Sales and Inventory data from MongoDB using Striim. Integrates with Azure Event Hubs, and visualizes it in Onelake using PowerBI. It’s a cool solution put together by Striim developers to combine operations, events, and analytics – highlighting our partnership with the newly announced unified Microsoft Fabric.