Enterprises invest millions in Snowflake to power their analytics. But too often, those highly scalable cloud warehouses are fueled by batch pipelines that run overnight.
Batch-based data delivery was good enough…until it wasn’t. Today, when your operational dashboards and predictive models run on data that is hours or even days old, you aren’t making real-time decisions, you’re just reviewing history. Snowflake is engineered for incredible scale and complex querying, yet its ultimate value depends entirely on the freshness of the data it holds.
To bring enterprise data platforms into the real-time era, data teams are increasingly replacing legacy batch ingestion with Change Data Capture (CDC).
In this guide, we’ll explore what CDC in Snowflake looks like in practice. We will break down how the underlying architecture works, examine the most common challenges data engineers face, and share best practices for building resilient, low-latency pipelines that can handle enterprise scale without breaking your budget.
What is Change Data Capture in Snowflake?
While Snowflake warehouses are incredibly elastic and powerful, feeding them with legacy batch pipelines wastes compute, delays time-to-insight, and ultimately drives up costs.
Change Data Capture (CDC) solves this by fundamentally shifting how data moves from operational systems into Snowflake. Instead of querying the entire source database on a schedule to extract massive historical tables, CDC identifies and captures individual changes—inserts, updates, and deletes—as they happen in the source system, delivering only those incremental changes downstream.
For Snowflake users, this is a game-changer. Snowflake excels at scale, complex transformations, and powering AI/ML models. But those workloads rely entirely on fresh, accurate data. By continuously trickling changes into Snowflake via CDC, your data warehouse stays perfectly synced with your operational databases (like PostgreSQL, Oracle, or SQL Server) in near real-time, without placing heavy query loads on the source systems.
To put this into perspective, here are two ways enterprises apply CDC in Snowflake:
- Real-Time Inventory and Supply Chain: A global retailer cannot afford to wait for a nightly batch job to update their inventory data in Snowflake. If a product sells out online at noon, the e-commerce platform and supply chain dashboards need to reflect that reality at exactly 12:00pm. CDC streams those inventory changes instantly, preventing stockouts and improving the customer experience.
- Fraud Detection and Risk Management: Financial institutions use Snowflake to run complex predictive models. If data is ingested in batches, anomaly detection models are effectively searching for fraud that happened yesterday. CDC ensures that transaction data hits Snowflake within milliseconds, allowing models to identify and flag suspicious behavior before the transaction fully settles.
How Does CDC in Snowflake Work?
Moving data from point A to point B is relatively straight forward. Moving it continuously, accurately, and securely—without impacting the performance of your production databases—is something else entirely.
There are multiple ways to implement CDC pipelines into Snowflake, and each comes with its own set of trade-offs.
The High-Level Architecture of CDC Pipelines
Regardless of the specific tools you use, the fundamental architecture of a CDC pipeline generally follows four steps:
- Capture: Identify and extract the changed data (inserts, updates, deletes) from the source operational system.
- Transport: Move the captured changes across the network, often utilizing a message broker or streaming platform to handle high volumes.
- Load: Ingest the data into Snowflake staging tables.
- Apply: Merge the changes into the target Snowflake tables to maintain data consistency with the source.
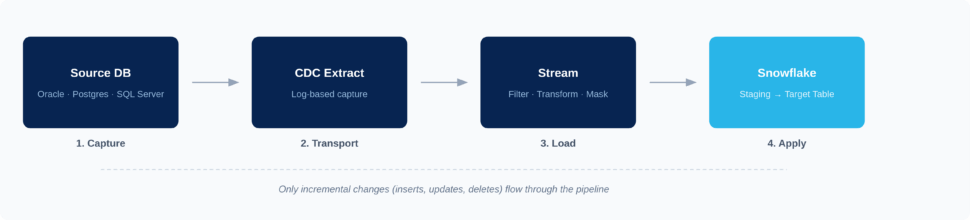
While this flow remains consistent across deployments, the underlying methods and tooling you choose will dictate how efficient, reliable, and scalable your pipeline actually is.
Implementation Methods: Log-Based vs. Query-Based Capture
When extracting changes from your source systems, you generally have two options: query-based capture or log-based capture.
Query-Based CDC Query-based CDC relies on running frequent SQL queries against the source database to check for new or updated rows, typically relying on a TIMESTAMP or STATUS column. While this approach is relatively simple to set up, it places a heavy compute load on your production database. Furthermore, it often misses “delete” operations (unless soft deletes are explicitly engineered) and cannot capture multiple intermediate changes that happen between polling intervals.
Log-Based CDC Log-based CDC, on the other hand, reads the database’s native transaction logs (such as the WAL in PostgreSQL or the Redo Log in Oracle). Because it reads the logs rather than querying the database tables directly, it has virtually zero impact on the source system’s performance. It captures every single event—including deletes and rapid sequential updates—in real-time. For enterprise-grade Snowflake pipelines, log-based CDC is widely considered the gold standard.
Feature |
Log-Based CDC |
Query-Based CDC |
| Latency | Sub-second (Real-time) | Minutes to hours (Batch/Micro-batch) |
| Source System Impact | Minimal (Reads transaction logs) | High (Requires frequent heavy queries) |
| Complexity | Higher initial setup | Lower initial setup |
| Scalability | High (Built for enterprise volumes) | Low (Degrades as data volume grows) |
| Common Use Cases | Mission-critical apps, real-time analytics, AI models | Low-priority internal reporting, small datasets |
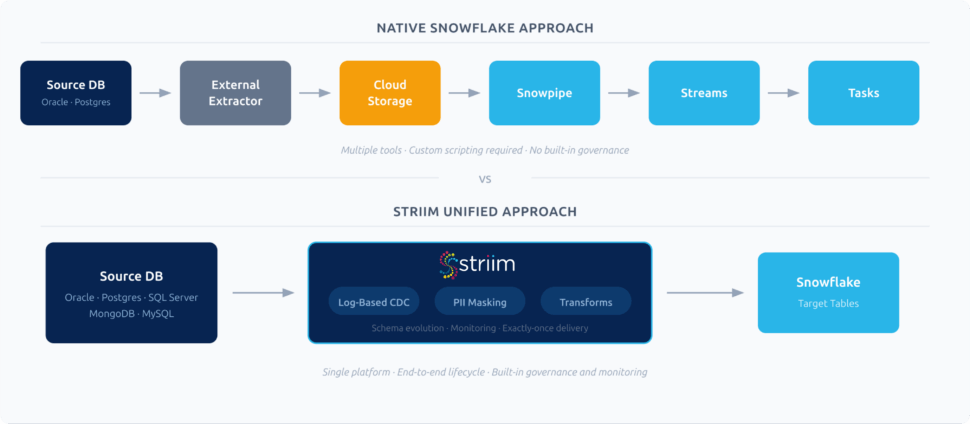
Native Snowflake vs. External CDC Tools
Once the data is captured, how does it get processed and merged into Snowflake? You face an architectural choice between relying on Snowflake’s native toolset or adopting an external, unified CDC platform.
Native Snowflake (Streams, Tasks, and Snowpipe) Snowflake offers robust native features. You can use Snowpipe for continuous loading from cloud storage, Snowflake Streams to track changes on staging tables, and Snowflake Tasks to schedule the merging of those changes into your final target tables.
- Pros: Built directly into the Snowflake ecosystem; no additional vendor procurement; utilizes Snowflake’s elastic compute.
- Cons: Requires significant custom scripting and orchestration; does not solve the problem of extracting data from your operational databases (you still need a tool to get the data into cloud storage first); compute costs can escalate rapidly if Tasks are running continuously.
External Unified CDC Platforms (Like Striim) Dedicated CDC platforms manage the entire end-to-end lifecycle. They connect directly to the source database, capture changes via log-based CDC, perform in-flight transformations (like masking PII), and write directly to Snowflake optimally.
- Pros: Out-of-the-box connectors for diverse sources (Oracle, Postgres, MongoDB); built-in real-time monitoring; in-flight processing reduces Snowflake compute costs; handles schema drift automatically.
- Cons: Introduces a third-party platform into the tech stack.
Ultimately, native tools work well for simple, isolated use cases where data is already staged in cloud storage. However, for organizations pulling data from diverse operational databases that require strict governance, in-flight processing, and high performance, a unified CDC platform is essential.
Why CDC Matters for Snowflake
Snowflake delivers exceptional analytical power, seamless scalability, and deep capabilities for AI/ML workloads. But a world-class analytics engine can only output insights as fast as it receives data.
Traditional batch pipelines throttle Snowflake’s potential. By relying on overnight or hourly reloads, organizations inevitably base time-sensitive analytics, customer experiences, and operational responses on stale information. CDC acts as the critical enabler, unlocking Snowflake’s full capabilities by continuously feeding it with the latest changes from across your operational footprint.
When implemented correctly, streaming CDC data into Snowflake drives several core business outcomes:
- Real-time analytics and reporting: Business leaders can track KPIs, monitor supply chains, and identify emerging market trends as they happen, enabling faster, more confident decision-making.
- Highly accurate AI/ML models: Feeding Snowflake with continuous CDC streams ensures models are trained on the freshest possible data, drastically improving predictive accuracy.
- Improved customer experiences: Real-time data syncs allow you to build applications that instantly reflect a customer’s recent purchases, loyalty status, or browsing behavior, driving highly personalized interactions.
- Reduced reliance on costly full reloads: Extracting and loading massive tables every night wastes database compute and network bandwidth. CDC sends only the incremental changes, vastly reducing pipeline overhead.
- Stronger data governance: By capturing exact, granular changes (including metadata like timestamps and user IDs), CDC provides a clear, auditable trail of how and when operational data evolved before hitting Snowflake.
Challenges of Implementing CDC for Snowflake
While the benefits of real-time data integration are undeniable, enterprise-scale CDC is notoriously complex. Building a few point-to-point pipelines might be straightforward, but scaling CDC across dozens of databases, billions of daily events, and highly governed environments introduces serious hurdles.
If you’re planning a CDC architecture for Snowflake, these are the most common challenges you will need to anticipate:
Schema Evolution and Drift
Source databases are rarely static. Application developers frequently add new columns, change data types, or drop tables altogether. In a brittle pipeline, this “schema drift” spells disaster. If a column is added to your operational PostgreSQL database and your pipeline isn’t designed to handle it, the ingestion into Snowflake will break, or worse, create silent data mismatches that corrupt your analytics. Handling schema evolution manually requires constant pipeline maintenance and engineering intervention.
Performance and Cost Trade-Offs
Snowflake’s pricing model is based on compute (Virtual Warehouses) and storage. If your CDC pipeline relies on micro-batching or runs Snowflake Tasks every 60 seconds to merge incoming data, your Snowflake compute credits could spiral.
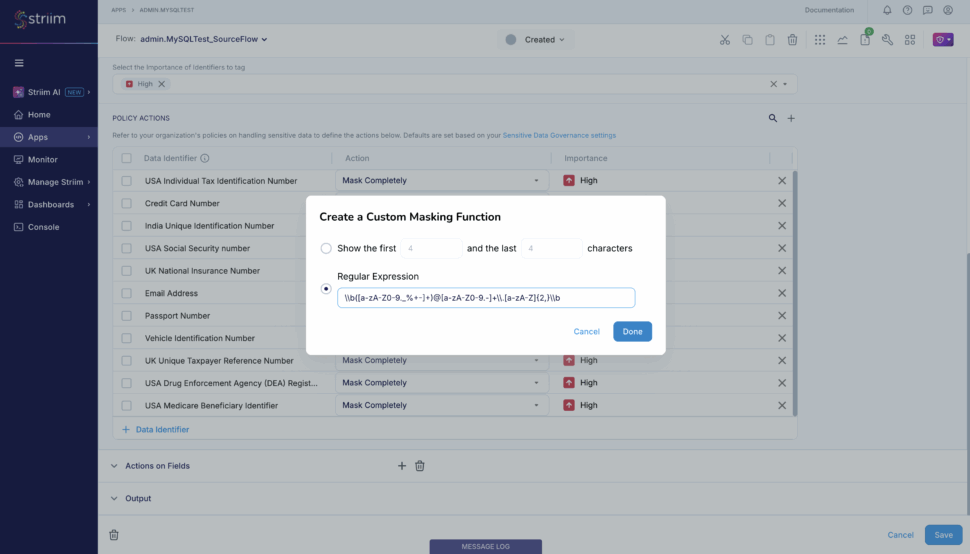
Data Quality, Masking, and Governance
Moving raw operational data directly into Snowflake introduces significant compliance risks. Production databases often contain Personally Identifiable Information (PII) like social security numbers, credit card details, or health records. If your CDC pipeline doesn’t take these into account, you risk exposing unmasked, sensitive data to your analytics teams or AI models in Snowflake, resulting in severe governance and regulatory violations.
Monitoring and Reliability at Scale
While a batch pipeline breaks loudly, CDC pipelines often fail in silence. When you’re streaming millions of events per hour, how do you know if a single update was dropped? Without robust, real-time observability, CDC pipelines can suffer from silent data loss or mounting latency lag. Troubleshooting these issues across complex distributed systems (especially if you’re self-managing Kafka in the middle) is incredibly difficult.
Secure Access vs. Exposing Production Systems
Providing direct database access for analytics tools or AI agents introduces unacceptable security risks and performance hits to production systems. Organizations must find a way to make real-time data available for advanced analytics without exposing the operational source systems to heavy queries or unauthorized access. This requires creating secure staging areas or continuously governed replicas.
Best Practices for Deploying CDC Pipelines Into Snowflake
Drawing from hundreds of enterprise deployments, we have seen firsthand what separates a brittle, expensive data platform from a resilient, high-performing one. To successfully land CDC data into Snowflake at scale, keep these core architectural best practices in mind:
Design Pipelines for Scale and Cost Efficiency
When planning your CDC architecture, it’s imperative to account for data growth upfront to avoid spiraling Snowflake compute costs. Relying on frequent micro-batching might seem like a shortcut to low latency, but it forces Snowflake warehouses to spin up constantly, burning through credits. True log-based streaming minimizes this cost by sending only the exact incremental changes continuously.
Furthermore: best practice dictates that teams never treat Snowflake as a dumping ground for raw, unfiltered operational data. To optimize costs, filter out the noise before it hits your warehouse. Striim solves this by enabling in-flight filtering and transformations. You can use Streaming SQL to aggregate records, drop irrelevant columns, or filter out specific events while the data is still in motion, drastically reducing the volume of unnecessary data hitting Snowflake.
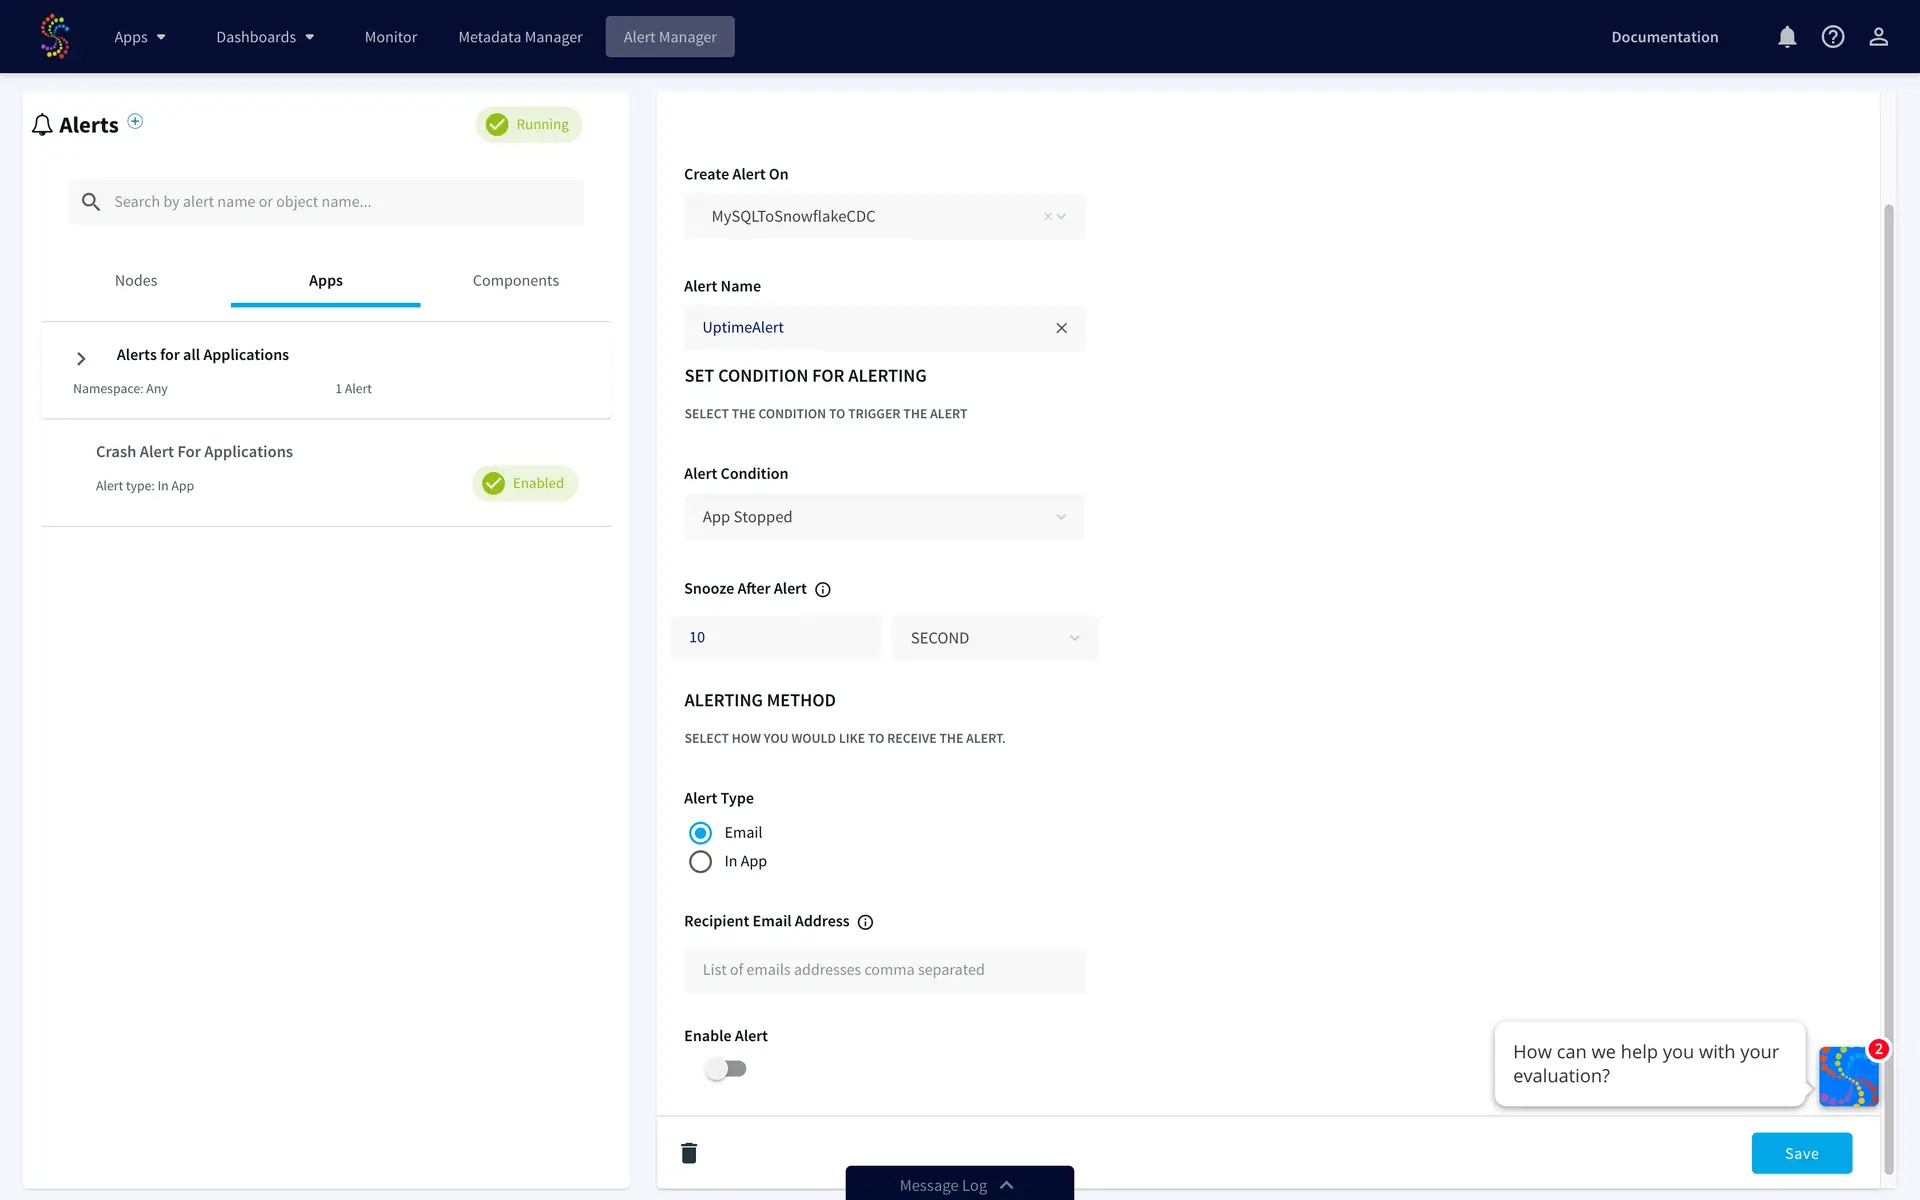
Implement Robust Monitoring and Error Handling
Because CDC pipelines can silently drop records when network interruptions or source database hiccups occur, you cannot deploy a pipeline without robust observability. You need real-time tracking of latency, automatic error alerts, and—most importantly—exactly-once processing (E1P) guarantees to ensure no duplicate records corrupt your analytics.
Striim is built with these enterprise-grade safeguards natively. It features built-in monitoring dashboards that give you complete visibility into pipeline health, throughput, and latency. Coupled with automatic recovery features, Striim ensures that if a connection drops, the pipeline resumes exactly where it left off without data loss or duplication.

Plan for Schema Evolution and Data Growth
Schema drift is arguably the most common failure point for data engineering teams managing Snowflake CDC pipelines. If your strategy relies on manually updating pipeline code every time a source database adds a column, your pipelines will inevitably break. You need dynamic schema mapping.
Rather than letting schema changes break your flow, Striim detects DDL (Data Definition Language) changes at the source and applies those schema evolutions to Snowflake in real time, automatically. Whether a column is added, dropped, or modified, Striim handles the transition without manual intervention, keeping your pipelines resilient and your data engineers focused on high-value tasks.

Enhance Snowflake CDC With Striim
While native tools and DIY scripting can work for highly isolated, simple use cases, enterprise data environments are rarely simple. When you need to scale across dozens of databases, enforce strict governance, and deliver sub-second latency to Snowflake without breaking the bank, you need a unified platform built for the task.
Striim is the world’s leading Unified Integration & Intelligence Platform, designed to complement and enhance Snowflake’s powerful analytics engine. By managing the end-to-end CDC lifecycle, Striim delivers the performance, governance, and flexibility enterprises demand:
- Log-based, low-latency pipelines: Capture changes from diverse sources (Oracle, PostgreSQL, SQL Server, MongoDB, and more) with zero impact on production systems.
- In-flight processing: Filter, enrich, and mask PII data while it’s in motion, before it ever lands in Snowflake.
- Automatic schema evolution: Keep pipelines running flawlessly even when source database structures change.
- No extra infrastructure required: Striim handles the end-to-end flow without requiring you to deploy, manage, or pay for Kafka.
- Enterprise reliability: Process billions of events daily with high throughput, exactly-once delivery guarantees, and real-time monitoring.
- AI-ready architecture: Striim features MCP-ready AgentLink, allowing you to create safe, governed replicas of your data, enrich metadata, generate vector embeddings, and provide context to agentic AI systems without exposing production databases.
Ready to bring real-time intelligence to your Snowflake environment?
Book a demo today or Get started with Striim for free to see how easily you can build resilient, low-latency CDC pipelines.