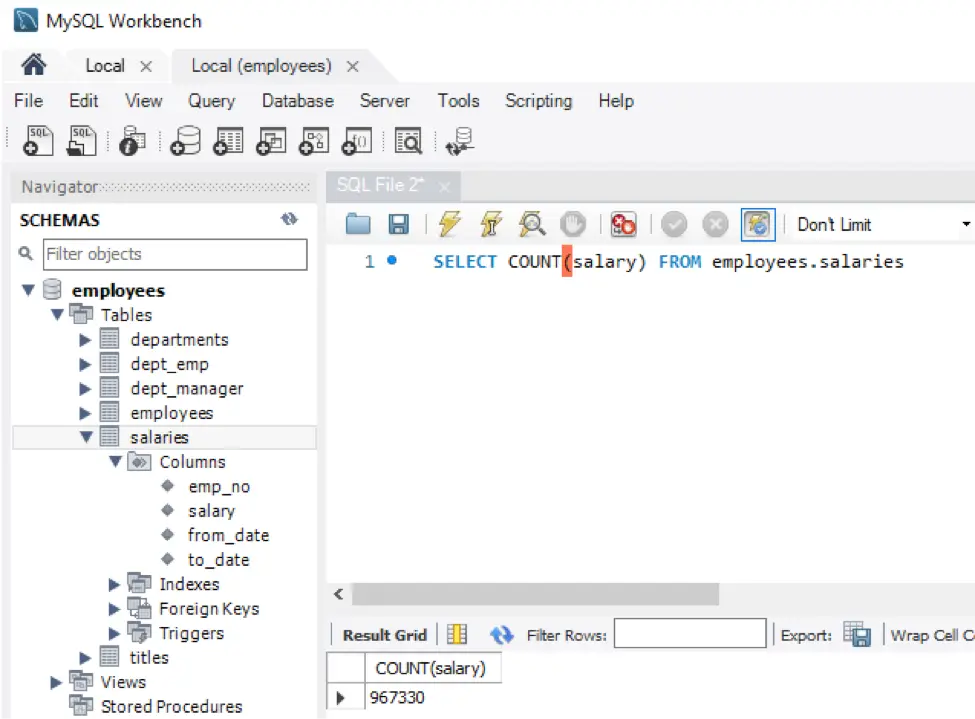
Streaming Data Integration: Using CDC to Stream Database Changes

Tutorial

Streaming Data Integration: Using CDC to Stream Database Changes

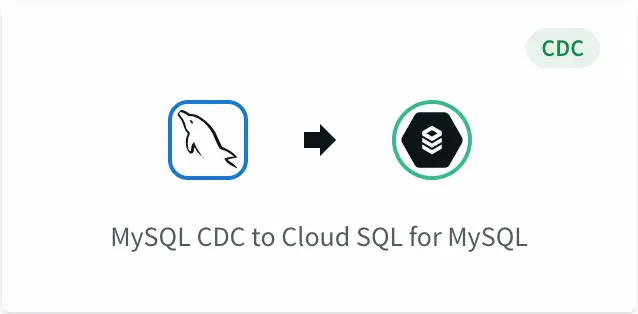
How to use the PostgreSQL CDC (PostgreSQL Reader) with a Striim Target

Benefits

Get a Live ViewUse Striim CDC to stream data for a continuous view of your transactional dataEmpower Your TeamsGive teams across your organization a real-time view into your database transactionsReact in Real TimeReact to business events as they happen; not minutes or hours later.
On this page

Overview

This is the first in a two-part blog post discussing how to use Striim for streaming database changes to Apache Kafka. Striim offers continuous data ingestion from databases and other sources in real time; transformation and enrichment using Streaming SQL; delivery of data to multiple targets in the cloud or on-premise; and visualization of results. In this part, we will use Striim’s low-impact, real-time change data capture (CDC)
feature to stream database changes (inserts, updates, and deletes) from an operational database into Striim.

What is Change Data Capture

Databases maintain change logs that record all changes made to the database contents and metadata. These change logs can be used for database recovery in the event of a crash, and also for replication or integration.

Striim Data Flow CDC Change Log

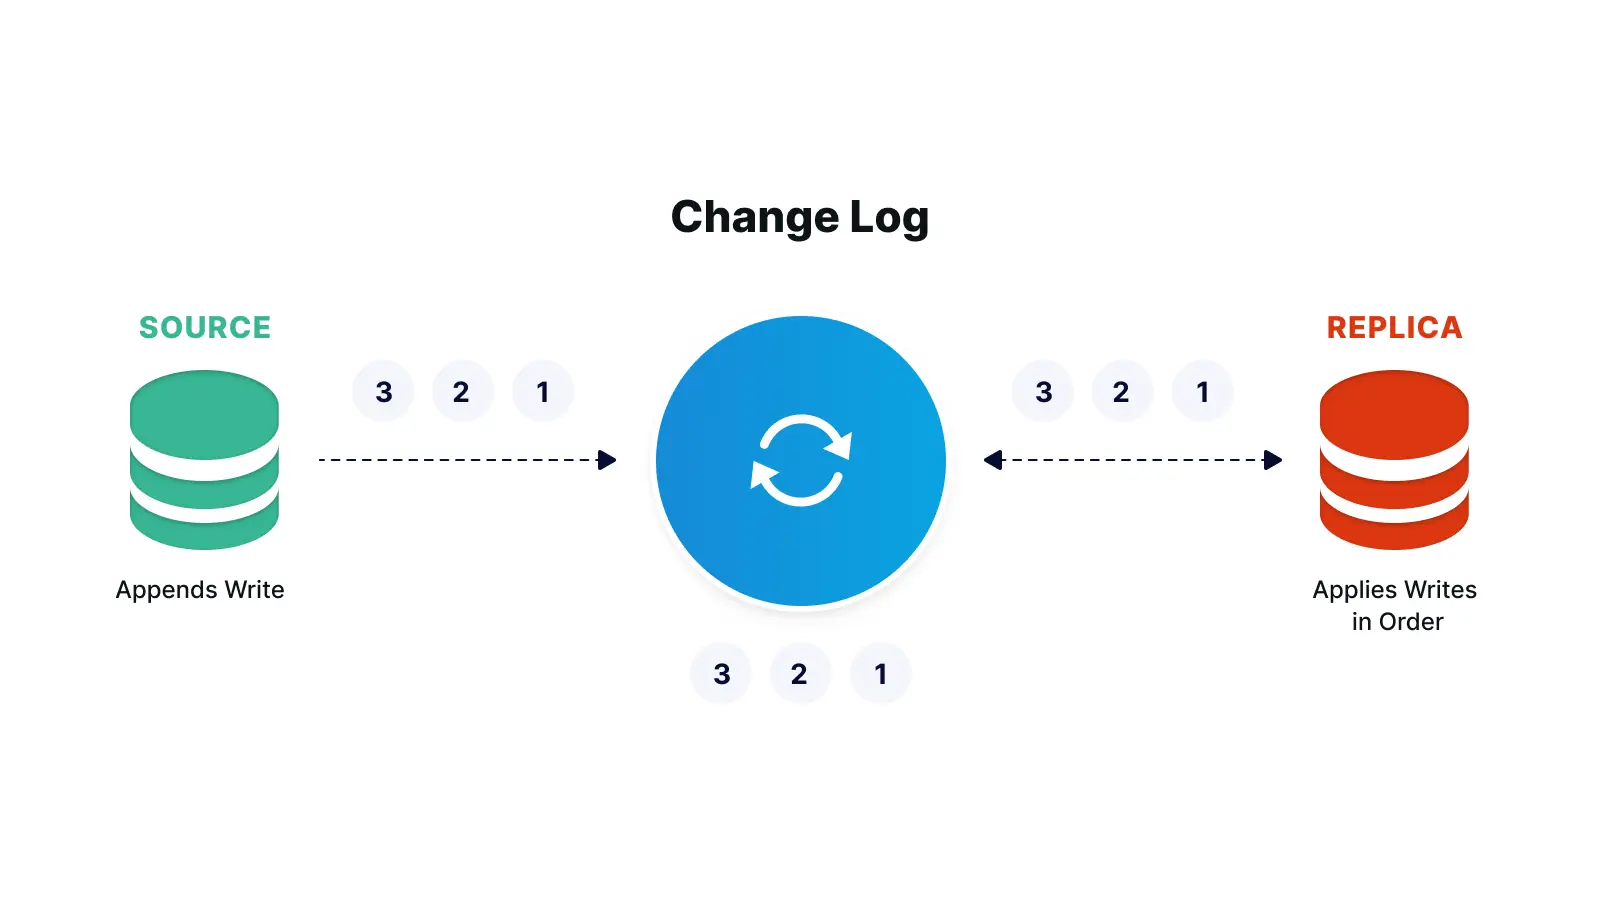
With Striim’s log-based CDC, new database transactions – including inserts, updates, and deletes – are read from source databases’ change logs and turned into a stream of events without impacting the database workload. Striim
offers CDC for Oracle, SQL Server, HPE NonStop, MySQL, PostgreSQL, MongoDB,
and MariaDB.

Why use Striim’s CDC?

Businesses use Striim’s CDC capabilities to feed real-time data to their big data lakes, cloud databases, and enterprise messaging systems, such as Kafka, for timely operational decision making. They also migrate from on-premises databases to cloud environments
without downtime and keep cloud-based analytics environments up-to-date with on-premises databases using CDC.

How to use Striim’s CDC?

Striim’s easy-to-use CDC template wizards automate the creation of applications that leverage change data capture, to stream events as they are created, from various source
systems to various targets. Apps created with templates may be modified using Flow Designer or by exporting TQL, editing it, and importing the modified TQL. Striim has templates for many source-target combinations.

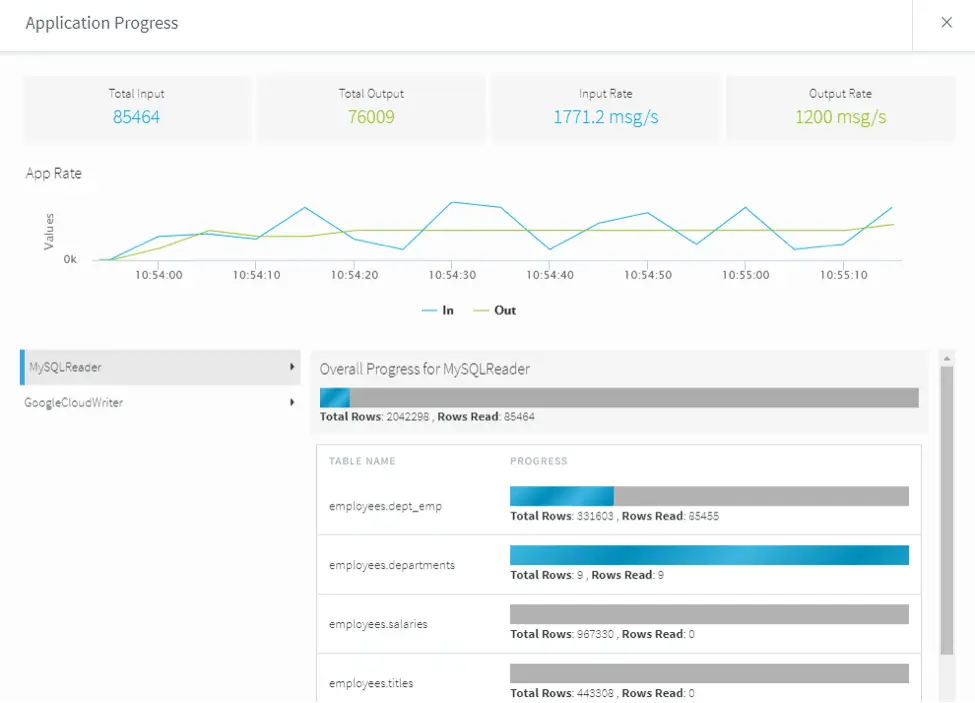
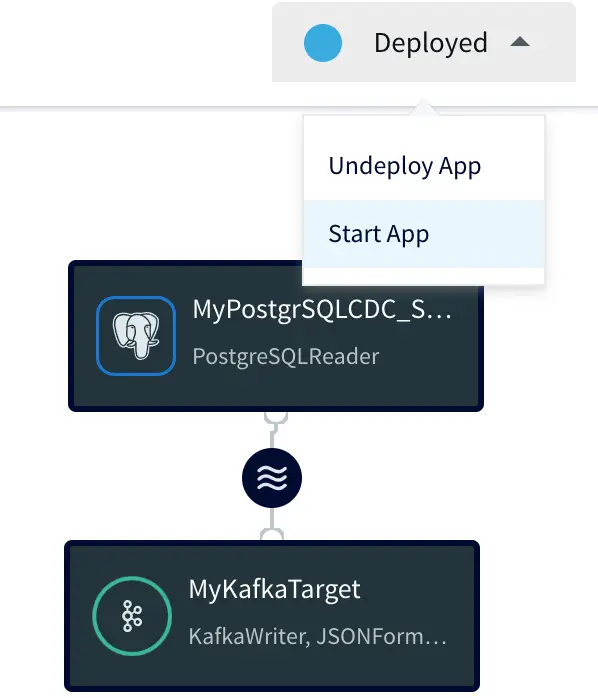
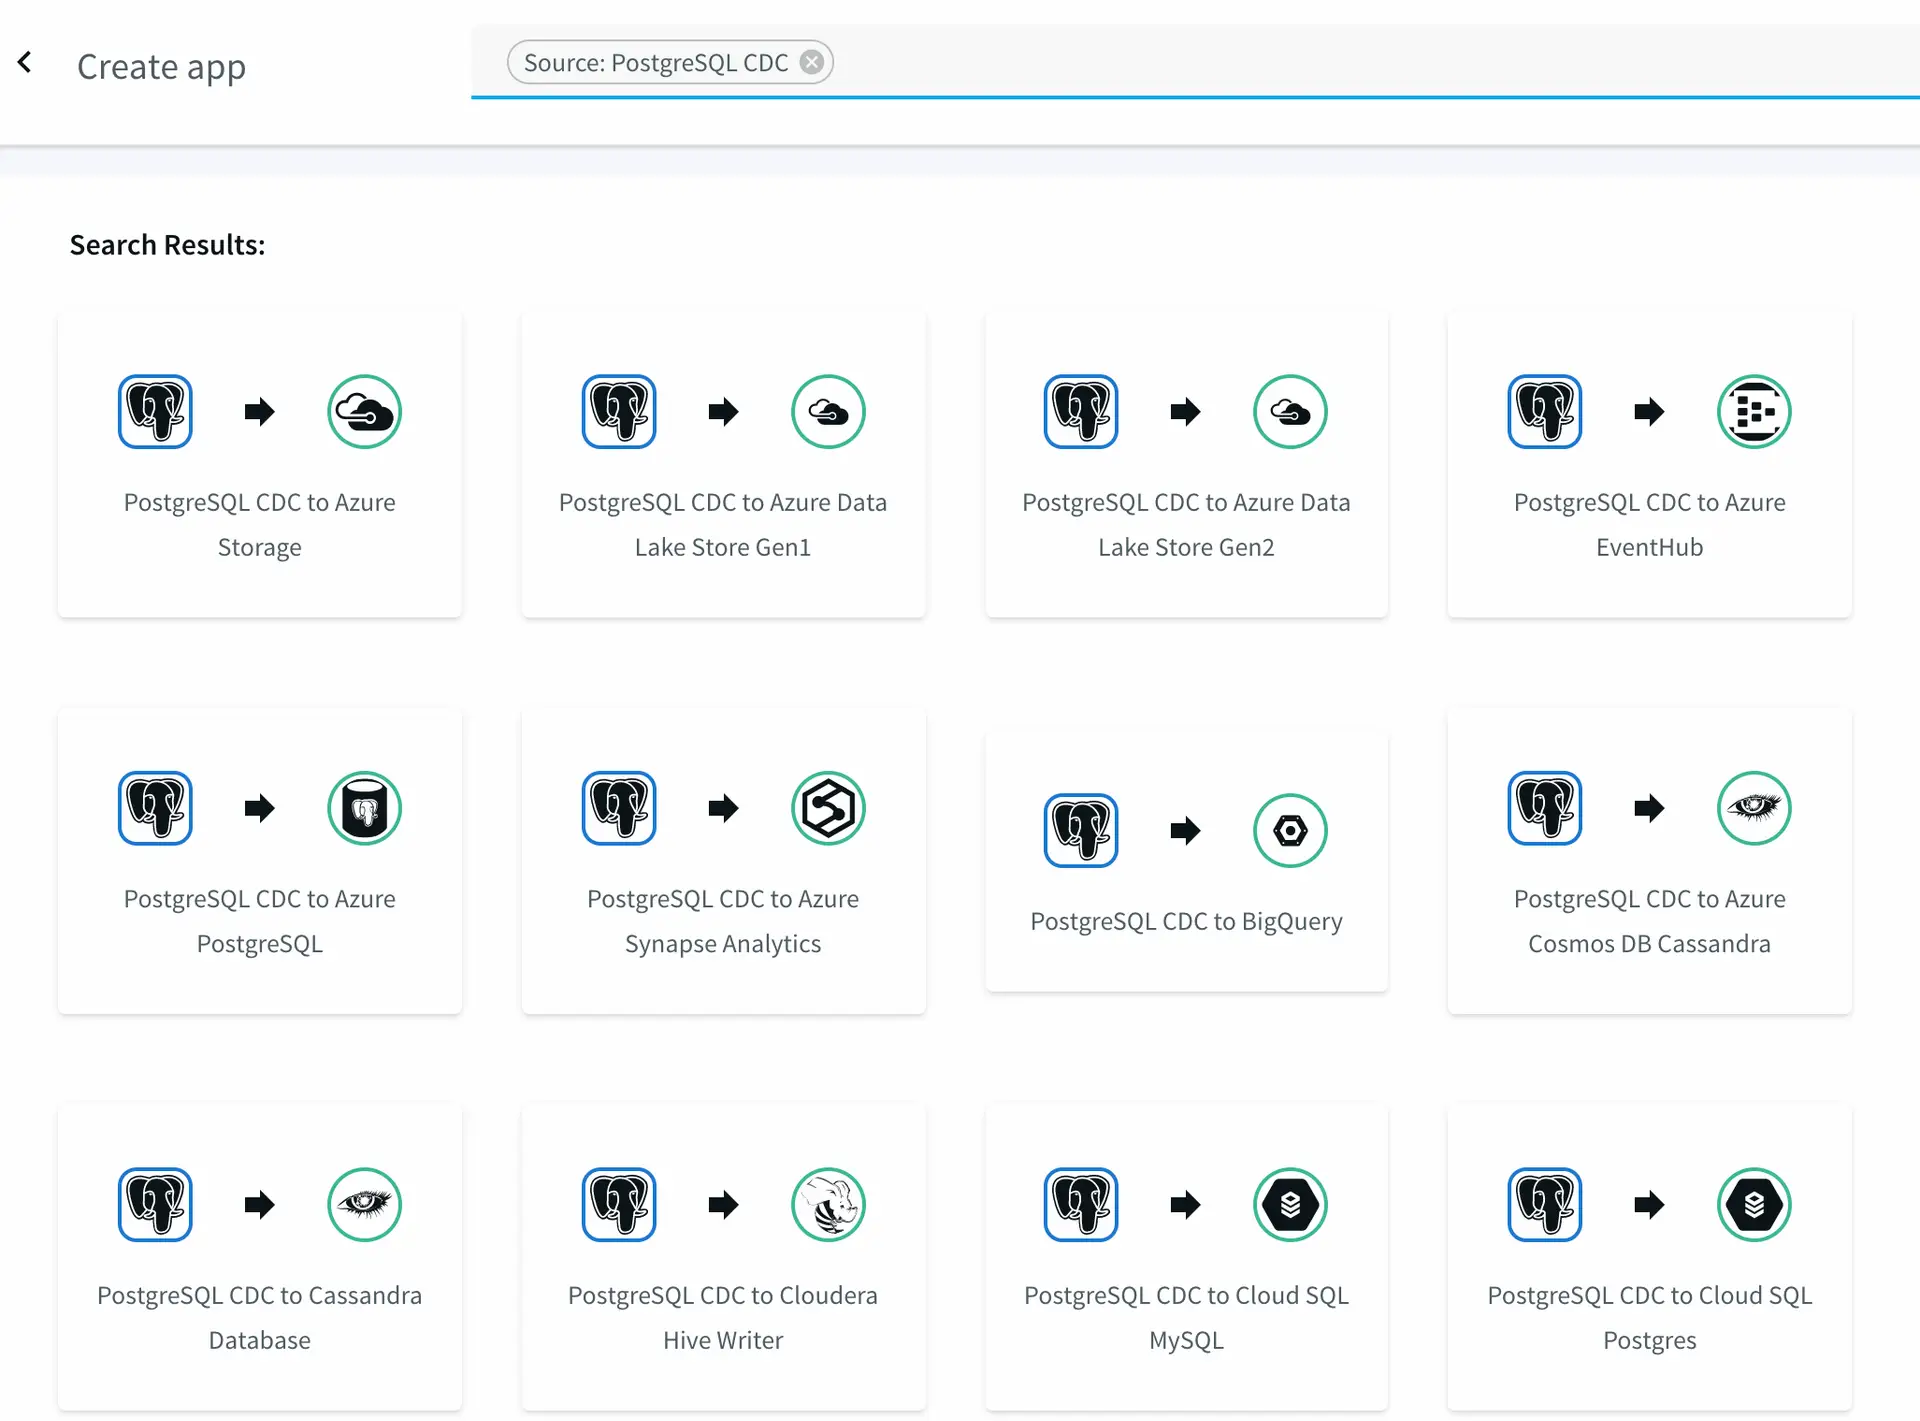
In addition, Striim offers pre-built integration applications for bulk loading and CDC from PostgreSQL source databases to target systems including PostgreSQL database, Kafka, and files. You can start these applications
in seconds by going to the Applications section of the Striim platform.

striim sample applications

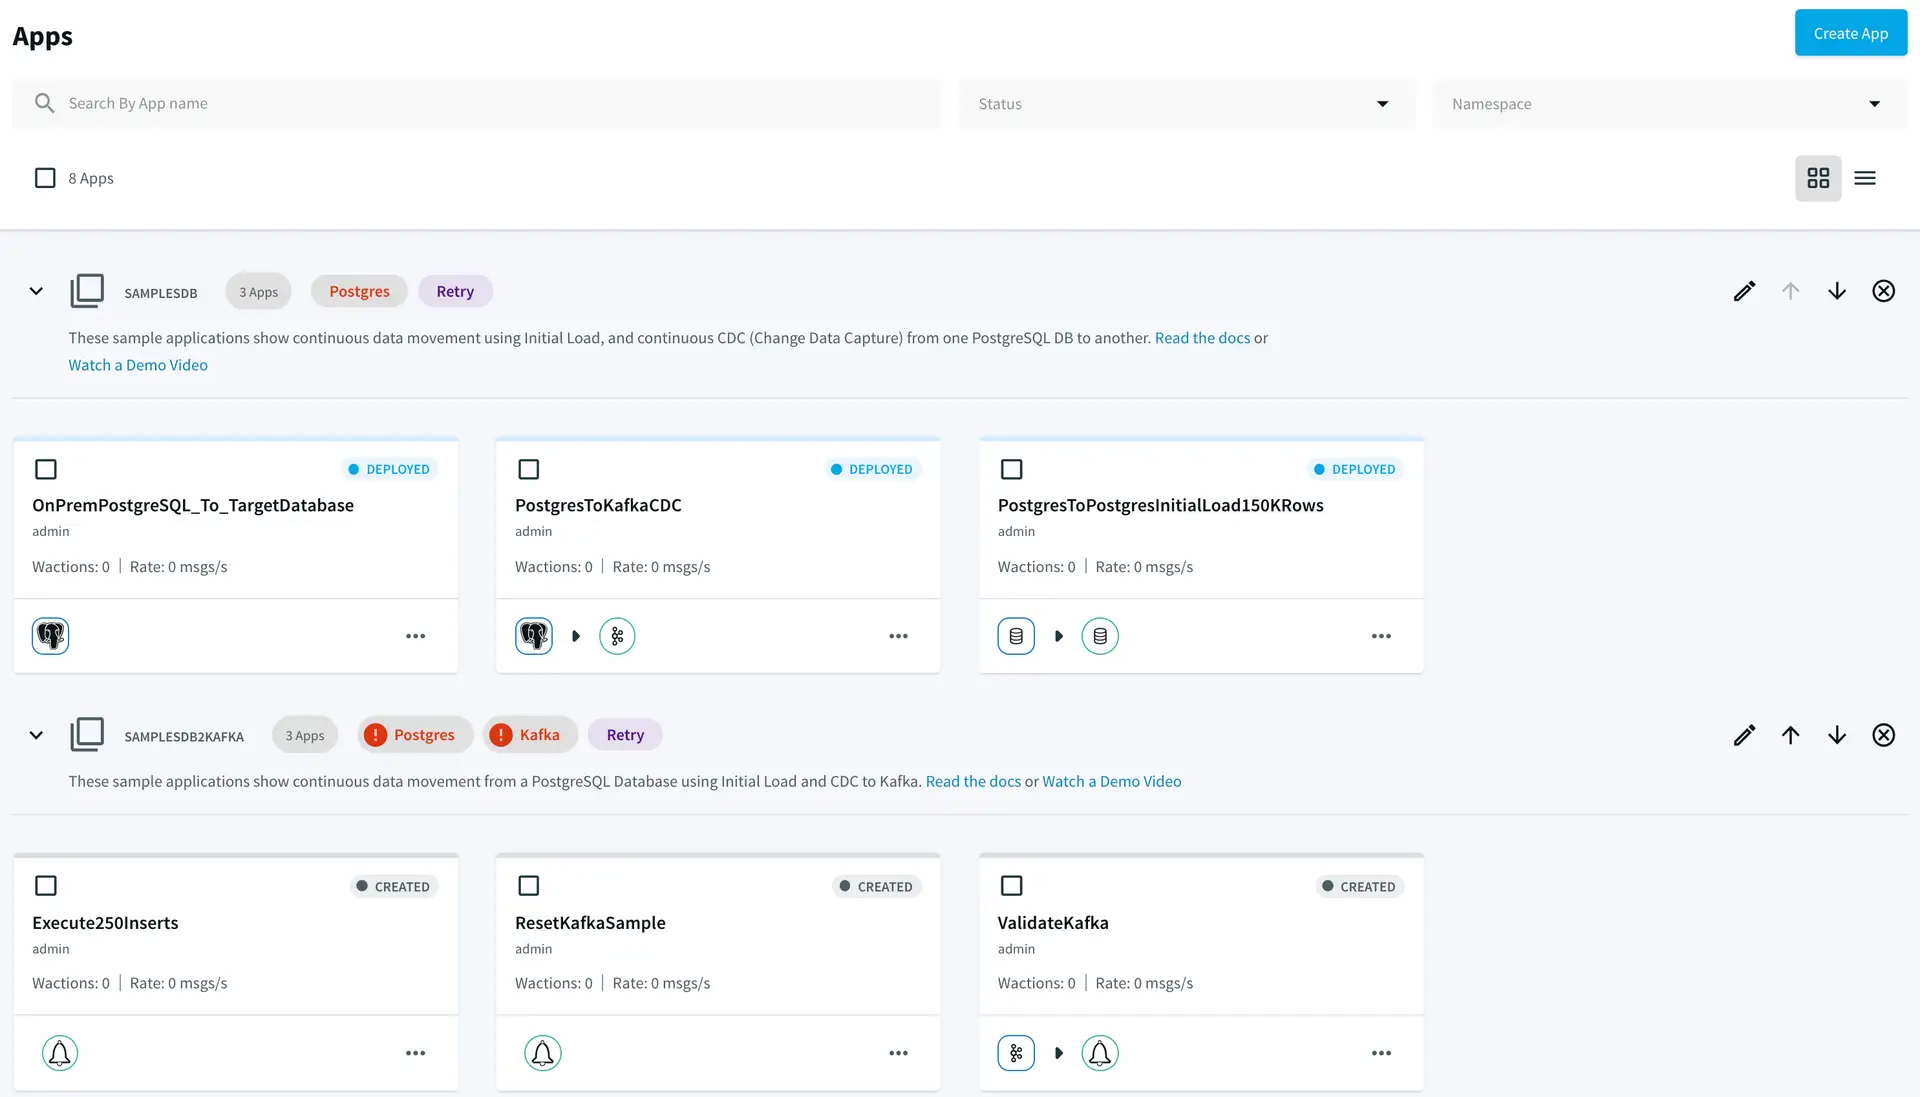
Striim pre-built sample integration applications.

In this post, we will show how to use the PostgreSQL CDC (PostgreSQL Reader) with a Striim Target using the wizards for a custom application instead of using the pre-built application mentioned above. The instructions below assume that you are using the PostgreSQL instance that comes with the Striim
platform. If you are using your own PostgreSQL database instance, please review our instructions on how to set up PostgreSQL for CDC.

Step 1: Using the CDC Template

To start building the CDC application, in the Striim web UI, go to the Apps page and select Add App > Start with Template. Enter PostgreSQL in the search field to narrow down the sources and select “PostgreSQL Reader to Striim”.

Wizard template selection when creating a new app.

Next enter the name and namespace for your application (the namespace is a way of grouping applications together).

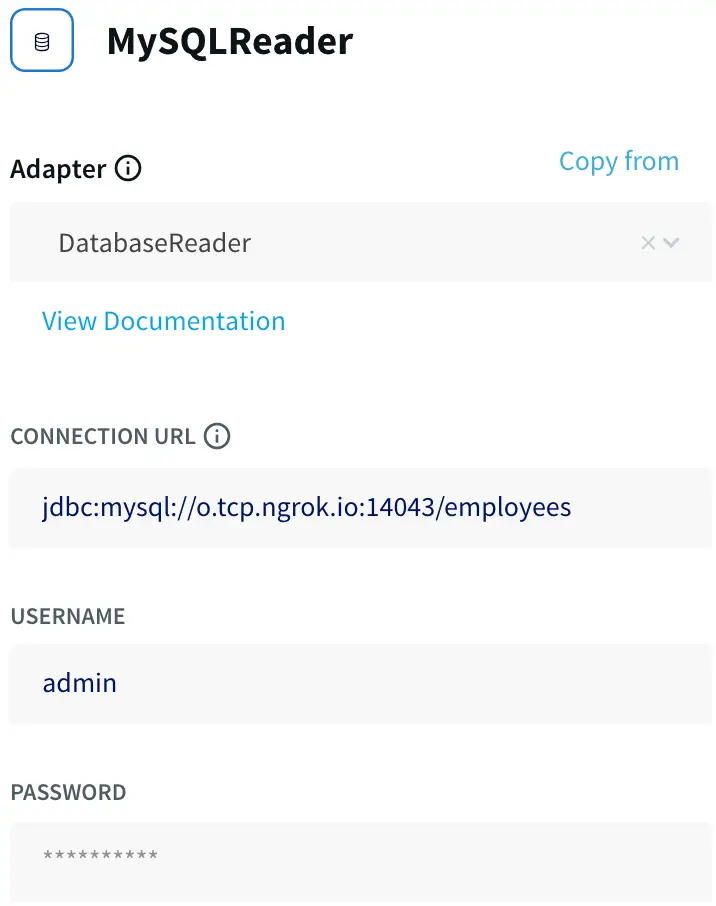
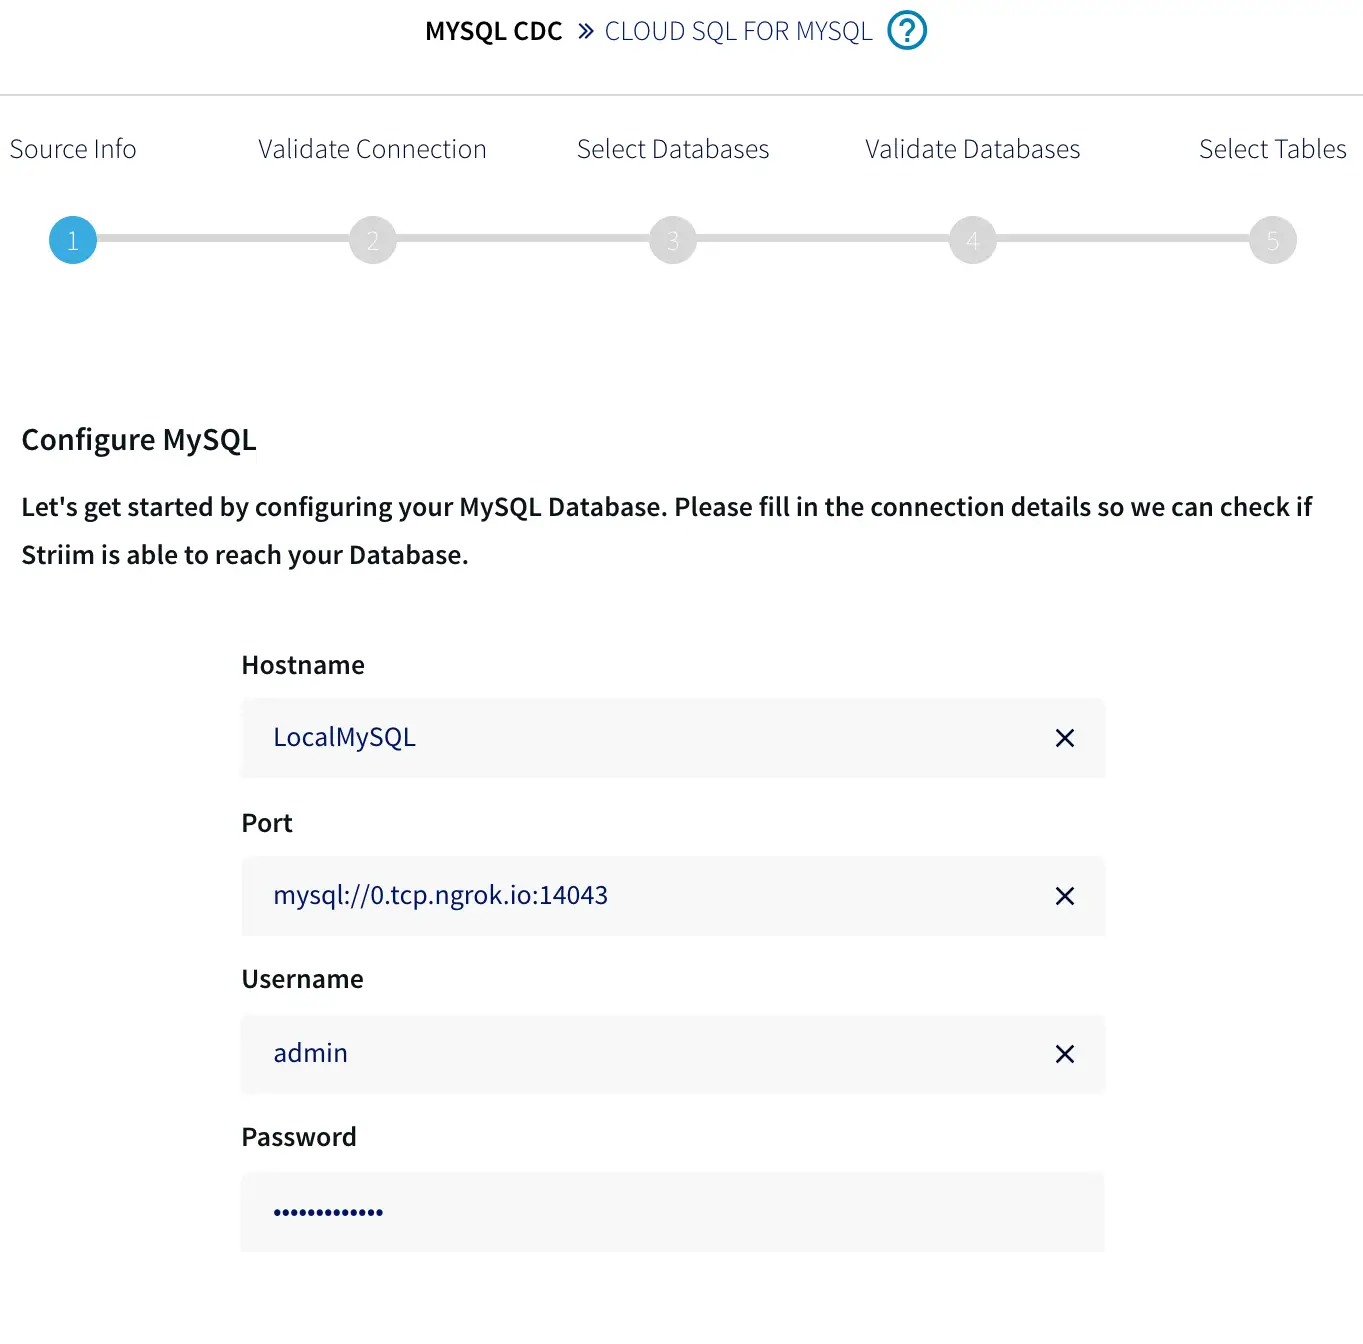
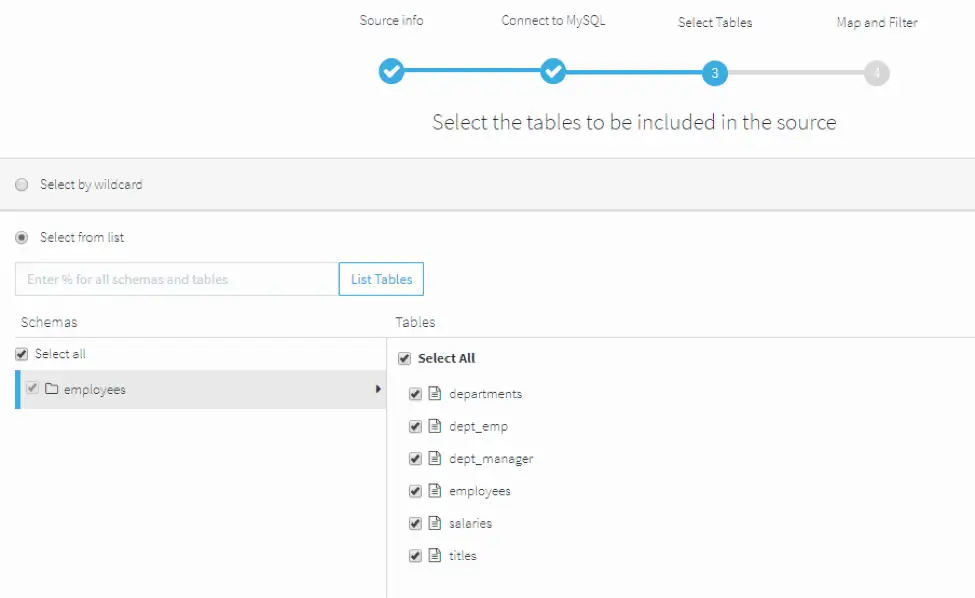
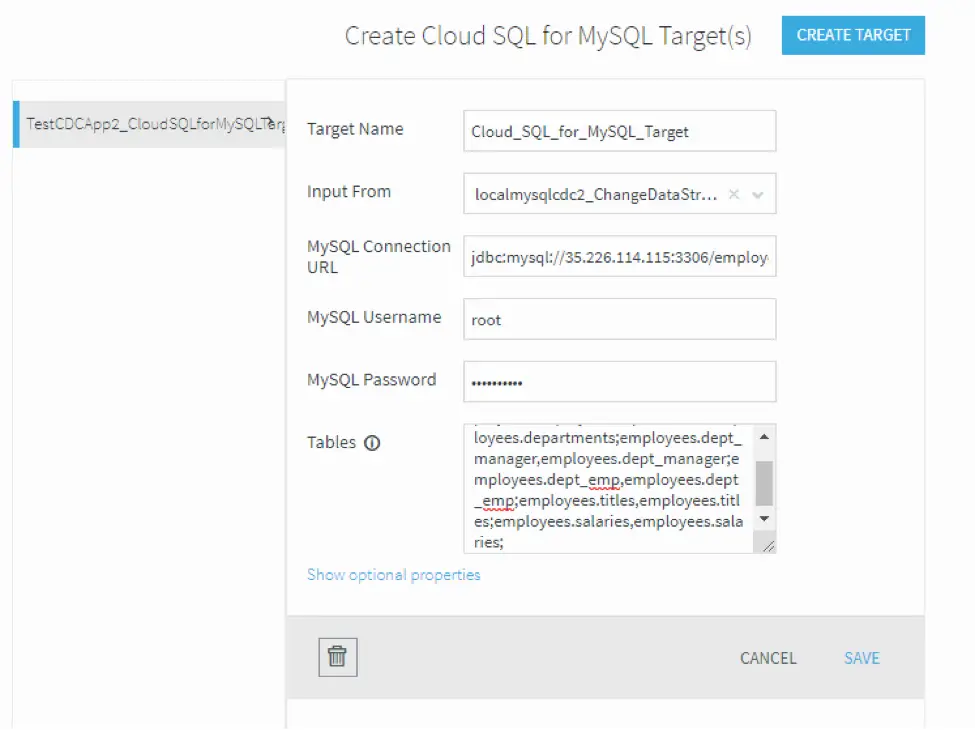
Step 2: Specifying the Data Source Properties

In the SETUP POSTGRESQL READER specify the data source and table properties:

  • the connection URL, username, and password.
  • the tables for which you want to read change data.
    configure postgresql reader source
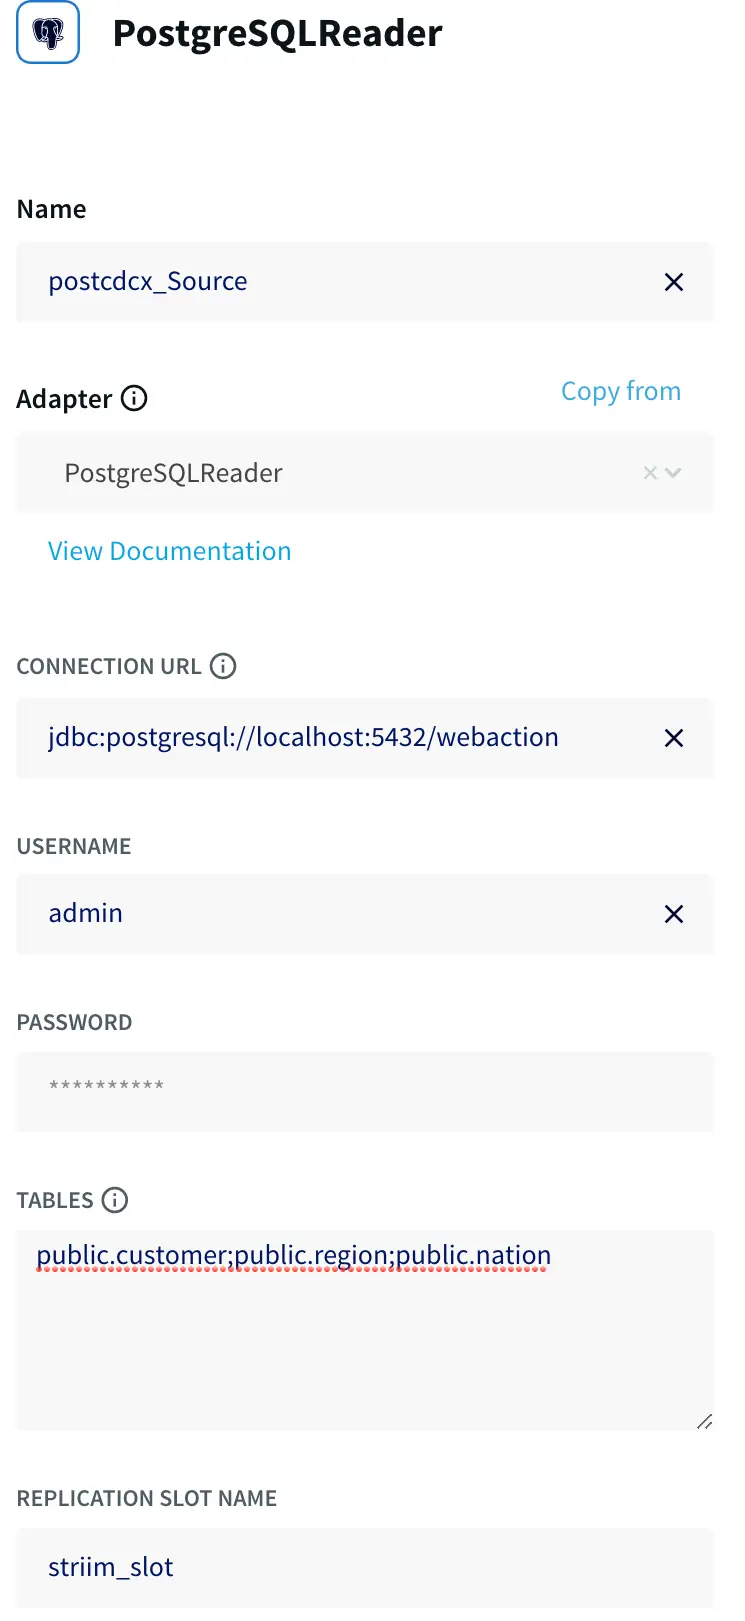
    Configuring the data source in the wizard.

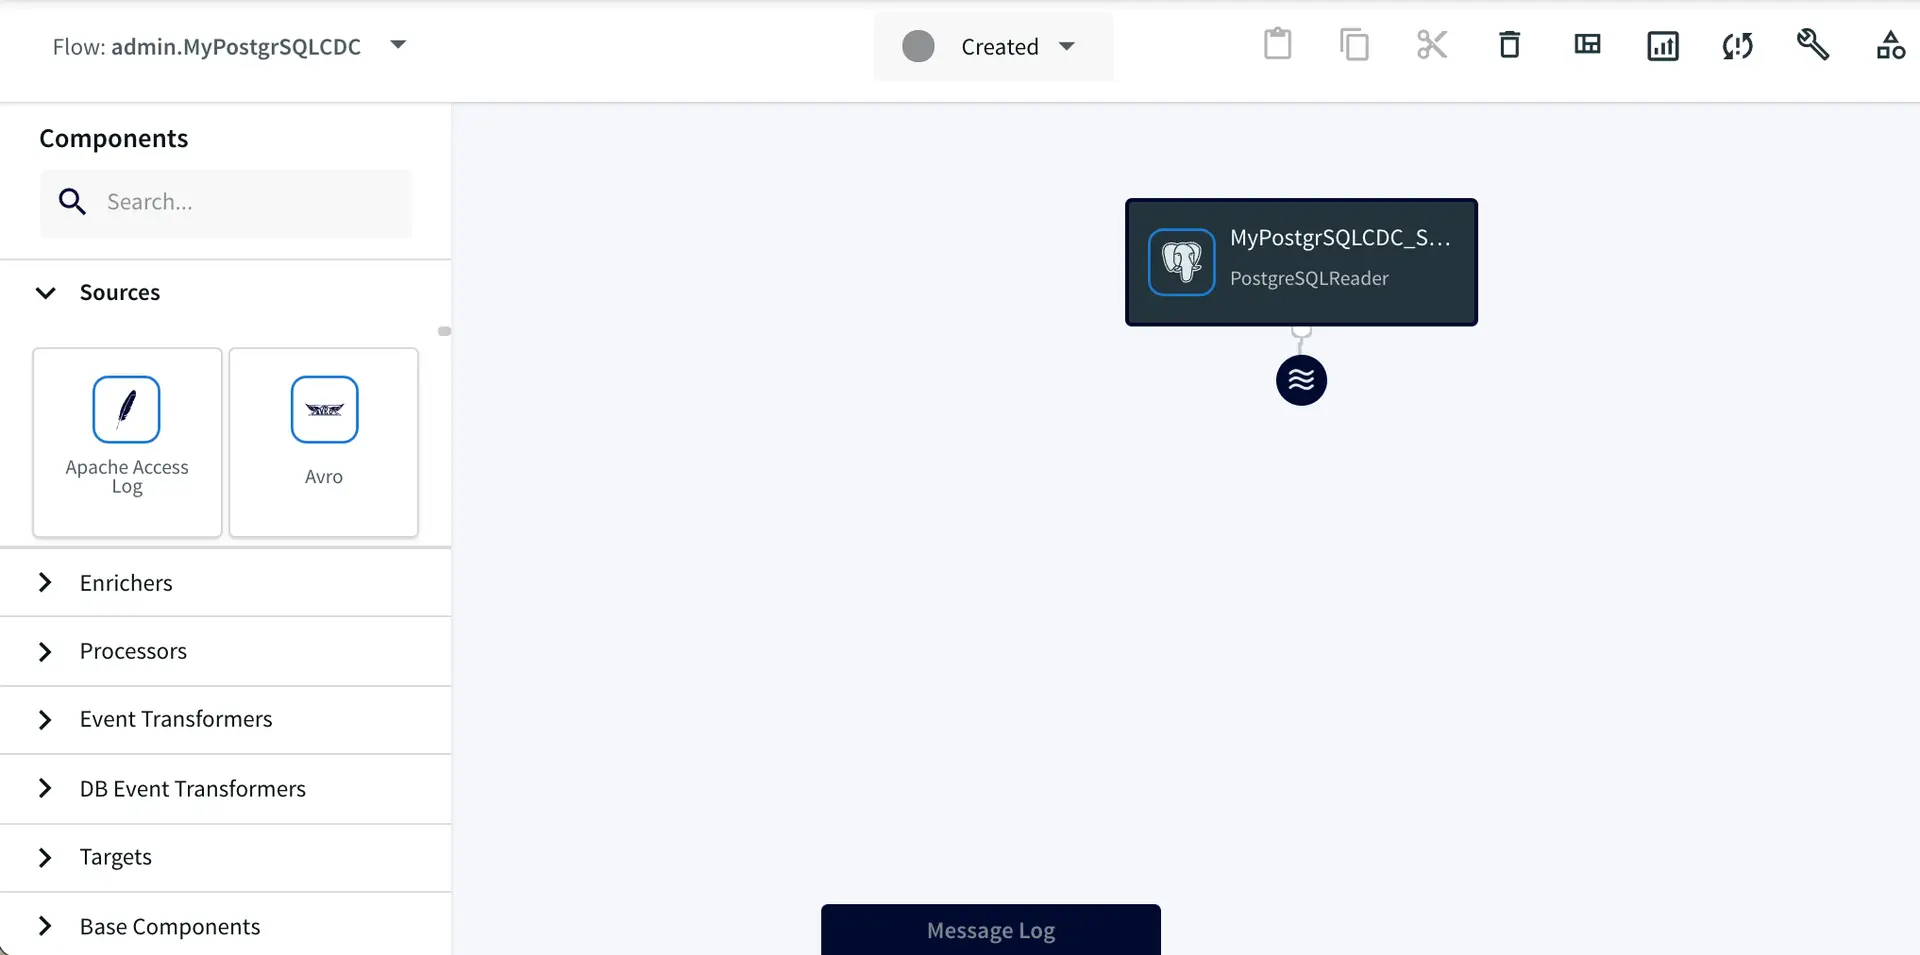
After you complete this step, your application will open in the Flow Designer.

wizard generated data flow

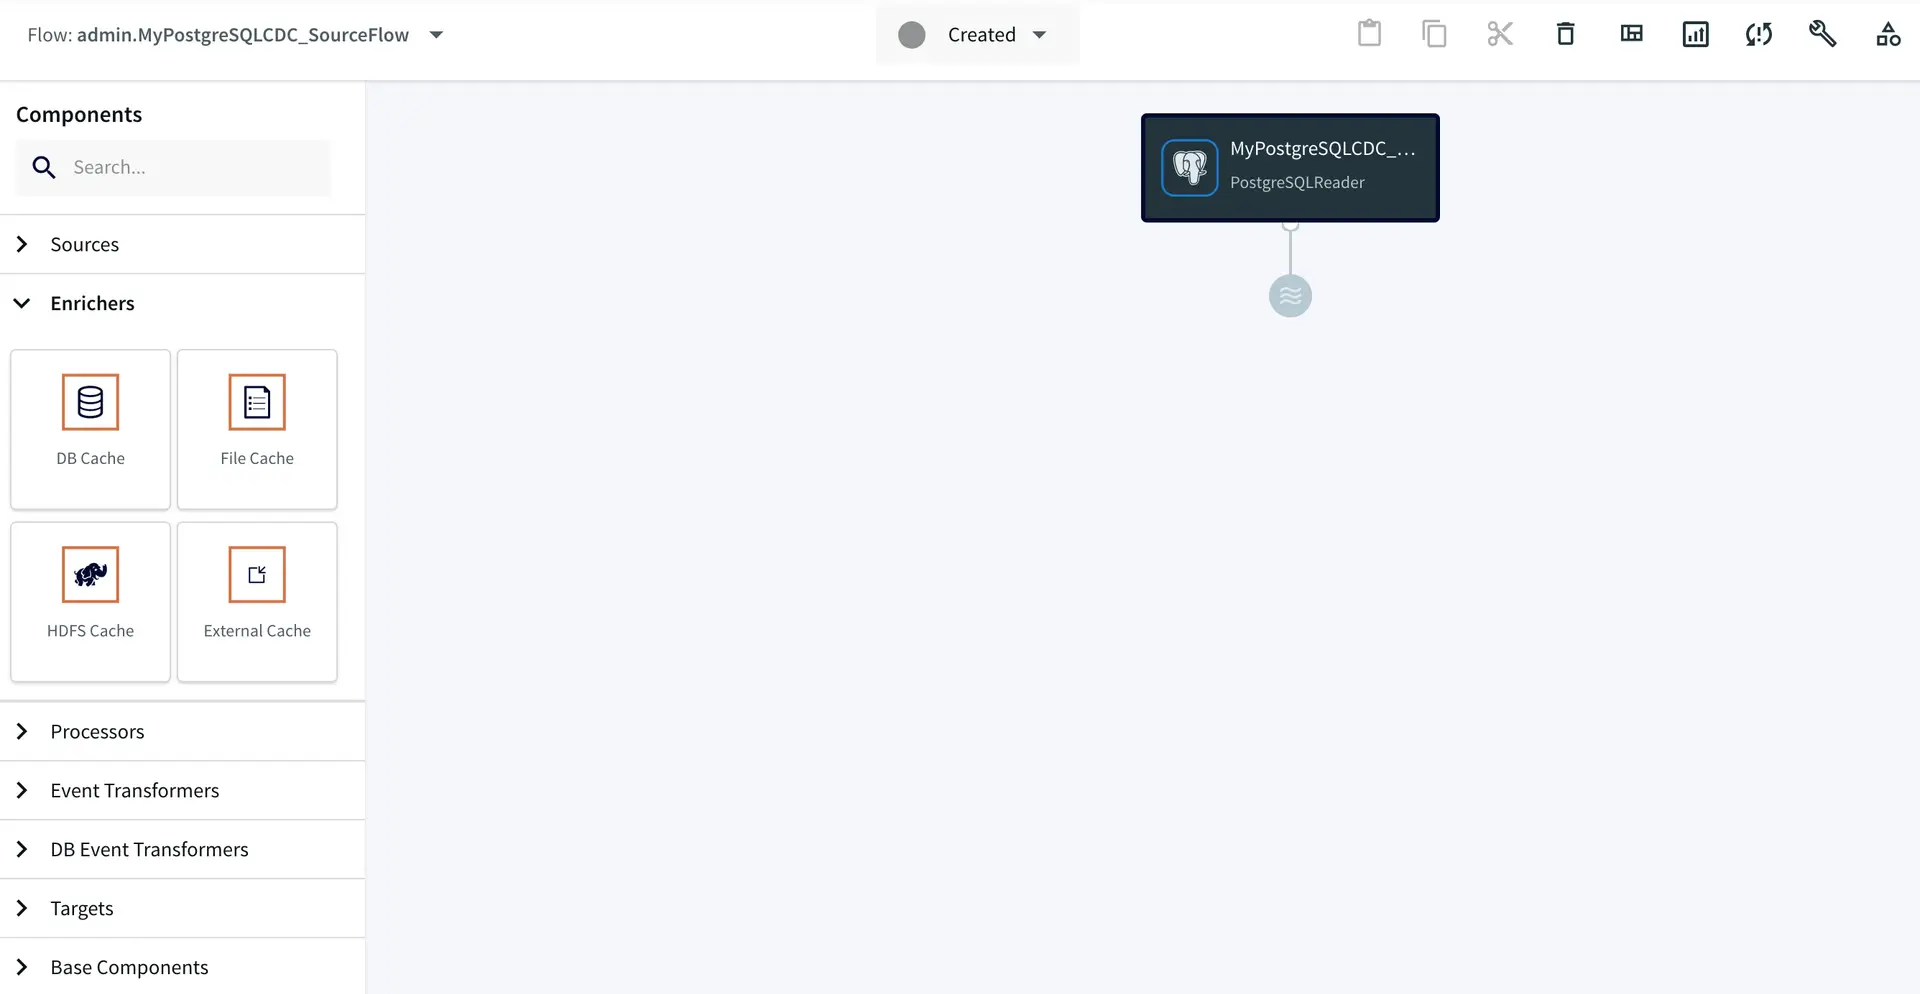
The wizard generates a data flow.

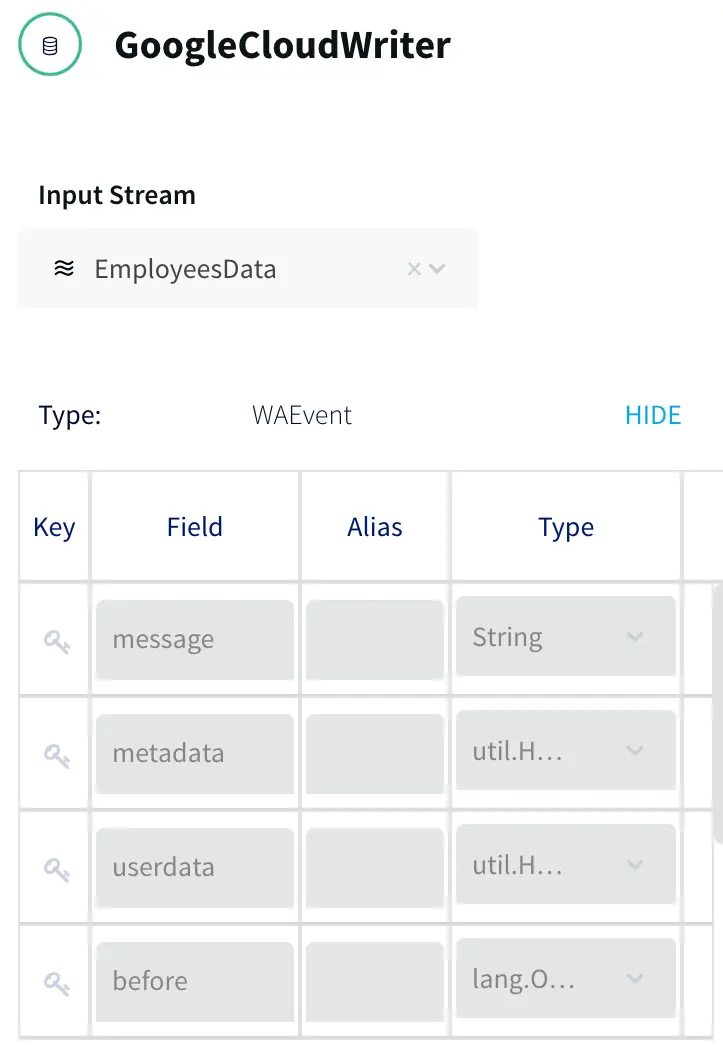
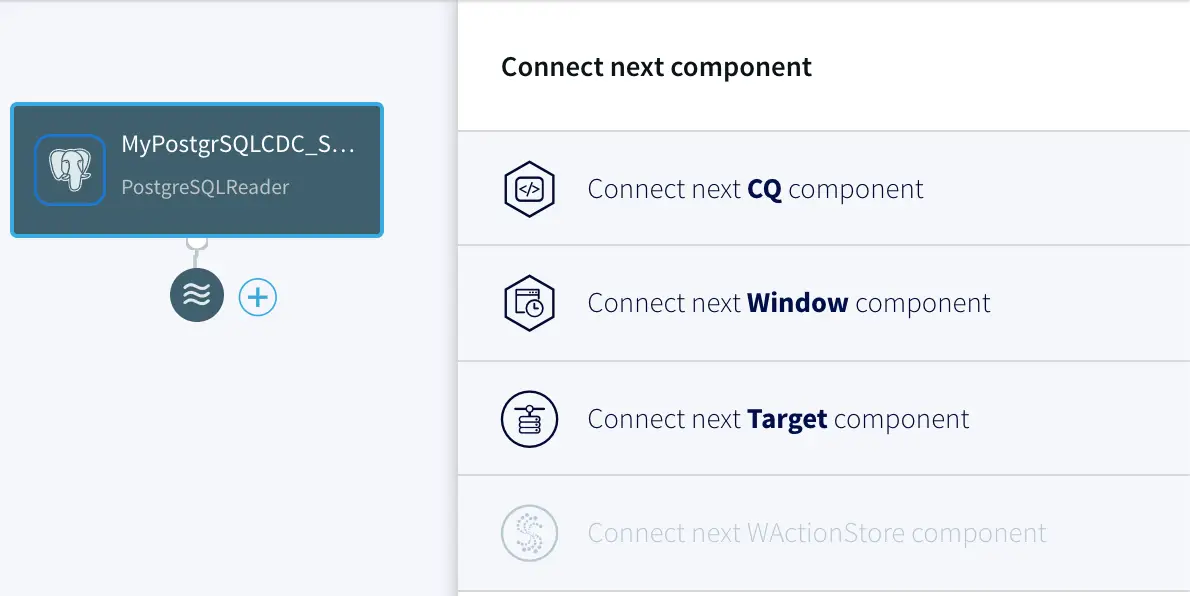
In the flow designer, you can add various processors, enrichers, transformers, and targets as shown below to complete your pipeline, in some cases with zero coding.

striim flow designer enrichers

striim flow designer processor

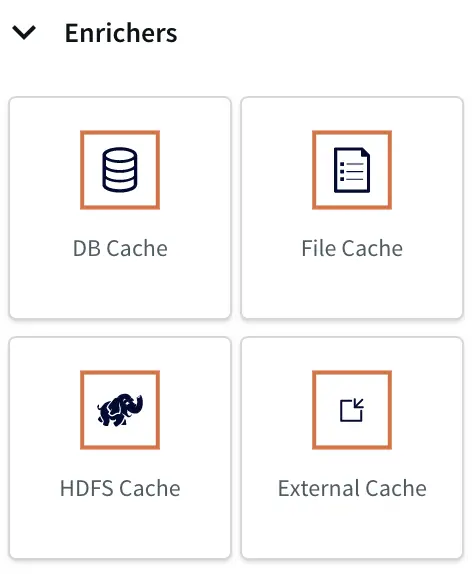
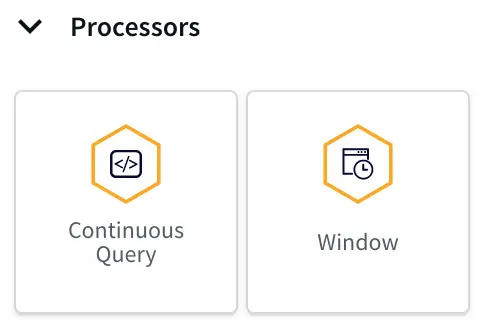
Flow designer enrichers and processors.

striim flow designer transformers

striim flow designer targets

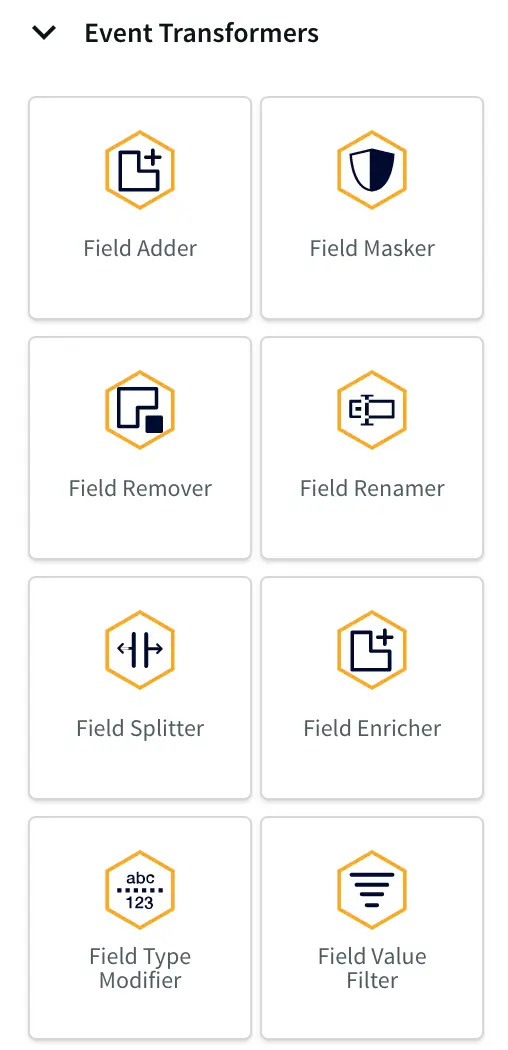
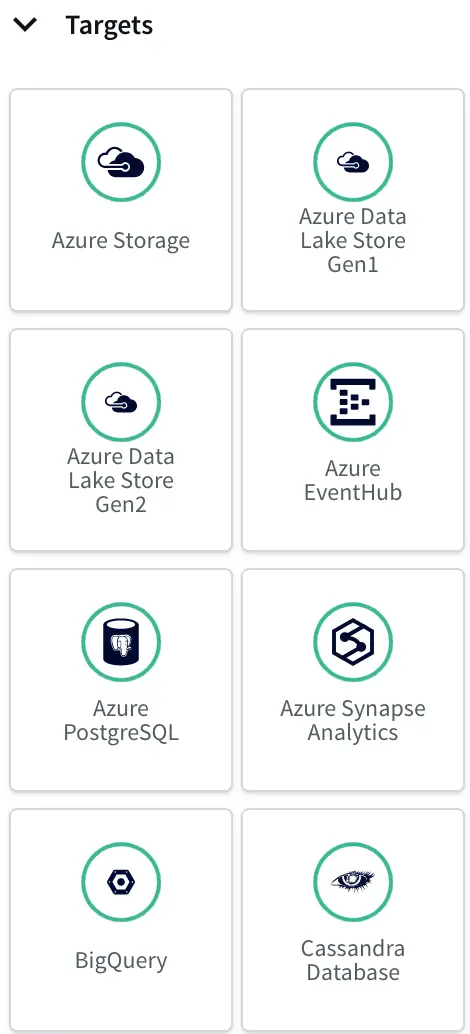
Flow designer event transformers and targets.

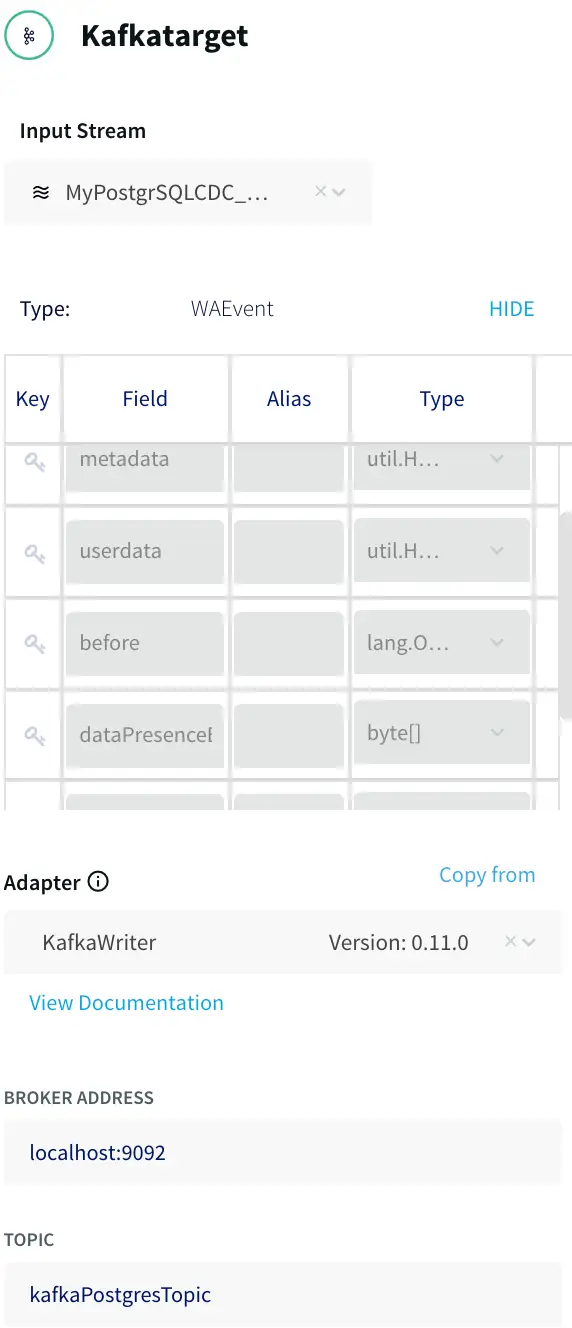
In the next blog post, we will discuss how to add a Kafka target to this data pipeline. In the meantime, please feel free to request
a demo
with one of our lead technologists, tailored to your environment.

Tools you need

Striim

Striim’s unified data integration and streaming platform connects clouds, data and applications.

PostgreSQL

PostgreSQL is an open-source relational database management system.

Migrating from MySQL to Google Cloud SQL with Change Data Capture​

Tutorial

Migrating from MySQL to Google Cloud SQL with Change Data Capture

How to Change Data Capture (CDC) to synchronize data from MySQL into a Google Cloud SQL instance

Benefits

Simplify Cloud MigrationsSay goodbye to downtime and complex migrations. Striim seamlessly loads and syncs your changing data.Add New Cloud ApplicationsAdd new, client-facing applications by synchronizing an existing on-premises application’s data set.Sync Current and New DatabasesKeep  data in your current MySQL instance in sync with your new CloudSQL deployment until your migration goes live
On this page

Overview

Migrating from MySQL to Google Cloud SQL opens up cloud services that offer a wealth of capabilities with low management overhead and cost. But, moving your existing on-premises applications to the cloud can be a challenge. Existing applications built on top of on-premises deployments of databases like MySQL. In this blog post we are going to use a database technology called Change Data Capture to synchronize data from MySQL into a Google Cloud SQL instance.

Introduction

One of the major hurdles when migrating applications, whether you’re changing the technology or moving to the cloud, is migrating your data. The older and bigger the application, the more difficult that migration becomes. Traditional Extract, Translate, and Load (ETL) tools require multiple passes and, potentially, significant downtime to handle data migration activities. This is where real-time ETL tools like Striim shine.
There are a number of benefits in migrating applications this way, such as being able to:
Add a new, client-facing cloud application by synchronizing an existing, traditionally on-premises application’s data set.
Migrate one or more on-premises application (with data) to the cloud for production testing with almost zero impact on the existing application.
Let’s walk through an example of connecting an on-premises instance of MySQL to Google Cloud SQL for MySQL.

Step 1: Set Up the MySQL Database

Before we dive into Striim, we are assuming you have an on-premises MySQL instance already configured and containing relevant data. For the purpose of this post, the dataset we have loaded data from a GitHub source (https://github.com/datacharmer/test_db) in a local MySQL instance. The data set is pretty large, which is perfect for our purposes, and contains a dummy set of employee information, including salaries.

MySQL to CloudSQL

Rather than importing all the data this data set contains, I’ve excluded the load_salaries2.dump and load_salaries3.dump files. This will allow us to insert a lot of data after Striim has been configured to show how powerful Change Data Capture is.

Step 2: Set Up the Striim Application

Now that we have an on-premises data set in MySQL, let’s set up a new Striim application on Google Cloud Platform to act as the migration service.
Open your Google Cloud console and open or start a new project. Go to the marketplace and search for Striim.

MySQL to CloudSQL

A number of options should return, but the one we’re after is the first item, which allows integration of real-time data to GCP.

MySQL to CloudSQL

Select this option and start the deployment process by pressing the deploy button at the bottom of this screen. For this tutorial, we’ll use the basic defaults for a Striim server. In production, however, you’d need to size appropriately depending on your load.

Step 3: Create a Target Database

While we wait for the Striim server to deploy, let’s create a Google SQL database to which we’ll migrate our database. Select the SQL option from the side menu in Google Cloud and create a new MySQL instance.

MySQL to CloudSQL

Once again, we’ll use the defaults for a basic Google MySQL instance. Open the instance and copy the instance connection name for use later. Then open the database instance and take note of the IP address.
We also need to create the database structure for the data we imported into the local MySQL instance. To do this, open the Google Cloud shell, log into the MySQL server, and run the SQL to create the table structure. Striim also needs a checkpoint table to keep the state in the event of failures, so create that table structure using the following:

                      CREATE TABLE CHKPOINT (
                      id VARCHAR(100) PRIMARY KEY,
                          sourceposition BLOB,
                          pendingddl BIT(1),
                      ddl LONGTEXT
                  );

Step 4: Initial Load Application

Open the Google Console and go back to the Deployment Manager, and click “Visit site”. It’s important to note that the Striim VM currently has a dynamic external IP address. In a production environment, you’ll want to set this to static so it won’t change.
When you first visit the site, you’ll see a congratulations screen. Click accept and fill in the basic details. Leave the license field blank for the trial version of Striim, or add your license key if you have one.
MySQL to CloudSQL
The first thing we need to do is create an application that performs the initial load of our current data set. There is no wizard for setting up an initial load application that we require, so go to Apps and create an app from scratch.


First, let’s add a MySQL reader from the sources tab on the left. This will access our local database to load the initial set of data. To read from a local server we need to use a JDBC style URL using the template:
jdbc:mysql://:/
We are also mapping the tables we want to sync by specifying them in the tables folder using

.

This allows us to restrict what is synchronized. Finally, under output to, specify a new WAEvent type for this connector.


Once we have our source wired up, we need to add a target to the flow so our data starts to transfer. Using a process similar to the one we used previously, add the GoogleCloudWriter target with the Google cloud instance in the connection URL. For the tables, this time we need to match the source and targets together using the form:
.,.


Once both the source and target connectors have been configured, deploy and start the application to begin the initial load process.


After the application goes through the starting process we can click on the monitor button to show the performance of the application. This will take a little while to complete, depending on your database size

Step 5: Change Data Capture

While the initial load takes place, let’s create the Change Data Capture (CDC) application to get ready for the synchronization process.

This time we are going to use a wizard to create the application. Click on Add Apps, then select the option to start with a Template. Striim comes with a lot of templates for different use cases out of the box. Scroll down to Streaming Integration for MySQL, click “show more,” then look for MySQL CDC to Cloud SQL MySQL. This option sets up a CDC application for MySQL to Google Cloud SQL.

Fill out the connection information for your on-premises application and click next. This should connect to the agent and ensure everything is correct.


Once everything is connected, check the tables you selected in the first application. These will synchronize any changes that occur.


Now we need to link our source to our target. Specify the connection details for your Google SQL instance using the IP address from the previous step. Fill in the username, password, and list of tables from the source database and click next. When you’ve finished the wizard, the application should be ready to go.


If the previous data load application has finished, stop the data load application and start the Change Data Capture application. Once the application has started, start loading transactions into your on-premises database. This should start synchronizing the data that changes up to your Google Cloud instance.

Open the Change Data Capture application and select monitor. You should see both the input and output figures as the application keeps track of your on-premises database. The activity chart should be showing the throughput of the records synchronizing from one location to another.
If you open the database console in Google Cloud and run a “SELECT COUNT(salary) FROM salaries” statement a couple of times, you should see the count figure rising.

Step 6: Adding More Load

While the servers are synchronizing, let’s go back to our local MySQL and add some other transactions. Import the remaining two salaries files, load_salaries2.dump and load_salaries3.dump. This will provide additional transactions to be synchronized and you’ll see Striim continue to add transactions as they happen without needing to do anything else.

Next Steps

We looked at a really quick and easy way to synchronize an on-premises instance of MySQL to Google Cloud SQL using Striim. At this point, you could start using the cloud database to run additional applications or do data analysis — without affecting the performance and use of your existing system.
If you open the menu on the Striim admin page, then open the apps section, and finally open this application, you’ll also see other steps you could add to this flow that support even more complex use cases, such as adding in transforms, combining multiple sources, or even splitting across targets.
To learn more about migrating from MySQL to Google Cloud SQL, check out the product page. To see how Striim can help with your move to cloud-based services, schedule a demo with a Striim technologist, or download a free trial of the platform.

Tools you need

Striim

Striim’s unified data integration and streaming platform connects clouds, data and applications.

MySQL

MySQL is an open-source relational database management system.

Google Cloud SQL

Google Cloud SQL is a fully managed relational database service for MySQL, PostgreSQL and SQL Server.

Migrate and Replicate Data from SQL Server to Snowflake with Striim

Tutorial

Migrate and Replicate Data from SQL Server to Snowflake with Striim

How to use Striim to migrate schemas and data from an existing SQL Server database into Snowflake

Benefits

Operational AnalyticsAnalyze your data in real-time without impacting the performance of your operational database.Control Your CostsMove data to Snowflake incrementally while controlling upload and merge intervals to optimize compute costsGet a Live ViewUse Striim CDC to stream data to Snowflake for a continuous view of your SQLServer transactions.
On this page

What is Striim?

Striim is a next generation Cloud Data Integration product that offers change data capture (CDC) enabling continuous replication from popular databases such as Oracle, SQLServer, PostgreSQL and many others.

In addition to CDC connectors, Striim has hundreds of automated adapters for file-based data (logs, xml, csv), IoT data (OPCUA, MQTT), and applications such as Salesforce and SAP. Our SQL-based stream processing engine makes it easy to enrich and normalize data before it’s written to Snowflake.

In this tutorial, we’ll show you how to use Striim to migrate schemas and data from an existing SQL Server database into Snowflake.

Step 1: Prepare a Snowflake Database and Launch Striim

Before migrating your data from SQL Server, you must first create a database within Snowflake to store the migrated data. After that database has been created you can launch Striim as a Snowflake partner service directly from within Snowflake.

Follow the steps below to prepare a database and launch Striim in Snowflake:

Launch Snowflake in a web browser.

Click on Databases > Create:


create snowflake database

Enter a unique name for the database and click Finish:


create database mmodal

Click on Partner Connect in the top right corner of the navigation bar.

Locate and click on Striim in the list of Snowflake partners. Note: you may need to first switch your user role to ACCOUNTADMIN in order to launch Striim from Snowflake:


Activate the partner account if the account has not been previously activated:


Confirm that the database you created in steps 2 and 3 above is listed in Database(s) with USAGE privilege granted and click Connect:


Note: On subsequent launches after activation has been completed for the first time, Snowflake will just prompt you to launch:


Step 2: Create a Striim Service to Host a Data Migration App

In Striim an app will be used to migrate the data. Before you can create that app, you need to first create and configure a service to host the app.

Follow the steps below to create a new Striim service:

Click on Marketplace in the top menu.

Locate the Snowflake app and click on Create:


Enter a unique name in the Name field noting the naming requirements listed:


(Optional) Click Show advanced options and specify the Service Version and Cluster Type.

Click Create. The browser will redirect to the Services screen.

Wait for the new service to enter the Running state.

Click on Launch:


The service will open in a new browser tab.

Step 3: Create a Data Migration App on the Striim Service

With the service now created and launched, you must create an app that runs on that service to perform the data migration.

Follow the steps below to create a new data migration app:

Click on Apps to display the app management screen:


Click Create app:


Click on SQL Server Database to Snowflake:


Enter a name for the new application and the namespace and click Save:


The data migration wizard is displayed:


Step 4: Prepare for Data Migration to Snowflake

In this section you will configure your app to access your source SQL Server database. As you proceed through Striim’s migration wizard, Striim will validate that it can access and fetch the metadata and data of your source SQL Server database.

Follow the steps below to migrate data using Striim’s step-by-step wizard:

Enter the details of your existing SQL Server database from which data is to be migrated and click Next:


Striim will verify that it can connect to your database and obtain metadata:

Click Next to advance to the Select Schemas screen.

Select the schemas to migrate from your SQL Server database to Snowflake and click Next:


Striim will fetch and validate metadata for each table in your database:


Click Next to advance to the Select Tables screen. Navigate through each schema on the left-hand side, and select the tables from each to migrate:


Click Next to complete the wizard. The target creation screen is displayed:


Step 5: Prepare Your Target and Migrate Your Data to Snowflake

Now that Striim can read from your source SQL Server database, you must configure Striim to write to your target Snowflake database.

Follow the steps below to prepare a Snowflake target and start the migration process:

Enter a unique name for the target in the Target Name field on the Create Snowflake Target(s) screen.

Ensure Input From is set to the stream you created using the steps in the previous sections. Note that the name will be in the form of+ _OutputStream.

Prepare the URL of the target Snowflake database: copy the following URL into the Connection URL field and replace YOUR_HOST with the base host domain assigned by Snowflake to your account, and YOUR_DATABASE with the name of your database:


jdbc:snowflake://YOUR_HOST.snowflakecomputing.com/?db=YOUR_DATABASE_NAME&schema=public

For example, the following URL has a base URL of xr86987.ca-central-1.aws and the database name set to RNA:


jdbc:snowflake://xr86987.ca-central-1.aws.snowflakecomputing.com/?db=RNA&schema=public

Enter your credentials corresponding to your Snowflake account into the Username and Password fields.

(Optional) Modify which tables to migrate by configuring the table name(s) listed in the Tables field. By default, the tables listed will be based on those specified in the steps from the previous section and include the % as a wildcard character:


Click Next. Striim will recreate the schema(s) in your Snowflake database:


Click Next after target creation is complete. Striim will begin migrating your data to Snowflake and will provide a detailed Application Progress popup showing how the migration is progressing:


Wrapping Up: Start Your Free Trial

Our tutorial showed you how easy it is to migrate data from SQLServer to Snowflake, a leading cloud data warehouse. Once your data has been migrated, Striim enables continuous, real-time updates via Change Data Capture.

For instances where changes continue to be made to the data in your source database, Striim enables zero-downtime, zero-data loss migrations to Snowflake.

As always, feel free to reach out to our integration experts to schedule a demo, or try Striim for free here.

Tools you need

Striim

Striim’s unified data integration and streaming platform connects clouds, data and applications.

PostgreSQL

PostgreSQL is an open-source relational database management system.

Snowflake

Snowflake is a cloud-native relational data warehouse that offers flexible and scalable architecture for storage, compute and cloud services.

Streaming Data Integration Tutorial: Adding a Kafka Stream to a Real-Time Data Pipeline

Tutorial

Streaming Data Integration Tutorial: Adding a Kafka Stream to a Real-Time Data Pipeline

Connect your streaming pipelines to Apache Kafka seamlessly for maximum organizational adoption of real-time data

Benefits

Turn Your Database into a StreamUse non-intrusive CDC to Kafka to create persistent streams that can be accessed by multiple consumers.Empower Your TeamsGive teams across your organization a real-time view of your Oracle database transactionsGet Analytics-Ready DataGet your data ready for analytics before it lands in the cloud. Streaming SQL scales in memory to keep your data moving.
On this page

Overview

This is the second post in a two-part blog series discussing how to stream database changes into Kafka. You can read part one here. We will discuss adding a Kafka target to the CDC
source from the previous post. The application will ingest database changes (inserts, updates, and deletes) from the PostgreSQL source tables and deliver to Kafka to continuously to update a Kafka topic.

What is Kafka?

Apache Kafka is a popular distributed, fault-tolerant, high-performance messaging system.

Why use Striim with Kafka?

The Striim platform enables you to ingest data into Kafka, process it for different consumers, analyze, visualize, and distribute to a broad range of systems on-premises and in the cloud with an intuitive UI and SQL-based language for easy and fast development.

Step 1: How to add a Kafka Target to a Striim Dataflow

From the Striim Apps page, click on the app that we created in the previous blog post and select Manage Flow.


MyPostgreSQL-CDC App

This will open your application in the Flow Designer.

source flow

MyPostgrSQLCDC app data flow.

To do the writing to Kafka, we need to add a Target component into the dataflow. Click on the data stream, then on the plus (+) button, and select “Connect next Target component” from the menu.

connect component data flow

Connecting a target component to the data flow.

Step 2: Enter the Target Info

The next step is to specify how to write data to the target. With the New Target ADAPTER drop-down, select Kafka Writer Version 0.11.0, and enter a few connection properties including the target name, topic and broker URL.

configuring the kafka target

Configuring the Kafka target.

Step 3: Data Formatting

Different Kafka consumers may have different requirements for the data format. When writing to Kafka in Striim, you can choose the data format with the FORMATTER drop down and optional configuration properties. Striim supports JSON, Delimited, XML, Avro and free text formats, in this case we are selecting the JSONFormatter.

Configuring the Kafka target FORMATTER.

Configuring the Kafka target FORMATTER

Step 4: Deploying and Starting the Data Flow

The resulting data flow can now be modified, deployed, and started through the UI. In order to run the application, it first needs to be deployed, click on the ‘Created’ dropdown and select ‘Deploy App’ to show the Deploy UI.

Deploying the app

Deploying the app

The application can be deployed to all nodes, any one node, or predefined groups in a Striim cluster, the default is the least used node.

Deployment node selection

Deployment node selection

After deployment the application is ready to start, by selecting Start App.

Starting the app

Starting the app

Step 5: Testing the Data Flow

You can use the PostgreSQL to Kafka sample integration application, to insert, delete, and update the PosgtreSQL CDC source table, then you should see data flowing in the UI, indicated by a number of msgs/s. (Note the message sending happens fast and quickly returns to 0).

Testing the streaming data flow

Testing the streaming data flow

If you now click on the data stream in the middle and click on the eye icon, you can preview the data flowing between PostgreSQL and Kafka. Here you can see the data, metadata (these are all updates) and before values (what the data was before the update).

Previewing the data flowing from PostgreSQL to Kafka

Previewing the data flowing from PostgreSQL to Kafka

There are many other sources and targets that Striim supports for streaming data integration. Please request a demo with one of our lead technologists, tailored to your environment.

Tools you need

Striim

Striim’s unified data integration and streaming platform connects clouds, data and applications.

PostgreSQL

PostgreSQL is an open-source relational database management system.

Snowflake

Snowflake is a cloud-native relational data warehouse that offers flexible and scalable architecture for storage, compute and cloud services.

Back to top