Learn how to play with real-time streams with simple auto-generated data streams
Real-Time Ingest for Snowflake
Enable true real-time ingest for Snowflake via Snowpipe StreamingActivate Data
With real-time data in Snowflake, you can power data activation workflows fed by fresh data and in-the-moment actions
On this page
Overview
Striim is a unified data streaming and integration product that offers change capture (CDC), enabling continuous replication from popular databases such as Oracle, SQLServer, PostgreSQL and many others to target data warehouses like BigQuery and Snowflake.
In this recipe, we walk you through setting up a streaming application to a Snowflake target. To begin with, we will generate synthetic data to get a feel for Striim’s streaming platform. We use Striim’s Continuous Generator component to generate test data which is then queried by a SQL-based Continuous Query. Follow the steps to configure your own streaming app on Striim.
Core Striim Components
Continuous Generator: A continuous data generator can auto-generate meaningful data for a given set of fields
Continuous Query: Striim continuous queries are continually running SQL queries that act on real-time data and may be used to filter, aggregate, join, enrich, and transform events.
Snowflake Writer: Striim’s Snowflake Writer writes to one or more existing tables in Snowflake. Events are staged to local storage, Azure Storage, or AWS S3, then written to Snowflake as per the Upload Policy setting.
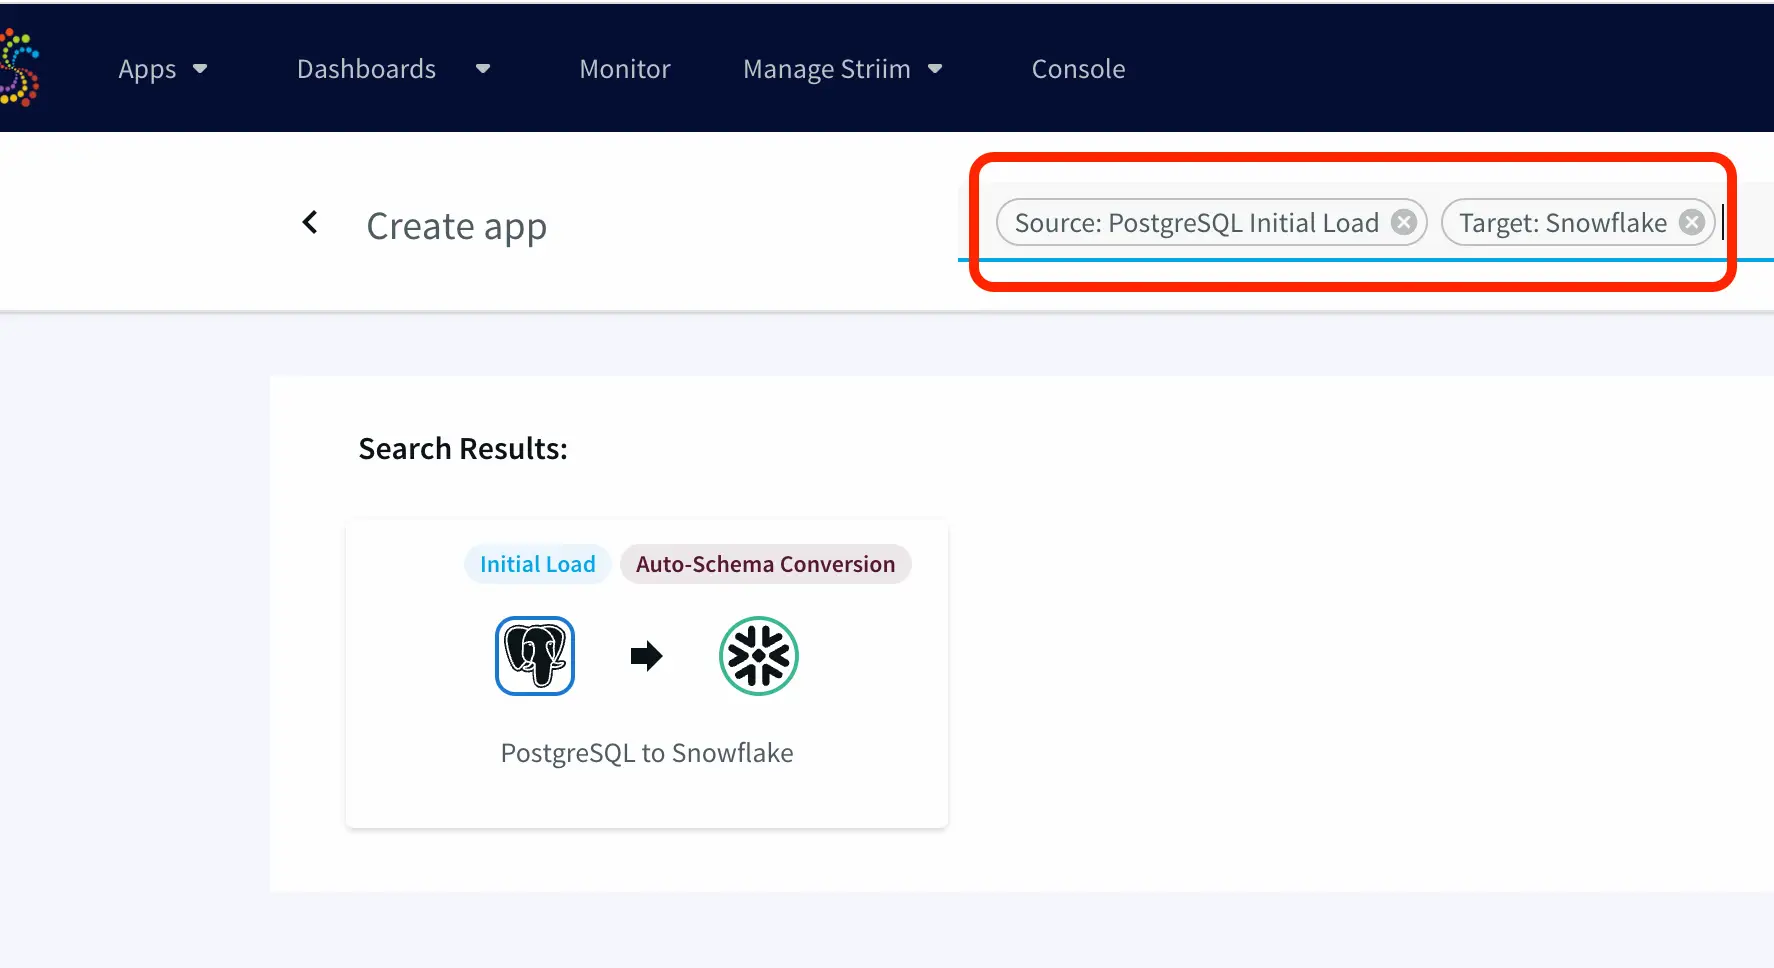
Step 1: Log into your Striim account and select the source
If you do not have an account yet, please go to signup-developer.striim.com to sign up for a free Striim developer account in a few simple steps. You can learn more on how to get started with free Striim Developer here. To configure your source adapter from the flow designer, click on ‘Create app’ on your homepage followed by ‘Start from scratch’. Name your app and click ‘Save’.
Click on the relevant link on the flow-designer screen to add an auto-generated data source.
You will be prompted to select a simple or an advanced source. For this application, we’ll add a simple source. The simple source has a continuous generator with four fields that are queried by a CQ component of Striim.
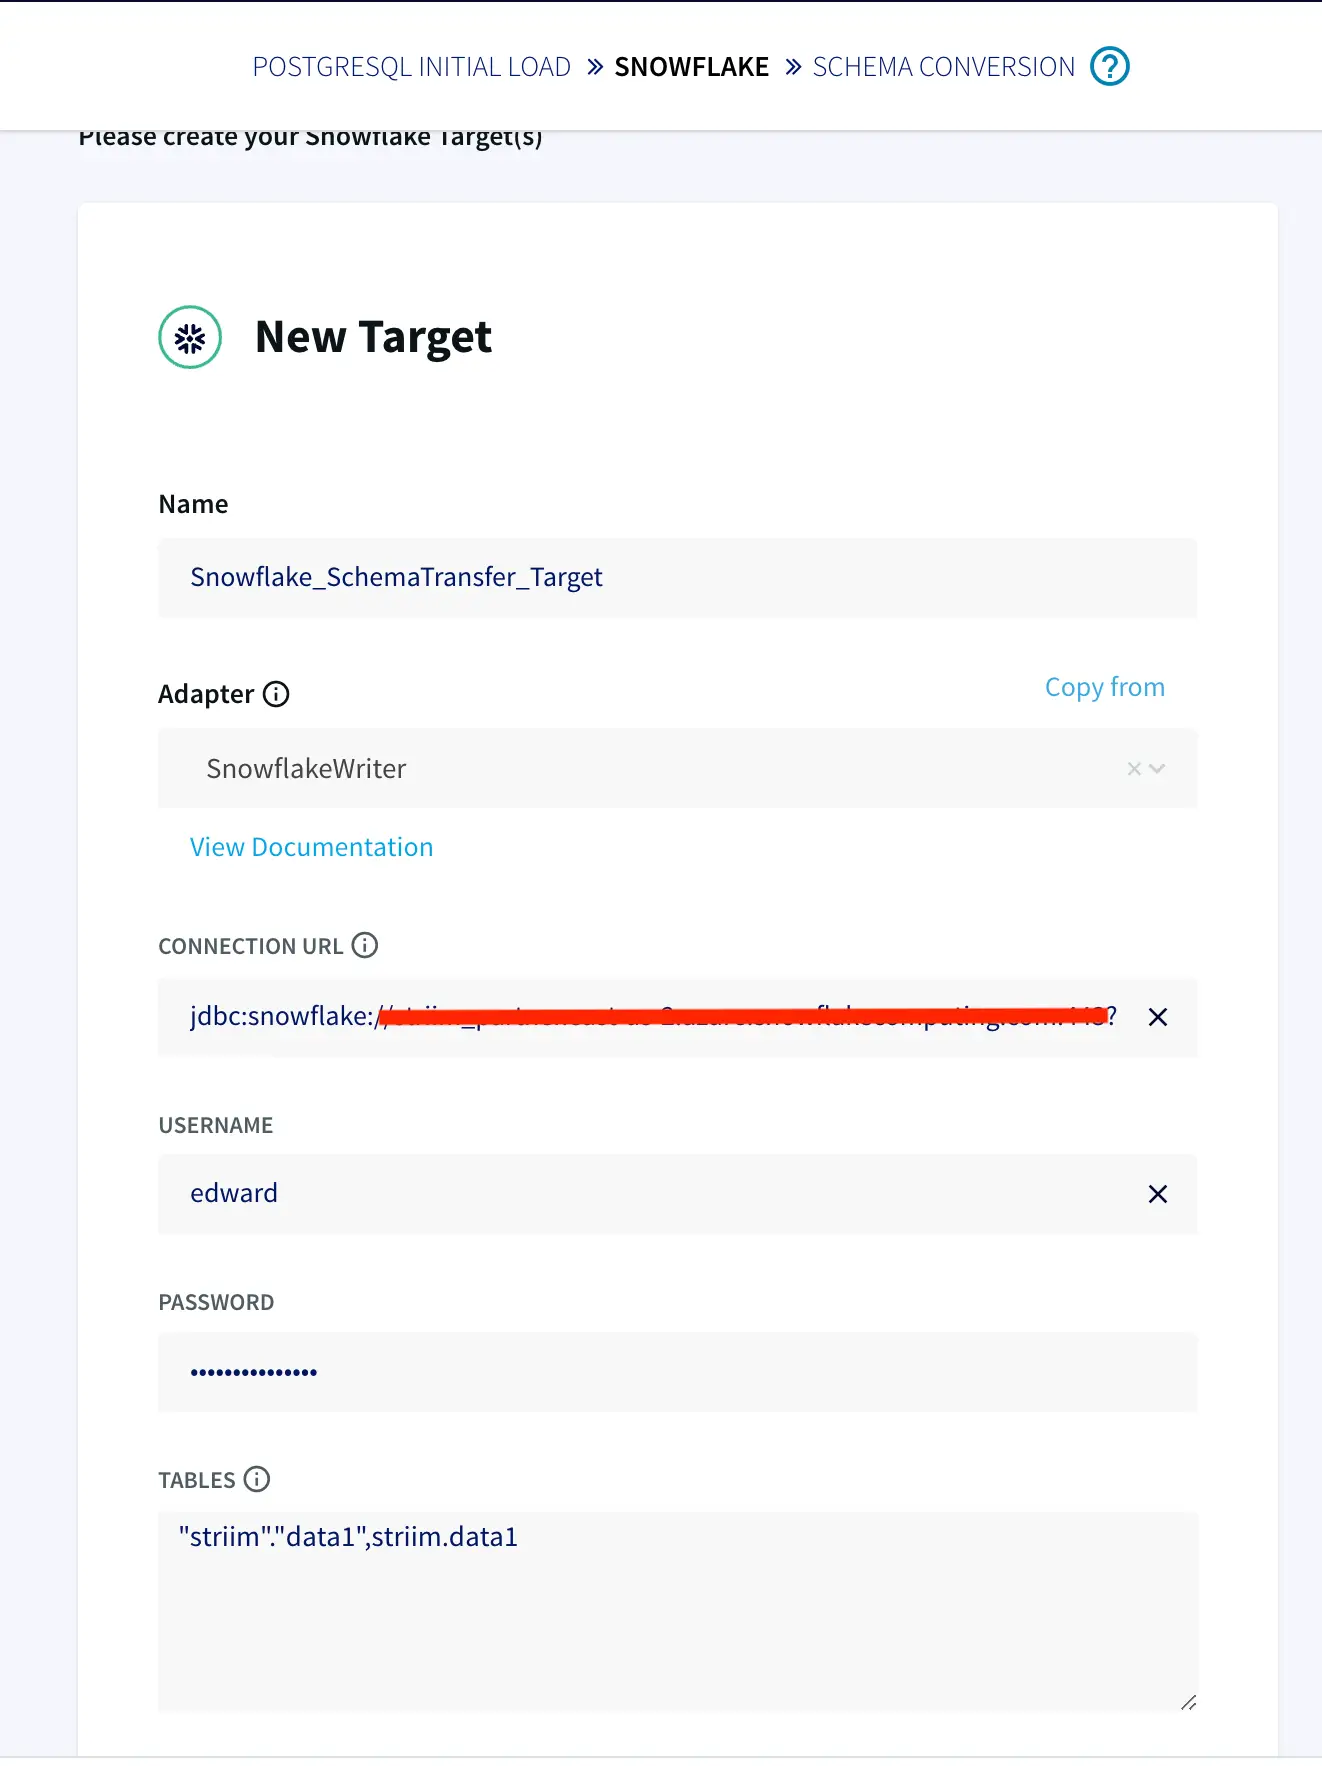
Step 2: Add a target table on your Snowflake Data Warehouse and enter the connection details on the Striim Target Snowflake adapter
On your Snowflake warehouse, add a table with the same fields and data type as the outcoming stream from Continuous Query.
Drag the Snowflake component from the left panel and configure your target. The connection url is of the format
Once the source, target and CQ are configured, select Deploy from the dropdown menu next to Created. Choose any available node and click Deploy. After the app is deployed, from the same drop-down, select StartApp.
You can preview the processed data by clicking on the ‘eye’ wizard next to the stream component.
Setting Up the Striim Application
Step 1: Log into your Striim account and select the source
Snowflake Writer: Support for Streaming API (Optional)
The Snowpipe Streaming API is designed to supplement Snowpipe, rather than replace it. It is intended for streaming scenarios where data is transmitted in row format, such as from Apache Kafka topics, rather than written to files. It enables low-latency loading of streaming data directly to the target table using the Snowflake Ingest SDK and Striim’s Snowflake Writer, thereby saving the costs associated with writing the data from staged files.
Configurations:
Users should enable streaming support for their Snowflake account along with key-pair authentication. The Private Key is passed on SnowflakeWriter property by removing header and footer and no line break:
—–BEGIN ENCRYPTED PRIVATE KEY—– ## HEADER
*************************
*******************
…
—–END ENCRYPTED PRIVATE KEY—– ## FOOTER
To configure the snowflake writer, under Advanced Settings, enable APPEND ONLY and STREAMING UPLOAD. With this setting, data will be streamed to the target table directly. Enter your user role and private key as shown below.
You can fine-tune the settings of upload policies based on the needs of your users. But you may start by changing ‘UploadPolicy’ to ‘eventcount:500,interval:5s’ to load either at every 500 events or 5 seconds (whichever comes first).
There are a few limitations to this approach, as follows:
Snowflake Streaming API restricts AUTO INCREMENT or IDENTITY.
Default column value that is not NULL is not supported.
Data re-clustering is not available on Snowpipe streaming target tables.
The GEOGRAPHY and GEOMETRY data types are not supported.
Wrapping Up: Start your Free Trial Today
In this recipe, we have walked you through steps for creating a Striim application with Snowflake as a target using test data from our Continuous Generator adapter. You can easily set up a streaming app by configuring your Snowflake target. As always, feel free to reach out to our integration experts to schedule a demo, or try Striim developer for free here.
Tools you need
Striim
Striim’s unified data integration and streaming platform connects clouds, data and applications.
Snowflake
Snowflake is a cloud-native relational data warehouse that offers flexible and scalable architecture for storage, compute and cloud services.
Data integration and SQL-based processing for Kafka with Striim
Benefits
Efficient Data Processing
Process streaming data quickly and effectively between enterprise databases and Kafka
Streamlined SQL-Based Queries
Transform, filter, aggregate, enrich, and correlate your real-time data using continuous queries
ACID-Compliant CDCStriim and Confluent work together to ensure high-performance, ACID-compliant Change Data Capture
On this page
Overview
Apache Kafka is a powerful messaging system, renowned for its speed, scalability, and fault-tolerant capabilities. It is widely used by organizations to reliably transfer data. However, deploying and maintaining Kafka-based streaming and analytics applications can require a team of developers and engineers capable of writing and managing substantial code. Striim is designed to simplify the process, allowing users to reap the full potential of Kafka without extensive coding.
Striim and Confluent, Inc. (founded by the creators of Apache Kafka), partnered to bring real-time change data capture (CDC) to the Kafka ecosystem. By integrating Striim with Confluent Kafka, organizations can achieve a cost-effective, unobtrusive solution for moving transactional data onto Apache Kafka message queues in real time. This delivery solution is managed through a single application that offers enterprise-level security, scalability, and dependability.
The Striim platform helps Kafka users quickly and effectively process streaming data from enterprise databases to Kafka. Streamlined SQL-like queries allow for data transformations, filtering, aggregation, enrichment, and correlation. Furthermore, Striim and Confluent work together to ensure high-performance, ACID-compliant CDC and faster Streaming SQL queries on Kafka. For further insights into the strengths of the Striim and Kafka integration, visit our comparison page.
This recipe will guide you through the process of setting up Striim applications (Striim apps) with Confluent Kafka. Two applications will be set up: one with Kafka as the data source using the Kafka Reader component and another with Kafka as the destination with the Kafka Writer component. You can download the associated TQL files from our community GitHub page and deploy them into your free Striim Developer account. Please follow the steps outlined in this recipe to configure your sources and targets.
Core Striim Components
Kafka Reader: Kafka Reader reads data from a topic in Apache Kafka 0.11 or 2.1.
Kafka Writer: Kafka Writer writes to a topic in Apache Kafka 0.11 or 2.1.
Stream: A stream passes one component’s output to one or more components. For example, a simple flow that only writes to a file might have this sequence.
Snowflake Writer: Striim’s Snowflake Writer writes to one or more existing tables in Snowflake. Events are staged to local storage, Azure Storage, or AWS S3, then written to Snowflake as per the Upload Policy setting.
Mongodb Reader:Striim supports MongoDB versions 2.6 through 5.0 and MongoDB and MongoDB Atlas on AWS, Azure, and Google Cloud Platform.
Continuous Query: Striim continuous queries are continually running SQL queries that act on real-time data and may be used to filter, aggregate, join, enrich, and transform events.
App 1: Kafka Source to Snowflake Target
For the first app, we have used Confluent Kafka (Version 2.1) as our source. Data is read from a Kafka topic and processed in real time before being streamed to a Snowflake target warehouse. Please follow the steps below to set up the Striim app from the Flow Designer in your Striim Developer account. If you do not have an account yet, please follow this tutorial to sign up for a free Striim Developer account in a few simple steps.
Step 1: Configure the Kafka Source adapter
In this recipe the Kafka topic is hosted on Confluent. Confluent offers a free trial version for learning and exploring Kafka and Confluent Cloud. To sign-up for a free trial of Confluent cloud, please follow the Confluent documentation. You can create a topic inside your free cluster and use it as the source for our Striim app.
To configure your source adapter from the Flow Designer, click on ‘Create app’ on your homepage followed by ‘Start from scratch’. Name your app and click ‘Save’.
From the side panel, drag the Kafka source component and enter the connection details.
Add the broker address that you can find under client information on Confluent Cloud, also called the bootstrap server.
Enter the offset from where you want to stream data from your topic. Change the Kafka Config value and property separators as shown above. For the Kafka Config field you will need API key and API secret of your Confluent Kafka topic. The Kafka Config is entered in the following
You can copy the sasl.jaas.config from client information on Confluent Cloud and use the correct separators for the Kafka Config string.
Step 2: Add a Continuous Query to process the output stream
Now the data streamed from the Kafka source will be processed in real time for various analytical applications. In this recipe the data is processed with SQL-like query that converts the JSON values into a structured table which is then streamed into your Snowflake warehouse, all in real time.
Drag the CQ component from the side panel and enter the following query. You can copy the SQL query from our GitHub page.
Step 3: Configure your Snowflake Target
On your target Snowflake warehouse, create a table with the same schema as the processed stream from the above Continuous Query. Enter the connection details and save. You can learn more about Snowflake Writer from this recipe.
Step 4: Deploy and run the app
Once the source, target and CQ are configured, select Deploy from the dropdown menu next to ‘Created’. Choose any available node and click Deploy. After the app is deployed, from the same drop-down, select StartApp.
You can preview the processed data by clicking on the ‘eye’ icon next to the stream component.
App 2: MongoDB Source to Kafka Target
In this app, real-time data from MongoDB has been processed with SQL-like queries and replicated to a Kafka topic on Confluent. Follow the steps below to configure a MongoDB to Kafka streaming app on Striim. As shown in app 1 above, first name your app and go to the Flow Designer.
Step 1: Set up your MongoDB Source
Configure your MongoDB source by filling in the connection details. Follow this recipe for detailed steps on setting up a MongoDB source on Striim. Enter the connection url, username, password and the collection data that you want to stream.
Step 2: Add a Continuous Query to process incoming data
Once the source is configured, we will run a query on the data stream to process it. You can copy and paste the code from our GitHub page.
Step 3: Set up the Kafka target
After the data is processed, it is written to a Confluent Kafka topic. The configuration for the Kafka Writer is similar to Kafka Reader as shown in app 1. Enter the connection details of your Kafka and click Save.
Step 4: Deploy and run the app
After the source and target adapters are configured, click Deploy followed by Startapp to run the data stream.
You can preview the processed data through the ‘eye’ wizard next to the data stream.
As seen on the target Kafka messages, the data from MongoDB source is streamed into the Kafka topic.
Step 2: Add a Continuous Query to process the output stream
select TO_STRING(data.get(“ordertime”)) as ordertime,
TO_STRING(data.get(“orderid”)) as orderid,
TO_STRING(data.get(“itemid”)) as itemid,
TO_STRING(data.get(“address”)) as address
from kafkaOutputStream;
Step 3: Configure your Snowflake target
Step 4: Deploy and run the Striim app
App 2: MongoDB Source to Kafka target
Step 1: Set up your MongoDB Source
Step 2: Add a Continuous Query to process incoming data
SELECT
TO_STRING(data.get(“_id”)) as id,
TO_STRING(data.get(“name”)) as name,
TO_STRING(data.get(“property_type”)) as property_type,
TO_STRING(data.get(“room_type”)) as room_type,
TO_STRING(data.get(“bed_type”)) as bed_type,
TO_STRING(data.get(“minimum_nights”)) as minimum_nights,
TO_STRING(data.get(“cancellation_policy”)) as cancellation_policy,
TO_STRING(data.get(“accommodates”)) as accommodates,
TO_STRING(data.get(“bedrooms”)) as no_of_bedrooms,
TO_STRING(data.get(“beds”)) as no_of_beds,
TO_STRING(data.get(“number_of_reviews”)) as no_of_reviews
FROM mongoOutputStream l
Step 3: Set up the Kafka target
Step 4: Deploy and run the app
Wrapping Up: Start your Free Trial Today
The above tutorial describes how you can use Striim with Confluent Kafka to move change data into the Kafka messaging system. Striim’s pipelines are portable between multiple clouds across hundreds of endpoint connectors. You can create your own applications that cater to your needs. Please find the app TQL and data used in this recipe on our GitHub repository.
As always, feel free to reach out to our integration experts to schedule a demo, or try Striim for free here.
Tools you need
Striim
Striim’s unified data integration and streaming platform connects clouds, data and applications.
Snowflake
Snowflake is a cloud-native relational data warehouse that offers flexible and scalable architecture for storage, compute and cloud services.
Apache Kafka
Apache Kafka is an open-source distributed streaming system used for stream processing, real-time data pipelines, and data integration at scale.
MongoDB
NoSQL database that provides support for JSON-like storage with full indexing support.
Streaming Change Data Capture from MongoDB to ADLS Gen2 in Parquet Format
Benefits
Leverage Striim for real-time CDC and convert data into Parquet format on the fly.
Use Striim with Databricks for instant scalability and accelerate Analytics and reporting.
Use the power of Delta Lake that extends Parquet data files with a file-based transaction log for ACID transactions and scalable metadata handling.
On this page
Real-time data analytics is proving to be the next big wave in Big data and Cloud computing and in a computing context, there’s an increasing demand to derive insights from data just milliseconds after it is available or captured from various sources.
NoSQL databases have become widely adopted by companies over the years due to their versatility in handling vast amounts of structured and unstructured streaming data with the added benefit to scale quickly with large amounts of data at high user loads.
Why MongoDB?
MongoDB has become a prominent powerhouse among NoSQL databases and is widely embraced among many modern data architectures. With its ability to handle evolving data schemas and store data in JSON-like format which allows us to map to native objects supported by most modern programming languages.
MongoDB has the ability to scale both vertically and horizontally which makes it a prime choice when it comes to integrating large amounts of data from diverse sources, delivering data in high-performance applications, and interpreting complex data structures that evolve with the user’s needs ranging from hybrid to multi-cloud applications.
Why Parquet?
Storage matters! I/O costs really hurt and with more multi-cloud distributed compute clusters being adopted, we would need to consider both the disk I/O along with the network I/O. In a Big data use case, these little costs accrue both in terms of compute and storage costs.
Considering the above-depicted scenario, let’s presume we have a dataset with 100+ fields of different datatypes, it would be unwise to ingest a 30+ GB file even by using a distributed processing system like Spark or Flink.
Parquet data format is more efficient when dealing with large data files and goes hand in hand with Spark which allows it to read directly from a Spark data frame while preserving the schema. At the same time, Parquet can handle complex nested data structures and also supports limited Schema evolution to accommodate changes in data like adding new columns or merging schemas that aren’t compatible.
Is Delta Lake the new Data Lake?
Databricks leverage Delta lake which helps accelerates the velocity at which high-quality data can be stored in the data lake and in parallel, provide teams with leverage to insights from data in a secure and scalable cloud service.
Key highlights among its features include
Leveraging spark distributed processing power to handle metadata for Petabyte scale tables.
Act interchangeably as a batch table, streaming source, and data sink.
Schema change handling that prevents insertion of bad records during ingestion.
Data versioning allows rollbacks, builds historical audit trails, and facilitates rebuildable machine-learning experiments.
Optimize upserts and delete operations that allow for complex use cases like change-data-capture (CDC), slowly changing dimension (SCD), streaming upserts, and so on.
Core Striim Components
MongoDB reader: MongoDBReader reads data from the Replica Set Oplog, so to use it you must be running a replica set. In InitialLoad mode, the user specified in MongoDBReader’s Username property must have read access to all databases containing the specified collections. In Incremental mode, the user must have read access to the local database and the oplog.rs collection.
Continuous Query: Striim Continuous Queries are continually running SQL queries that act on real-time data and may be used to filter, aggregate, join, enrich, and transform events.
ADLS Gen2 Writer: Writes to files in an Azure Data Lake Storage Gen2 file system. When setting up the Gen2 storage account, set the Storage account kind to StorageV2 and enable the Hierarchical namespace.
Stream: A stream passes one component’s output to one or more other components. For example, a simple flow that only writes to a file might have this sequence.
Dashboard: A Striim dashboard gives you a visual representation of data read and written by a Striim application.
WAEvent: The output data type for sources that use change data capture readers is WAEvent.
Simplified diagram of the Striim App
The Striim app in this recipe showcases how we can stream the CDC data from MongoDB as Json events and convert them into Parquet files before placing them into Azure’s ADLS Gen2 storage account. The same Striim app can be used to perform historical or initial loads and seamlessly convert into an incremental application once the historical data is captured.
We use the Continous Query to extract the fields from the JSON events and convert them into Parquet files using the Parquet formatter built into ADLS Gen2 writer. Once the data lands, Databricks provides us the option to convert these parquet files into a Delta table in-place.
In a production setting, Striim’s Change Data Capture allows for real-time insights from MongoDB into Databricks Delta tables.
Feel free to sign up for a Free trial of Striim here
Step 1: Setting up MongoDB Atlas as a source
MongoDB Atlas is a Database as a service (DBaaS) and a fully managed cloud database that handles the complexity of configuring and deploying in the cloud provider of our choice(AWS, Azure, and GCP). Feel free to sign up for an account here.
If you are a new user, Complete the prompts to create an organization and a project which are needed in order to create a database cluster.
Note: There are multiple cluster offerings to choose from MongoDB which are as follows: Shared cluster, Dedicated Cluster, and Multi-Cloud & Multi-region cluster. We will be using a Dedicated cluster in this recipe since the shared free tier cluster uses a shared opLog, and for security concerns, external services or applications aren’t given access to it.
1. Once the Dedicated cluster is up and running, we would need to whitelist the IP for Striim Cloud which can be found under the Secure connection tab within the Striim cloud account.
2. Navigate to Network Access under Security in the MongoDB account and whitelist the IP for any workstation that will be used along with the Striim App’s IP.
3. Create a database user for the cluster by navigating into the Database Access tab and make sure to add clusterMonitor role under the MongoDB roles. This is necessary for the Striim App to gain access to the OpLog and read the CDC data.
We can connect to the cluster using the mongosh or Mongo’s GUI tool called Compass.
MongoDB provides us the option to import test data via CSV or JSON document. For this recipe, we will use the sample airbnb dataset which is offered by MongoDB when a new database cluster is created.
Step 2: Configure the MongoDB Reader in Striim
Login to your Striiim cloud instance and select Create App from the Apps dashboard.
Click on Start from scratch or use the built-in wizard by using keywords to the data source and sink in the search bar. Drag and drop the MongoDB CDC reader from Sources and enter the connection parameters for the MongoDB database cluster.
Obtain the Connection URL by navigating to the MongoDB account and click on Connect under the Database tab, and Select Connect using MongoDB Compass. We can use the same connection string to connect the Striim app as well.
Enter the other connection URL from above along with the username, and password of the database user which has ClusterMonitor role which was created as part of Step 1. Select the type of ingestion as Initial or Incremental and Auth type as default or SCRAMSHA1.
Note: If the Striim app is configured to run Initial mode as ingestion first, do turn on the option for Quiesce on IL Completion. Set to True to automatically quiesce the application after all data has been read.
Step 3: Configure a Continous SQL Query to parse JSON events from MongoDB
A new stream is created after the MongoDB reader is configured which loads the Type in the stream as JsonNodeEvents. JSON’s widespread use has made it the obvious choice for representing data structures in MongoDB’s document data model.
Select the Continuous Query (CQ) processor from the drop-down menu and pass the following query to pull MongoDB data from the dataset that has been created. The query can be found in the following GitHub repository.
2. Make sure the values under the Type have been picked up by the Striim app.
Note:
This allows the JSON events from MongoDB to be converted into WAEvent within Striim. This is necessary as part of the Parquet conversion process since the reader-parser combinations are not supported directly from JSON to Parquet.
Step 4: Configure the ADLS Gen2 as a Data Sink
Navigate to the Azure portal and create a new ADLS Gen2 and make sure to set the Storage account kind to StorageV2 and enable the Hierarchical namespace.
Inside the Striim App, Search for the Azure Data Lake Store Gen2 under Targets and select the input stream from above.
Enter the Storage account name and Generate the SAS token by Navigating to the Shared Access Signature tab under the Security + Networking tab and Enable all three options (Service, Container, Object) as shown below.
Note:
Once the SAS key is generated, Remove the ? from the beginning of the SAS token before adding it into the Striim App. Refer to the ADLS Gen2 Writer documentation here.
For example,
?sv=2021-06-08&ss=bfqt&srt=o&sp=upyx&se=2022-10-16T07:40:04Z&st=2022-10-13T23:40:04Z&spr=https&sig=LTcawqa0yU2NF8gZJBuog%3D
Add the mandatory fields like Filesystem name, File name, and directory (if any), and also enable Roll Over on DDL which has a default value of True. This allows the events to roll over to a new file when a DDL event is received. Set to False to keep writing to the same file.
Under the Formatter, Select ParquetFormatter option and provide a Schema file name and make sure to append _.Note:
In the Downstream application of Databricks, we will be generating a Delta table in-place which will generate a _delta_log folder. All other files/folders will be treated as Parquet files along with the Schema file name folder that will be created by the Striim application during run-time.
By not appending the underscore value to the Schema file name in this use case will lead to a run time error during the creation of the delta table.
Once the app is configured, Click on the Deploy App from the top menu and Select Start App.
Once the app is deployed and Started, we can view the status of the data streaming via the dashboard. The parquet files can be viewed inside the ADLS Gen2 container.
Step 5: Convert Parquet to Delta
Navigate to your Databricks Homepage and import the notebook from this Github repo.
Databricks allows us to convert an existing parquet table to a Delta table in place and in this recipe, we will be pointing the Delta table to the ADLS storage container from above which receives the Parquet file dump.
CONVERT TO DELTA parquet.`abfss://@.dfs.core.windows.net/`;
Executing the above operation will create a Delta Lake Transaction log that tracks the files in the ADLS storage container. It can also automatically infer the data schema from the footers of all Parquet files. This allows for more flexibility when the schema is modified at the source allowing the Delta table to handle it seamlessly.
Next, we can go ahead and create a table in Databricks as shown below. An added advantage of using the Parquet file format is, it contains the metadata of the schema for the data stored. This reduces a lot of manual effort in production environments where schema has to be defined. It is much easier to automate the whole pipeline via Delta tables by pointing to the ADLS storage container.
Once the _delta_log is created, any new Parquet file landing in the storage container will be picked up by the Delta table allowing for near real-time analytics.
For instance, when the values for certain fields have been updated as shown below, Striim CDC application is able to pick up the CDC data and convert them into Parquet files on the fly before landing in ADLS.
Note:
For CDC testing purposes, avoid using the updateMany({….})with MongoDB since that would lead to error with Null IDs being generated.
Optimize Delta tables
The Parquet data files can be enhanced further by running the Optimize functionality in Databricks which optimizes a subset of data or colocates data by Column. If you do not specify colocation, bin-packing optimization is performed.
Any file not tracked by Delta lake is considered invisible and will be deleted if the VACUUM operation is performed on the Delta Table. If the DELETE or OPTIMIZE operations are performed which can change the Data files, Run the following command to enforce Garbage collection.
> VACUUM delta.`<path-to-table>` RETAIN 0 HOURS
Limitations
While the above architecture is cost-efficient, supports open formats, and compatible with future analytics workloads, it has limitations around read isolation and data management at scale.
It can be further simplified by using Striim’s DeltaLakeWriter to handle copying data directly into Delta Tables with optimized merges and partition pruning for fast performance streaming into Delta Lake.
Step 6: Create Delta Live Tables (Optional)
Delta Live tables (DLT) is a Databricks offering that allows for building reliable and maintainable pipelines with testable data processing. DLT can govern task orchestration, cluster management, monitoring, data quality, and error handling.
Striim’s Delta Lake Writer writes to tables in Databricks for both Azure and Amazon Web Services. Additional documentation on Delta Lake writer properties can be accessed here.
The recipe can be further augmented using Delta Live tables which simplifies ETL/ELT development and management with declarative pipeline development.
The main unit of execution in Delta Live tables is a pipeline which is a Directed Acycle Graph (DAG) linking multiple data sources. In this case, each table in a production environment can be pointed to an ADLS container.
Leverage Expectations which allows us to specify data quality controls on the contents of a dataset. Unlike the CHECK constraint, Expectations provide added flexibility to handle incorrect data based on the constraints that are set instead of killing the whole pipeline due to bad data.
Use Striim and Delta lake to create Streaming tables and views that reduce the cost of ingesting new data and the latency at which new data is made available leading to near real-time analytics.
Leverage streaming data from Striim and Spark jobs in Databricks by using the ADLS storage container from the above recipe as the Raw/Ingestion tables(Bronze layer), create Refined tables (Silver layer) which apply any Transformations and then create Feature/Aggregate Data Store (Gold layer) for advanced reporting and real-time analytics.
To know more about Databricks Delta live tables feel free to explore here.
How to deploy and run this Striim Application?
Step 1: Download the TQL files
The Striim application’s TQL file is available from our Github repository which can import and Deploy the app on your Striim server.
Step 2: Set up MongoDB Atlas account and cluster
The sample dataset is readily available with the cluster once it is active. Configure the access roles/permissions for the MongoDB cluster and configure the connection parameters in the Striim Application.
Step 3: Setup ADLS and Databricks cluster
Set up ADLS gen2 storage container through the Azure portal and use the Databricks notebook from the Github repository.
Step 4: Deploy the App and Run the Databricks notebook
Wrapping up: Start your free trial
The recipe highlighted how Streaming Data from High-performance databases like MongoDB can be handled seamlessly and leverage Striim’s CDC capability and Parquet formatter to help enable the creation of Delta tables in-place.
Leveraging MongoDB’s ability to handle different types of data and scale horizontally or vertically to meet users’ needs.
Striim’s ability to capture CDC data using MongoDB’s OpLog minimizes CPU overhead on sources with no application changes.
Use Striim’s Parquet formatter to convert Json events on the fly and leverage the Parquet file format that helps optimize the data. This helps in significantly reduce the Compute cost of using Databricks or any other application to convert the JSON data after it lands into Parquet.
Leverage the same ADLS container where the data lands instead of mounting the data into DBFS or any other Datawarehouse thereby reducing the amount of I/O costs which are crucial in any cloud-based environment.
Striim’s pipelines are portable between multiple clouds across hundreds of endpoint connectors including MongoDB, and Azure Cosmos, and also support other data warehouses including Google BigQuery, Snowflake, and Amazon Redshift.
Questions on how to use this recipe? Join the discussion on The Striim Community and also check out our other recipes here!”
As always, feel free to reach out to our integration experts to schedule a demo, or try Striim for free here.
Tools you need
Striim
Striim’s unified data integration and streaming platform connects clouds, data and applications.
Databricks
Databricks combines data warehouse and Data lake into a Lakehouse architecture
Azure ADLS Gen2
Azure ADLS Gen2 storage is built on top of Blob Storage and provides low-cost, file system semantics and security at scale.
MongoDB
NoSQL database that provides support for JSON-like storage with full indexing support.
Use cases
Integrating Striim’s CDC capabilities with MongoDB makes it very easy to rapidly expand the capabilities of real-time data with just a few clicks.
Striim’s additional components allow not only to capture real-time data, but also apply Parquet or Avro conversions on the fly before it even lands in the staging zone, thereby reducing the amount of data storage that is required.
The wide array of Striim’s event transformers makes it as seamless as possible with handling any type of sensitive data allowing users to maintain compliance norms on various levels.
Allow high-quality data into Databricks in Parquet format in real-time which can then be transformed via Spark code and integrate with Power BI or Tablueau for Visualizations.
Replicating changes and maintaining history in your warehouse with streaming change data capture
You don’t have to copy data or run expensive batch jobs to audit your data
Benefits
Reduce Costs
Run updates only when the data changes and not on fixed schedule
Avoid Maintainability Problems
Simplified Architecture that gives you correctness and avoids maintainability problems with batch/scheduled snapshots
Extend with Additional FunctionalityEasy to extend with additional functionality, e.g. Slack Notification when a customer changes their address and has an open order
On this page
Overview
Many companies need to maintain a history of changes on the lifecycle of their customers while keeping the latest ‘source of truth’. When this data is processed in an operational database (PostgreSQL, MySQL, MongoDB), the common method of doing the above is change data capture to a cloud data warehouse (Snowflake, BigQuery, Redshift). However there are challenges here: how do I use the same CDC stream to A) apply the changes as DML to a table in my warehouse and B) maintain a separate table to track the history WITHOUT copying data inefficiently or creating multiple CDC clients on the database (each client adding some processing overhead).
Striim is a unified data streaming and integration product that offers change data capture (CDC) enabling continuous replication from popular databases such as Oracle, SQLServer, PostgreSQL and many others to target data warehouses like BigQuery and Snowflake. The CDC capabilities of Striim makes it a powerful tool to track changes in real time whenever a table is altered.
In this recipe we have shown how we can use Striim to maintain historical records while streaming data that gets frequently updated. For example, when engineering teams have a production table that overwrites data, such as users in a CUSTOMERS table change their addresses and the table is updated with the new data. However, for tax and reporting purposes, a record of the customer’s previous addresses is required. We can use CDC to solve this without requiring engineering effort from the backend teams.
One possible solution is a Batch ETL process directly into Snowflake with dbt Snapshots running regularly to mimic a CDC-like process. The problem with this approach is that it only detects changes when it’s running. If a record changed twice between dbt Snapshots, then the first change is lost forever. To support the CDC-like behavior, you have to run your batch ETL more frequently in order to reduce (but not eliminate) the likelihood of missing a change between runs.
We can leverage Striim to generate a CDC feed from source database (eg. PostgreSQL) that captures all changes as they happen. All new and updated records are appended to an audit/history table and at the same time, we use Snowflake’s merge function to maintain an up-to-date list of current customer information.
The latter architecture gives correctness and avoids maintainability problems that occur in batch/scheduled snapshots. There is a reduction in cost as updates are run only when the data changes and not on a fixed schedule. The data pipeline is simpler with only one connector/CDC stream for incoming data. Last but not least, this architecture can be easily extended with additional functionality, e.g. Slack Notification when a change occurs.
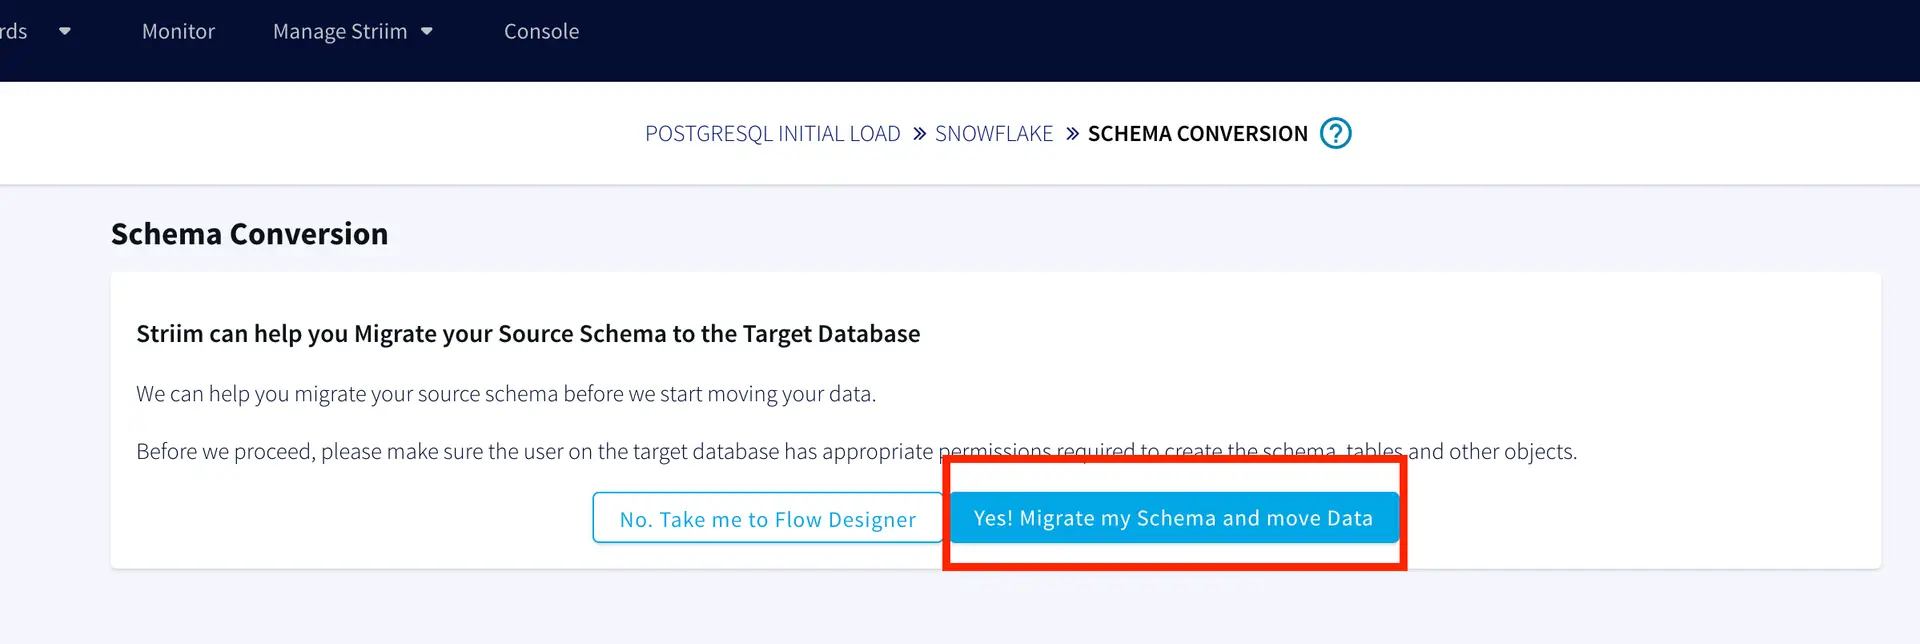
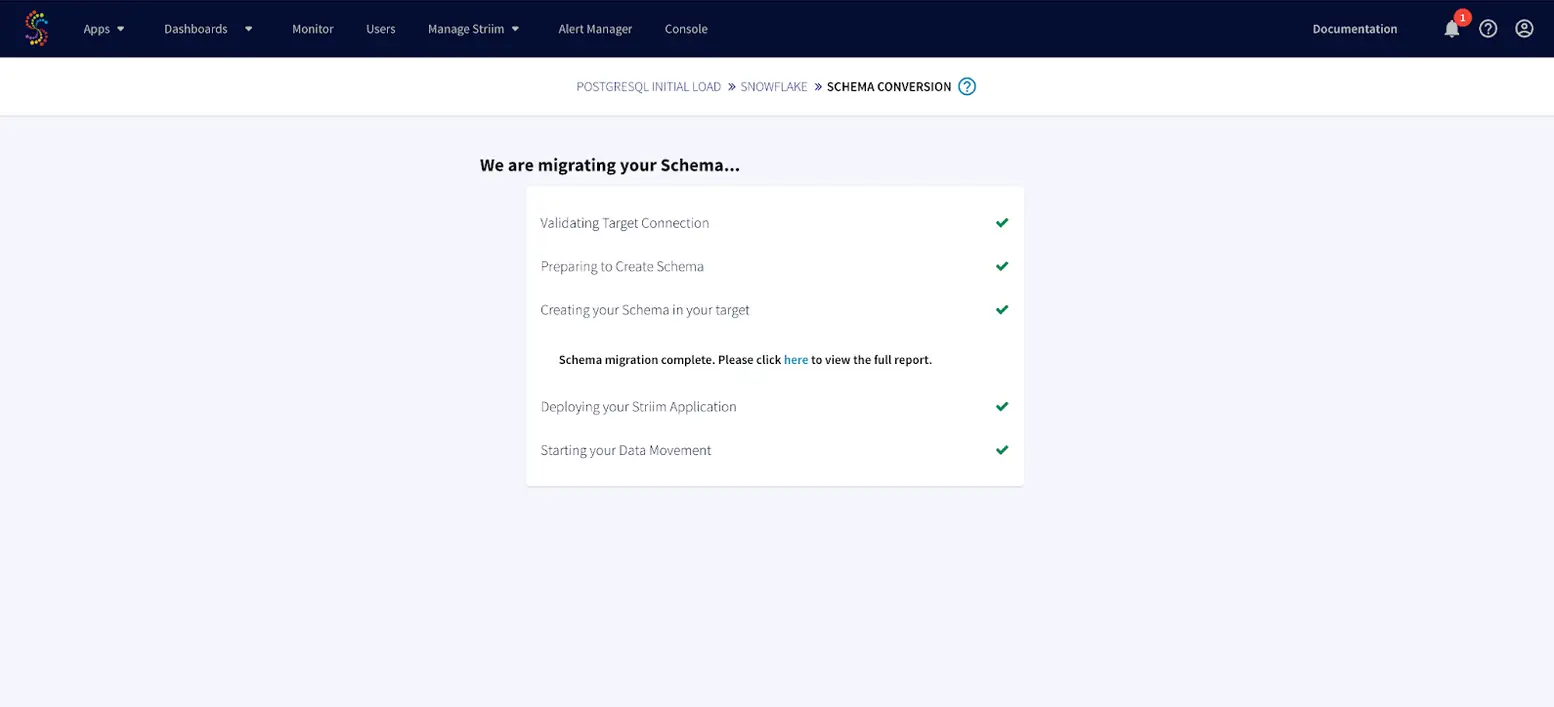
Please follow the steps below to set up your CDC source and configure the target table for both historical records table and most up-to-date table.
Core Striim Components
PostgreSQL Reader: PostgreSQL Reader uses the wal2json plugin to read PostgreSQL change data.
Stream: A stream passes one component’s output to one or more other components. For example, a simple flow that only writes to a file might have this sequence.
Snowflake Writer: Striim’s Snowflake Writer writes to one or more existing tables in Snowflake. Events are staged to local storage, Azure Storage, or AWS S3, then written to Snowflake as per the Upload Policy setting.
Step 1: Set up your Source Database
For this recipe, our source database is PostgreSQL. A table containing customer names and addresses is updated when a customer changes their address. It is very important to have a Primary Key column to capture DMLs like Update and Delete operations.
Step 2: Set up your Snowflake Targets
The target tables for this streaming application are hosted in snowflake data warehouse. There is an AUDIT table that stores all new as well as historical records for each customer and a second table called ADDRESS stores the most recent records for each customer.
To insert data into AUDIT table, we process the input stream with a Continuous Query to include operation time and Timestamp when CDC occurred using the metadata. The APPEND ONLY setting is set to True that handles the updates and deletes as inserts in the target.
With the default value of False, updates and deletes in the source are handled as updates and deletes in the target. With Append Only set to True, Primary key updates result in two records in the target, one with the previous value and one with the new value. For more information on Snowflake Writer, please follow the Striim documentation.
Step 3: Run the app and update your source table
Once the source and target adapters are configured, deploy and run the Striim app and update your source table to stream both updated and historical data into the target tables. You can download the app TQL file from our github repo. Perform the following DMLs on your source table:
Update address for ‘John Doe’ from ‘Franklin Street’ to ‘Monroe Street’
Insert a new record for customer ‘Zane Doe’
Delete the row containing information about ‘Zane Doe’
We can check the target table and preview the data stream between source and target adapters after each DML to confirm if the target table has been populated with desired records. As shown below, when a row is updated (Preview 3), an UPDATE operation on metadata is streamed, similarly for INSERT (Preview 4) and DELETE (Preview 5), operations in the source table are reflected.
The ADDRESS table in the snowflake data warehouse has the most updated record whereas AUDIT table stored all the previous records.
Setting Up the Log CDC Application
Step 1: Set up the source table on Postgres
Create a new table on your source Postgres database with the following query
CREATE TABLE Address(
“Serial” integer,
name TEXT,
address TEXT,
PRIMARY KEY (“Serial”)
);
Step 2: Set up the target tables on Snowflake
Create an ADDRESS table with the same column names and data types as your source table and AUDIT table with additional columns for operation and timestamp on snowflake.
Step 3: Configure your source and target adapters on Striim
You can download the TQL file from our github repository and deploy it by configuring your source and target as explained in this recipe.
Step 4: Perform DML operations and stream records to target tables
Deploy and run the Striim app and replicate most updated as well as historical data on your target tables.
Wrapping Up: Start your Free Trial Today
The above tutorial describes how you can use Striim to replace the Batch ETL process with a low cost CDC for audit logs. Striim’s pipelines are portable between multiple clouds across hundreds of endpoint connectors. You can create your own applications that cater to your needs. Please find the app TQL and data used in this recipe on our github repository.
As always, feel free to reach out to our integration experts to schedule a demo, or try Striim for free here.
Tools you need
Striim
Striim’s unified data integration and streaming platform connects clouds, data and applications.
PostgreSQL
PostgreSQL is an open-source relational database management system.
Snowflake
Snowflake is a cloud-native relational data warehouse that offers flexible and scalable architecture for storage, compute and cloud services.
Real-Time Customer Analytics with Change Data Capture + Streaming SQL Joins
Use Striim for real-time analytics with in-flight data processing and transformation
Benefits
Ensure Data Delivery SLAs
Monitor data delivery in real time to ensure it meets Service Level Agreements with your stakeholders
Visualize Data with Striim Dashboards
Get real-time insights for immediate decision-making
Reliable Real-Time Analytics Stream real-time data for operational analytics knowing your teams won’t fall behind
On this page
Overview
Striim is a unified data streaming and integration product that offers change data capture (CDC) enabling continuous replication from popular databases such as Oracle, SQLServer, PostgreSQL and many others to target data warehouses like BigQuery and Snowflake. Striim is a powerful tool for real-time analytics, allowing you to stream data in real time or near-real time from various sources, and analyze and transform it into a format that is readily understandable by end users.
Real-time analytics plays a major role in retail industries. For example, a multinational retail chain keeps a centralized record of all its branches in different geographical locations and needs access to real-time insights for immediate decision-making. Data streaming and integration platforms like Striim perform in-flight data processing such as filtering, transformations, aggregations, masking and enrichment of streaming data before delivering it with sub-second latency to diverse environments in the cloud or on premises. The data can be delivered on a dashboard, report or any other medium. Managers and analysts can view real-time dashboard data to oversee the supply chain and strategize demand and supply.
The following recipe demonstrates how to stream retail data from a PostgreSQL database, process it in-flight using Streaming SQL, cache, and window components in a Striim application, and deliver it to a dashboard for analysis.
Core Striim Components
PostgreSQL Reader: PostgreSQL Reader uses the wal2json plugin to read PostgreSQL change data.
Stream: A stream passes one component’s output to one or more other components. For example, a simple flow that only writes to a file might have this sequence.
Cache: A memory-based cache of non-real-time historical or reference data acquired from an external source, such as a static file of postal codes and geographic data used to display data on dashboard maps, or a database table containing historical averages used to determine when to send alerts. If the source is updated regularly, the cache can be set to refresh the data at an appropriate interval.
Continuous Query: Striim Continuous Queries are continually running SQL queries that act on real-time data and may be used to filter, aggregate, join, enrich, and transform events.
Window: A window bounds real-time data by time, event count or both. A window is required for an application to aggregate or perform calculations on data, populate the dashboard, or send alerts when conditions deviate from normal parameters.
WAction and WActionStore: A WActionStore stores event data from one or more sources based on criteria defined in one or more queries. It is an incrementally maintained view.
Dashboard: A Striim dashboard gives you a visual representation of data read and written by a Striim application
Simplified Diagram of the Striim App
The Retail app in this recipe reads data from PostgreSQL Database and processes it into a usable format. The data is enriched using a cache containing customer details and then transformed using Continuous Queries. The transformed data is streamed with a one-minute window on order time which is further processed and stored in WActionStores. The data from the WAction component is used to populate a dashboard that shows top spenders, referrals and counties. In the production environment, data will be continuously updated on the source database which could be read with Striim’s Change Data Capture for real-time insights.
Step 1: Read Retail Data from Postgres Reader and process using CQ
For this recipe we are reading data from Postgres Database. The dataset can be found on our github repo. The data is read once and queried in a one-minute window. In production, this would be live streaming data from different sources at different locations. The metadata is processed and enriched using customer cache data and the Continuous Query Striim component.
Postgres Source and csv cache: We specify the endpoints, username and password of the source Postgres database. The Cache will cache a dataset in Striim Cloud so it can be joined with a Stream using SQL.
Initial Data Processing and Enrichment: The Continuous Query, LineCSVtoData8 is used to change the datatype for each field in usable format and merge the customer name from cache.
Step 2: Split data into one-minute window on Order time
The processed data stream is split into one-minute chunks. The Window component in Striim creates a bounded dataset by a specified number of events, a period of time, or both. In this recipe, the incoming steam contains order data. There are two window components as shown below. Both the windows have jumping mode which means data is periodically updated for 1 minute interval. For RefWindow1Mins window, we have partitioned the datastream by reference link for every county. The partition by option on a time based window starts the timer separately for each. field value. The OrdersWindow1Mins partitions the data stream on countyID.
The timeout of one minute under Advanced Window settings forces the window to jump within a set period. To prevent the window from opening over longer time gaps between events, a timeout value is provided.
Step 3: Aggregate data using CQ on various fields
In this section continuous queries are written on orders and referral streams to aggregate data by top referral urls, top selling counties, top customers, and loyal customers. The data is then stored in the WAction component which is used to populate the Striim dashboard.
Top Referral links: The CQ counts the number of orders placed through various referral links in each county. The aggregated data is then stored in a WAction store which will be used in the Striim dashboard.
Aggregate County: In this query the total order amount and order count from each county is recorded.
Top County: In this query the maximum order amount from customers in every county is recorded.
Top Customer: In this app, the order count and order amount of each customer is queried which is then partitioned to 3 events window with partition on customer key. The total order amount by each customer in a 3 event window is calculated. The data is then stored in WAction to analyze the top loyal customers with repeat orders.
Step 4: Populate the dashboard with data from WAction Stores
In this step a Striim dashboard is configured. Click on the Dashboards option on your service page as follows:
For this recipe, we have created two bar charts, one pie chart and one table. There are many more options to visualize data on the Striim dashboard. Please follow our dashboard guide to learn about various dashboard options in Striim.
Top 10 Spenders:
The Top 10 Spender table shows the county id, customer name and order amount of customers with the highest order amount. The data is pulled from WATOPPRELOYALCUST WAction store and ordered by orderamount.
Top 10 County IDs:
This is a bar chart that reads data from WATOPCOUNTY and orders by amount sold in each county.The top 10 county ids with total order amount are shown in the bar chart.
Top 10 Referral Links-Global:
This barchart shows the top 10 referral links through which orders are placed.
Referrals- Santa Clara (County ID: 43)
This pie chart shows the referral links for order counts sold in Santa Clara county (County id: 43). Most orders were placed through google.com, instagram and recode.net.
Final App and Dashboard
How to deploy and run this Striim Application?
Step 1: Download the TQL files
You can download the TQL files from our github repository. Deploy the Retail app on your Striim server.
Step 2: Set up the Postgres Source
The csv data used in this recipe can be downloaded from our github repository. You can use the data to populate tables in your own Postgres database. Configure the source adapter with Postgres endpoint, username, password and relevant tables.
Step 3: Deploy and Run the app
Deploy and run the retail app.
Step 4: Populate the dashboard
You can find the .json file for the dashboards in our github repository. Deploy the dashboard to visualize the retail dataset.
Wrapping Up: Start your Free Trial Today
The above tutorial describes how you can use Striim’s real-time data streaming feature to process, aggregate and enrich in-flight data and display it through a Striim dashboard for real-time analytics. Striim’s pipelines are portable between multiple clouds across hundreds of endpoint connectors. You can create your own applications and dashboards that cater to your needs. Please find the app TQL and data used in this recipe on our github repository
As always, feel free to reach out to our integration experts to schedule a demo, or try Striim for free here.
Tools you need
Striim
Striim’s unified data integration and streaming platform connects clouds, data and applications.
PostgreSQL
PostgreSQL is an open-source relational database management system.
Stream data from Salesforce and Oracle to Azure Synapse
Benefits
Analyze real-time operational, and transactional data from Salesforce and Oracle in Synapse.
Leverage Synapse for instant scalability and accelerate Analytics and reporting
Use the power of Real-Time Data Streaming to build Real-Time analytical and ML models with Synapse
On this page
The advent of the Digital age created the need for robust and faster analytics, an essential part of every organization’s growth and success. Analysts and business executives rely on real-time data to derive insights into their business decisions.
Most of the pre-existing data pipelines in the industry are ETL based which gets bottlenecked with the Data transformation operations like aggregating, joining and other compute activities given the amount of data that is being generated or consumed. Data transformation is usually time-consuming and complex which has only increased with more streaming data sources that have come into play.
Why Salesforce?
Among the many data sources widely used, Salesforce has become one of the pivotal tools as part of any business process management by uniting the sales, service, marketing, and IT teams within a single shared view of customer information.
Why Striim with Salesforce?
Striim makes it easy to migrate data from Salesforce in minutes. After your data migration is complete, Striim can continuously sync Salesforce and a wide array of data sinks or targets with real-time data integration using change data capture.
This allows you to build real-time analytics and machine learning capabilities alongside Operational systems with minimal impact.
Why is Azure Synapse Analytics considered a powerhouse among data warehouses?
Synapse sets itself apart by providing key features such as Azure Synapse Link which provides an end-to-end view of your business by easily connecting separate Microsoft data stores and automatically moving data without time-consuming extract, transform and load (ETL) processes. Synapse has an added advantage of integrations with Azure databricks, Spark, T-SQL, and Power BI all while using the same analytics service.
Optimizing pipelines through DB cache
In this recipe, we’ll explore how to create Salesforce and Oracle as a data sources and integrate them with Striim and Synapse. This recipe tutorial shows how retail order data in Salesforce is combined with sensitive PII data of customers stored in Oracle and loaded into Synapse for analytics. More often in production use cases implemented in real life, some of the data sets used to generate analytics are static and don’t require a constant refresh. Most data sets can be categorized into daily refresh or weekly refresh depending on the characteristics and frequency at which data is being generated. To optimize these kinds of pipelines, we are going to use Striim’s DB cache which loads the static/non-real-time historical or reference data acquired from Oracle into the cache. This cached data is typically used by queries to enrich real-time data. If the source is updated regularly, the cache can be set to refresh the data at an appropriate interval.
Oracle DB cache can be replaced with Oracle CDC as a source if the data source is more real-time oriented.
Feel free to sign up for a Free trial of Striim here
Step 1: Setting up Salesforce as a source
Login to your Salesforce and get the following connection parameters that are required for the Salesforce adapter in Striim.
Firstly, We would need the security token for the salesforce account, which is usually generated during account sign-up and received via email. We can also reset the security token by navigating to the User menu → My Settings →Under Personal tab → Reset My Security token.
The sample data used in Salesforce connected app for this tutorial can be found in this github repository.
The easiest way to get the API endpoint is from the homepage after we log in to the salesforce profile.
We can also verify the API endpoint (instance_url) from the curl command which generates the Authentication token. Send a request to the Salesforce OAuth endpoint using this cURL template:
Replace MyDomainName with the domain for your Salesforce org. Replace consumer-key and consumer-secret with the consumer key and consumer secret of your connected app. Replace
my-login@domain.com and my-password with your login credentials for your Salesforce org and also append the security token with the password. If the request was unsuccessful and you’re unable to log in, see Troubleshoot Login Issues in Salesforce Help.
If the request was successful, the response contains an access token that you can use to access your data in Salesforce.
Step 2: Configure the Salesforce Adapter in Striim
Login to your Striiim cloud instance and select Create App from the Apps dashboard.
Click on Start from scratch to build using the flow designer and name the application. Search for Salesforce under the search menu.
Enter the values and connection parameters derived from Step 1 of the Salesforce setup. The Consumer key and consumer secret are the client id and client secret from the curl command used above to generate the Auth token.
Note: Enable Auto auth token renewal under the settings. If not enabled, the app would crash since the curl command needs to be rerun manually to generate a new auth token.
Step 3: Configure the query to pull Salesforce records
Select the Continuous Query (CQ) processor from the drop-down menu and pass the following query to pull salesforce data from the Connected app that has been created. The query can be found in the following github repository.
Next, we search for Stream base component from the drop-down menu and configure the fields/columns for the next CQ processor.
Create a new Type , for example l2_type and add the fields or column names from the salesforce connected app and configure the datatype respectively.
Select the DB Cache from the drop-down menu and configure the Oracle database connection parameters.
Create a new type and add the respective field and datatypes for the fields.
The Oracle sample in this tutorial stores the sample data for customers’ sensitive information and can be found in this github repository.
Step 5: Configure the Query to pull Salesforce and Oracle data in real-time
Insert another CQ processor from the Components menu and pass the following query to pull the combined data of Oracle and salesforce data. The query can be found in the following github repository.
Create a new Stream from the Base components and create a new type that contains the enriched fields from oracle and salesforce and click Save.
Step 6: Configure the Synapse Target
Search for the Synapse Target component and select the input stream of the above CQ component.
For Synapse, The connection URL needs to be in the following format:
Enter the account name and Account access key for the ADLS storage used by synapse.
Make sure the table already exists in Synapse and enter the target table name. The query to create the target table is available in the github repo
Set the Storage access driver type to ABFSS since the dedicated Synapse pool is using ADLS.
Once the app is configured, Click on the Deploy app from the top menu and Select Start app
The data in synapse can be queried using Synapse studio or through Azure data studio.
Step 7: (Optional) Performing Spark analysis through in-built Synapse Spark pool
Create a new spark pool with the configuration of your choice. For this tutorial, we can choose one with the minimum requirements.
Once the spark cool is available, we can perform spark analytics on the data through the synapse itself.
Wrapping up: Start your free trial
Create a new spark pool with the configuration of your choice. For this tutorial, we can choose one with the minimum requirements.
The tutorial showed how data from multiple sources like Salesforce and Oracle can be combined using the Striim app and integrated with Synapse Datawarehouse. By Constantly moving real-time data into Synapse, we can build analytics or Machine learning models through spark within Synapse with minimal impacts on current systems with unparalleled performance.
Striim’s pipelines are portable between multiple clouds across hundreds of endpoint connectors including MongoDB, and Azure Cosmos, and also support other data warehouses including Google BigQuery, Snowflake, and Amazon Redshift.
As always, feel free to reach out to our integration experts to schedule a demo, or try Striim for free here.
Tools you need
Striim
Striim’s unified data integration and streaming platform connects clouds, data and applications.
Oracle
Oracle is a multi-model relational database management system.
Salesforce
Salesforce is a popular CRM tool for support, sales, and marketing teams worldwide
Azure Synapse
Azure Synapse Analytics is a limitless analytics service that brings together data integration, enterprise data warehousing, and big data analytics
Use cases
Integrating Striim’s CDC capabilities with Salesforce makes it very easy to rapidly expand the capabilities of a CRM data with just a few clicks.
Striim’s additional components allow not only to capture real-time data, but also apply transformations on the fly before it even lands in the staging zone, thereby reducing the amount of data cleansing that is required.
The wide array of Striim’s event transformers makes it as seamless as possible with handling any type of sensitive data allowing users to maintain compliance norms on various levels.
Allow high-quality data into Synapse which can then be transformed via Spark code and integrate with Power BI or Tablueau for Visualizations.
Use Striim’s Streaming SQL to monitor and alert on lag between source and target systems
Benefits
Ensure Data Delivery SLAs
Monitor the data delivery in real-time to ensure it meets Service Level Agreement with your stakeholders
Simple Notifications in Email or Slack
Stream real-time alerts on stale data directly to your data teams via email or slack
Reliable Real-Time Analytics Stream real-time data for operational analytics knowing your teams won’t fall behind
On this page
Overview
Striim is a unified data streaming and integration product that offers change data capture (CDC) enabling continuous replication from popular databases such as Oracle, SQLServer, PostgreSQL and many others to target data warehouses like BigQuery and Snowflake. Data loses its value over time and to make the most out of it, real-time analytics is the modern solution. It is important for streaming pipelines to deliver real-time data with desired SLAs required for the target application.
In this application, the OP will monitor the target and generate an output stream with monitoring metrics, such as target table names, last merge time, and lag in minutes. These monitoring metrics can be used to trigger conditional flows based on business needs. In this case, we are using this to alert specific users or integrated Slack channels.The service level of this tool in terms of data freshness is in minutes and so it will only indicate the possibility of loss or delay in minutes.
The table monitoring application can be paired with any striim app with different targets. The coupled application will alert customers if their expected data rates are not being achieved on the target component of the Striim app. This way users can identify tables that are stale for analytics use cases and triage.
Core Striim Components
PostgreSQL CDC: PostgreSQL Reader uses the wal2json plugin to read PostgreSQL change data. 1.x releases of wal2jon can not read transactions larger than 1 GB.
BigQueryWriter: Striim’s BigQueryWriter writes the data from various supported sources into Google’s BigQuery data warehouse to support real time data warehousing and reporting.
Open Processor: A Striim open processor contains a custom Java application that reads data from a window or stream, processes it, optionally enriching it with data from a cache, and writes to an output stream.
Streaming App
The utility tool can be paired with any Striim app with a variety of targets supported by Striim. For this recipe, our app replicates data from Postgres CDC to BigQuery. Please follow this recipe to learn how to set up a CDC user and configure Postgres CDC to BigQuery streaming application.
Monitoring Tables
There are four major components of the utility tool that couples with the user’s streaming app to analyze and alert on database tables that are falling behind their data delivery SLA to respective targets.
A Trigger input stream invokes the monitoring Open Processor at specified time intervals. The Open Processor that contains a custom Java code will monitor the target component and emit monitoring metrics as stream for the next component (in this case, Continuous Query) in the application flow The Continuous Query component then compares the table lag condition (specified in the user-provided spreadsheet) with the monitoring metrics from the OP. Finally, mailer target component will send alerts when the SLA condition has not been met. The following functional diagram shows the architecture of the Table-level monitoring utility system.
Here is the Striim Utility app that fetches data from target and compares it against a benchmark to ensure table SLAs. You can download the TQL file from our github repository.
Trigger Input Stream
The Trigger input stream (TableLagHBCQ) passes a heartbeat (in this case 5 seconds) that acts as a trigger to allow the Open Processor to run its cycles periodically. This periodic time interval can be modified by the user.
Open Processor
The OP component is the heart of this utility tool. It is designed by Striim’s engineering team for the purpose of table-level lag monitoring. It is in the form of a .scm file. Loading an Open Processor file requires a Global.admin role. Please reach out to cloud_support@striim.com to load the .scm file downloaded from our github repo. To upload the .scm file click on My files in the upper right corner and select the file from your local computer.
Once the file is uploaded, copy the file path and paste it into LOAD/UNLOAD OPEN PROCESSOR under Configuration -> App Settings as shown below:
Next, the user needs to configure the Open Processor Component inside the TQL file downloaded from our github account. The TQL file from the git repo should ideally look like this:
The user needs to add the OP component from the list of components in Striim:
The configuration of OP component is shown below:
Lag Threshold CSV and Continuous Query
This part of the application reads from a csv file uploaded in the same way as the .scm file in the previous step that contains the list of Target Tables, lag threshold as per table SLAs and email in case of email adapter as the mailer alert. A sample file can be found in the github repository. The first column specifies all the table names that are monitored. The second column contains the SLA in minutes. The third column is used for email as mailer alert and can be skipped for slack alert.
If you are setting up the app from scratch, use a File reader component and specify the file path with DSVParser as shown below:
The Continuous Query has already been written for users in our tql file. It returns an alert message when the output lag time from the OP’s monitoring metrics is greater than the lag threshold specified by the user.
Slack Adapter as Mailer Target Component
For this use case, we have configured a Slack target component. Please follow the steps in this link to configure slack to receive alerts from Striim. There is an additional Bot Token scope configuration for incoming-webhook. Please refer to the next image for scopes section.
Configure the slack adapter with the channel name and oauth token as shown below:
Step 2: Set up the source and Target for streaming app
You can use any Striim app of your choice and monitor the data freshness. Please checkout our tutorials and recipes to learn how to set up streaming applications with various sources and targets.
Step 3: Edit the csv file
The first column of lagthreshold csv file lists the names of target tables that are monitored and second column contains the SLA in minutes. The third column is optional and is used in case of email alerts. Upload the csv file and enter the filepath in the FileReader component of your app as explained in ‘Lag Threshold CSV and Continuous Query’ section of this recipe
Step 4: Upload the .scm file
If you do not have Global.admin permission, please reach out to cloud_support@striim.com to upload the OP .scm script. Once the .scm file is uploaded, follow the steps in ‘Open Processor’ section of this recipe to configure the open processor component.
Step 5: Set up the Slack Channel
Configure a slack channel with correct Bot Token and User Token Scopes as explained above. You can follow this link to set up the slack alerts. Generate the oauth token for your channel and configure the slack mailer component of the lag monitor app.
Next, you are ready to monitor the data rates through slack alerts for your streaming app.
Running the Application
Next, deploy and run the lag monitor app. When the streaming app (Postgres to BQ) is deployed, run, quiesced, stopped, halted or crashed, OP will be able to retrieve Monitoring Report and Slack alerts will be sent through mailer components accordingly. Here is a sample Slack alert notification for a lagging table.
Wrapping Up: Start your Free Trial Today
Our tutorial showed you how a striim utility tool created with an Open Processor component can help customers monitor table SLAs. The Slack alerts make it very easy to track data delivery rate and take action immediately in case of delays.
As always, feel free to reach out to our integration experts to schedule a demo, or try Striim for free here.
Tools you need
Striim
Striim’s unified data integration and streaming platform connects clouds, data and applications.
PostgreSQL
PostgreSQL is an open-source relational database management system.
Google BigQuery
BigQuery is a serverless, highly scalable multicloud data warehouse.
Building Real-Time Data Products on Google Cloud with Striim
Leveraging Striim to create decoupled, decentralized real-time data products in Streaming SQL
Benefits
Domain Ownership
Transform raw change data capture logs to domain-specific business events in real-time
Decentralized Data
Use Striim to decentralize your data operations and provide self-service access to domain events
Data Contracts
Enforce contracts on schemas and data delivery SLAs across multiple business groups while minimizing load on the database
On this page
Overview
The Data Mesh – a concept coined by Zhamak Dehghani – is emerging as a popular set of principles and methods to manage enterprise data with product-thinking and domain ownership. Without diving into the details of Data Mesh, we want to highlight the importance of self-service data access, generalizing data for consumption, and sparing superfluous technical details of sourced data from analytical models.
While monolithic data operations accelerated adoption of analytics within organizations, centralized data pipelines quickly grew into bottlenecks due to lack of domain ownership and focus on results.
To address this problem an approach called Data Mesh and tangential Data Mesh data architectures are rising in popularity. A data mesh is an approach to designing modern distributed data architectures that embrace a decentralized data management approach.
In the following, we will dive into ‘Collaborating operational systems as data sources’ of a data product using Chapter 12 of Zhamak Dehghani’s Data Mesh book as a reference. To be clear: this recipe is NOT labeling itself as a way to ‘build a data mesh’, rather how teams can architect a source-aligned data product with operational databases as the source which supports a Data Mesh strategy. The other goal here is to create source aligned analytical data from an operational database rather than directly exposing change data capture logs to the analytical users.
“Common mechanisms for implementing the input port for consuming data from collaborating operational systems include asynchronous event-driven data sharing in case of modern systems, and change data capture.”. (Dehghani, 220)
In this data mesh use-case, we have shown how Striim aides decentralized architecture in the form of multiple decoupled Striim Applications with different data processing logic and delivery SLAs. We can leverage Striim for change data capture and persisted streams that can be consumed by separate targets to create data products.
The application created in this tutorial has five components serving five different teams. LCR data is read from a source database which is replicated and transformed in different streams. The data stream is persisted with a kafka message broker. The business architectural view of this application is shown below where Striim delivers real-time data to multiple consumers.
Benefits of Using Data Mesh
Domain Oriented Decentralization approach for data enables faster and efficient real-time cross domain analysis. A data mesh is an approach that is primitively based on four fundamental principles that makes this approach a unique way to extract the value of real-time data productively. The first principle is domain ownership, that allows domain teams to take ownership of their data. This helps in domain driven decision making by experts. The second principle projects data as a product. This also helps teams outside the domain to use the data when required and with the product philosophy, the quality of data is ensured. The third principle is a self-serve data infrastructure platform. A dedicated team provides tools to maintain interoperable data products for seamless consumption of data by all domains that eases creation of data products. The final principle is federated governance that is responsible for setting global policies on the standardization of data. Representatives of every domain agree on the policies such as interoperability (eg: source file format), role based access for security, privacy and compliance
Data Contracts
Data Contracts are another pattern gaining popularity and can be built on top of Data Mesh’s innately decentralized, domain specific view of the world. We will not focus on how to build the Data Contracts in this specific recipe, but you can learn about how Striim’s unified change data capture and streaming SQL layer allows you to
Capture raw changes from your database with low impact CDC
Set parameters for Schema Evolution based on internal data contracts
Propagate compliant schema changes to consumers on an independent, table specific basis
Alert directly to Slack and other tools when schema contracts are broken
Data Contracts with Striim
Schematic Architecture to support Data Mesh Pattern
The data mesh shown in the next sections has six apps that is fed data from the same source through kafka persisted stream
App1: Production Database Reader
This application reads LCR data from a Postgres database and streams into a kafka persisted stream
App2: Real-Time BigQuery Writer
This application transforms data in-flight and writes to a BigQuery data warehouse with 30 secs SLA. The team needs the real-time transformed data for inventory planning.
App3: Near Real-Time BigQuery Writer
This application reads fast table with 5 min SLA and medium/near real-time tables with 15 min SLA and write into BigQuery tables with the respective upload policy
App4: Cloud Database Replication
This application replicate the incoming LCR data into a Google Spanner Database in real time
App5: A/B Testing Query Logic
This application compares data from two different version of CQ to find the best data that can be ingested to a model that forecasts average order amount
App6: Pub/Sub
This application records all the order values larger than $500 and writes it to an existing topic in Google cloud Pub/Sub
Core Striim Components
PostgreSQL CDC: PostgreSQL Reader uses the wal2json plugin to read PostgreSQL change data. 1.x releases of wal2jon can not read transactions larger than 1 GB.
Stream: A stream passes one component’s output to one or more other components. For example, a simple flow that only writes to a file might have this sequence
Continuous Query : Striim Continuous queries are are continually running SQL queries that act on real-time data and may be used to filter, aggregate, join, enrich, and transform events.
Window: A window bounds real-time data by time, event count or both. A window is required for an application to aggregate or perform calculations on data, populate the dashboard, or send alerts when conditions deviate from normal parameters.
Event Table: An event table is similar to a cache, except it is populated by an input stream instead of by an external file or database. CQs can both INSERT INTO and SELECT FROM an event table.
BigQueryWriter: Striim’s BigQueryWriter writes the data from various supported sources into Google’s BigQuery data warehouse to support real time data warehousing and reporting.
Google Pub/Sub Writer: Google Pub/Sub Writer writes to an existing topic in Google Cloud Pub/Sub.
Spanner Writer: Spanner Writer writes to one or more tables in Google Cloud Spanner.
Launch Striim Cloud on Google Cloud
The first step is to launch Striim Cloud on Google Cloud. Striim Cloud is a fully managed service that runs on Google Cloud and can be procured through the Google Cloud Marketplace with tiered pricing. Follow this link to leverage Striim’s free trial for creating your own data-mesh. You can find the full TQL file (pipeline code) of this app in our github repo.
App 1: Production Database Reader
The first app reads the logical change streams from the production database into a ‘persistent stream’ that persists for 7 days. In this use case real-time Retail data is stored and is streamed from a Postgres database. The data consists real-time data of store id, skus and order details at different geographical locations.
Source Reader
Please follow this recipe to learn about how to set up a replication slot and user for a Postgres database that reads Change Data Capture in real-time.
Persistent Stream:
Striim natively integrates Apache Kafka, a high throughput, low-latency, massively scalable message broker. Using this feature developers can perform multiple experiments with historical data by writing new queries against a persisted stream. For a detailed description of this feature follow this link.
App 2: Real Time BigQuery Writer
In this application, the team needs inventory updates from each state in real time. The team takes care of the transportation of various different skus and does the inventory planning for each state to meet the forecasted demand. The application has a strict policy where real-time data must be available in BigQuery within 30 seconds. A Continuous Query transforms the data in-flight for analytics-ready operations rather than transforming in the warehouse.
The data is read from Kafka persisted stream, transformed in-flight and streamed to BigQuery target tables. To know more about how to set up a BigQuery target for Striim application, please follow this recipe.
App 3: Near Real-Time BigQuery Writer
In app 3 fast tables are selected from LCR (Logical Change Record) streams with 5 minute upload policy and medium/near-real time SLA tables are selected and written to BigQuery within 15 minutes upload policy. In this use case the Store activity data such as store id, order amount in each store and number of orders in each store are updated within 5 minutes whereas Product Activity such as number of orders for each sku are updated every 15 minutes on BigQuery table. This helps the relevant team analyze the store sales and product status that in turn is used for inventory and transportation planning.
App 4: Cloud Database Replication
For this app, the team needs real-time business data to be replicated to Spanner on GCP. The CDC data is read from Kafka persisted stream and replicated to Google Cloud Spanner.
App 5: A/B Testing CQ Logic
In this app, the team performs an experiment on stream with two different SLAs. The idea is to compare the average order amount of each state obtained from a 30 seconds window stream and 1 minute window stream for forecasting average order amount. The forecasting model is applied on each data stream to find out the best SLA for forecasting average order amount.The updated data is stored in an event table which can be read by the analytics team for A/B testing.
Continuous Query and Event Table
App 6: Google Pub/Sub Messaging App
In this app, the user wants to get a notification when a high value order is placed. The data is transformed in-flight using Continuous Query and all the orders greater than $500 are streamed into a google pub/sub topic which can be further subscribed by various teams.
Continuous Query and Pub/Sub Target Configuration
The topic is configured in Google Pub/Sub and the subscribers can pull the messages to see each new entry.
Running the Striim Pipelines
The following image shows the entire data mesh architecture designed using Striim as the streaming tool that replicated data to various targets with SLAs defined for each application.
Setting Up PostgreSQL to BigQuery Streaming Application
Step 1: Download the data and Sample TQL file from our github repo
You can download the TQL files for streaming app our github repository. Deploy the Striim app on your Striim server.
Step 2: Configure your Postgres CDC source
Set up your source and add the details in striim app
Step 3: Configure your BigQuery Targets
Add all the targets in this decentralized data-mesh application
Step 4: Set up Google Pub/Sub
Set up Google cloud Pub/Sub and add the details on Google Pub/Sub Writer component
Step 5: Set up Google Spanner
Set up Google Spanner and configure Spanner Writer Component on Striim app
Step 6: Deploy and run your Striim Data Mesh app
Run your app for decentralized real-time data streaming
Wrapping Up: Start your Free Trial Today
The above tutorial describes each component of a decentralized application in detail. As demonstrated, Striim’s pipelines are portable between multiple clouds across hundreds of endpoint connectors.
As always, feel free to reach out to our integration experts to schedule a demo, or try Striim for free here.
Tools you need
Striim
Striim’s unified data integration and streaming platform connects clouds, data and applications.
PostgreSQL
PostgreSQL is an open-source relational database management system.
Google BigQuery
BigQuery is a serverless, highly scalable multicloud data warehouse.
Google Cloud Pub/Sub
Google Cloud Pub/Sub is designed to provide reliable, many-to-many, asynchronous messaging between applications.
Google Cloud Spanner
Spanner is a distributed, globally scalable SQL database service
Recover your CDC pipeline on Striim after planned downtime or cluster failure with no loss of data
Use Striim to recover or autoresume your data stream after server failure
Benefits
Restart your data pipeline after planned or unplanned failure from where it left off.
Resume data streaming automatically by assigning retry interval for planned outages
Avoid duplicate data from source to target table after recovery from CDC pipeline failure
On this page
Overview
Striim is a next generation unified data streaming product that offers change data capture (CDC) from popular databases such as Oracle, SQLServer, PostgreSQL and many others. Server downtime is defined as the amount of time organizations are offline. This is an unavoidable event for most companies and can be either planned due to maintenance or IT-related tasks or unplanned due to system crashes or connectivity issues.
Data Pipelines are majorly affected by server failovers. In 2009, PayPal’s network infrastructure faced a technical issue, causing it to go offline for one hour. This downtime led to a loss of transactions worth $7.2 million. In these circumstances real-time streaming with a strong recovery feature is one of the most efficient solutions.
With few limitations, Striim applications can be recovered after planned downtime or most cluster failures with no loss of data. In the following recipe, we have shown how to enable ‘RECOVERY’ and ‘AUTO RESUME’ features in Striim that can be utilized to handle failovers along with real-time streaming. Striim allows data pipelines to pick up from where it left during the failover, thus avoiding loss of data or duplicates in the target table. Please find the github link for this application here.
Core Striim Components
PostgreSQL CDC: PostgreSQL Reader uses the wal2json plugin to read PostgreSQL change data. 1.x releases of wal2jon can not read transactions larger than 1 GB.
Stream: A stream passes one component’s output to one or more other components. For example, a simple flow that only writes to a file might have this sequence
Snowflake Writer: Striim’s Snowflake Writer writes to one or more existing tables in Snowflake. Events are staged to local storage, Azure Storage, or AWS S3, then written to Snowflake as per the Upload Policy setting.
Enabling Recovery from System Failures
Striim supports recovery from system failures through Recovery and Autoresume features. For recovery of WAction stores, persistence streams must be enabled on every WAction store within the Striim application. Before enabling Recovery, create your app using flow designer. In the following use-case, our source is postgres CDC and target is Snowflake. You can refer to our recipes and tutorials for detailed steps on creating striim app from flow designer, both using wizard or from scratch.You can configure the Recovery and Autoresume setting from flow designer as follows:
On the upper right corner under app configuration -> App settings, specify the time interval for ‘RECOVERY’.With this setting, Striim will record a recovery checkpoint every ten seconds (or time specified by the user), provided it has completed recording the previous checkpoint. When recording a checkpoint takes more than ten seconds, Striim will start recording the next checkpoint immediately. When the Striim application is restarted after a system failure, it will resume exactly where it left off.
Running the Streaming App before Failover
The postgres CDC to Snowflake streaming application is deployed and run. When one row is inserted to the source table, it is replicated into the target table.
Running the Streaming App after Failover
When a failover occurs, the app stops and the last checkpoint is recorded. When recovery is enabled, DatabaseWriter uses the table specified by the Checkpoint Table property to store information used to ensure that there are no missing or duplicate events after recovery.
The failover occurred after the first row was replicated to target table:
When the app is restarted, it takes some time to start from where the application left off:
During failover, two more rows were added to the source table which was picked up by the striim app and once the server was up, two more rows were replicated to the target table.
The following snapshots show the source (Postgres) and target (Snowflake) tables and we can see there is no repetition on the target table even though the app started after a failover.
You can also monitor the checkpoint with console commands. To see detailed recovery status, enter MON . in the console (see Using the MON command). If the status includes “late” checkpoints, we recommend you Contact Striim support, as this may indicate a bug or other problem (though it will not interfere with recovery).
To see the checkpoint history, enter SHOW . CHECKPOINT HISTORY in the console.
Automatically Restarting an Application after a Crash
If known transient conditions such as network outages cause an application to crash, you may configure it to restart automatically after a set period of time. You can enable auto resume feature with desired retry interval and maximum retries under App Setting in the flow design as follows:
Setting Up Striim app for CDC pipeline recovery
Step 1: Download the data and Sample TQL file from our github repo
You can download the TQL files for streaming app our github repository. Deploy the Striim app on your Striim server. It should have failure recovery enabled. If you are creating your app from wizard please follow the steps shown in the recipe
Step 2: Configure your source and target
Configure your source and Target in the striim components.
Step 3:Run app before failover
Deploy your streaming app and run it for real-time data replication
Step 4: Run app after failover
Run the Striim app after Failover. Check the source and target for the recovered data
Wrapping Up: Start your Free Trial Today
The above tutorial showed you how to enable recovery for any planned or unplanned server outages or failovers. With Striim’s powerful CDC technology and recovery feature, you can rely on your real-time data pipeline for any analytical purposes even when there is a failover. Striim supports a multitude of sources and targets . This can be utilized to build reliable streaming applications with desired databases and data warehouses.
As always, feel free to reach out to our integration experts to schedule a demo, or try Striim for free here.
Tools you need
Striim
Striim’s unified data integration and streaming platform connects clouds, data and applications.
PostgreSQL
PostgreSQL is an open-source relational database management system.
Snowflake
Snowflake is a cloud-native relational data warehouse that offers flexible and scalable architecture for storage, compute and cloud services.
PostgreSQL CDC to Snowflake data pipeline with Schema Evolution and Data Contracts
Use Striim to capture and propagate schema changes while performing real-time CDC from PostgreSQL to Snowflake
Benefits
Reduce data downtime by building pipelines resilient to schema changes
Create smart rules to keep schemas in sync without propagating problematic DDL
Automatically keep schemas and models in sync with your operational database.
On this page
Overview
Striim is a next generation unified data streaming product that offers change data capture (CDC) from popular databases such as Oracle, SQLServer, PostgreSQL and many others. To maximize uptime and operational success, Striim can enforce Data Contracts with Schema Evolution. Data Contracts are a way to align on the function of critical data pipelines with technical and business stakeholders. For instance, you may have an analytics team that wants to automatically add all new tables to their pipelines. On the other hand, you may have a software development team that will need to block and immediately be alerted on all new schema changes.
Data Contracts can also be applied on Data Freshness SLAs. These can be managed by Striim’s Smart Alerts. However we will go over that in a separate recipe. Here we are simply focussed on enforcing Data Contracts on schemas.
Striim can capture common DDL statements in the source table and replicate those changes to the target tables, or take other actions such as quiescing or halting the application. To know more about the supported CDC sources and adapters, please follow this link.
In one of our previous recipes, we have shown how to create a replica slot and cdc user to stream CDC changes from the PostgreSQL source table in real-time. In this tutorial we have configured a Striim app that captures schema evolution like CREATE TABLE, ALTER TABLE (eg. add column) and DROP TABLE and delegate the changes to the target through striim. In case of a new column, the target table updates with the new column. For CREATE and DROP TABLE, Striim’s message logs notify the new DDL change for any further action by the user. Please follow the steps below to configure your source database and Striim app for capturing schema evolution. Please refer to our github repository for all codes, datasets and tql file of this app.
Core Striim Components
PostgreSQL CDC: PostgreSQL Reader uses the wal2json plugin to read PostgreSQL change data. 1.x releases of wal2jon can not read transactions larger than 1 GB.
Stream: A stream passes one component’s output to one or more other components. For example, a simple flow that only writes to a file might have this sequence
Snowflake Writer: Striim’s Snowflake Writer writes to one or more existing tables in Snowflake. Events are staged to local storage, Azure Storage, or AWS S3, then written to Snowflake as per the Upload Policy setting.
Step 1: Create a Replication Slot and Replication User
For a CDC application on a postgres database, make sure the following flags are enabled for the postgres instance:
Create a user with replication attribute by running the following command on google cloud console:
CREATE USER replication_user WITH REPLICATION IN ROLE cloudsqlsuperuser LOGIN PASSWORD ‘yourpassword’;
Follow the steps below to set up your replication slot for change data capture:
CDDL stands for “Common Data Definition Language”. Striim supports Create Table, Alter Table (Add, Modify, Drop, Add primary key and adding unique constraints) and Drop Table for handling schema evolution or CDDL.The source adapter must be able to capture the CDDLs executed on the interested tables and schema and the target adapter must be able to process DDL WAEvents sent by the source adapter.
For PostgreSQL CDDL Capture procedure and Tracking, a set of SQL scripts has to be executed on the source database by the customer with the superuser role. Firstly, the schema is created if it does not already exist and an empty table with DDL Capture fields is created that will record the DDL changes.
CREATE SCHEMA IF NOT EXISTS striim;

 CREATE TABLE IF NOT EXISTS striim.ddlcapturetable

  (

     event           TEXT,

     tag             TEXT,

     classid         OID,

     objid           OID,

     objsubid        INT,

     object_type     TEXT,

     schema_name     TEXT,

     object_identity TEXT,

     is_extension    BOOL,

     query           TEXT,

     username        TEXT DEFAULT CURRENT_USER,

     db_name TEXT DEFAULT Current_database(),

     client_addr     INET DEFAULT Inet_client_addr(),

     creation_time   TIMESTAMP DEFAULT now()

  );
The next step is to write a PostgreSQL function that collects DDL change logs from pg_stat_activity and inserts into ddlcapturetable. The function shown below is called ‘ddl_capture_command()’ which is executed inside two event triggers in the next section.
GRANT USAGE ON SCHEMA striim TO PUBLIC;
GRANT SELECT, INSERT ON TABLE striim.ddlcapturetable TO PUBLIC;
create or replace function striim.ddl_capture_command() returns event_trigger as $$ declare v1 text; r record; begin
select query into v1 from pg_stat_activity where pid=pg_backend_pid(); if TG_EVENT='ddl_command_end' then SELECT * into r FROM pg_event_trigger_ddl_commands(); if r.classid > 0 then insert into striim.ddlcapturetable(event, tag, classid, objid, objsubid, object_type, schema_name, object_identity, is_extension, query) values(TG_EVENT, TG_TAG, r.classid, r.objid, r.objsubid, r.object_type, r.schema_name, r.object_identity, r.in_extension, v1); end if; end if; if TG_EVENT='sql_drop' then SELECT * into r FROM pg_event_trigger_dropped_objects(); insert into striim.ddlcapturetable(event, tag, classid, objid, objsubid, object_type, schema_name, object_identity, is_extension, query) values(TG_EVENT, TG_TAG, r.classid, r.objid, r.objsubid, r.object_type, r.schema_name, r.object_identity, 'f', v1); end if; end; $$ language plpgsql strict;
Once the ddlcapture table is created and ddl_capture_command() function is defined, two event triggers are executed as follows.
CREATE EVENT TRIGGER pg_get_ddl_command on ddl_command_end                    EXECUTE PROCEDURE striim.ddl_capture_command();
CREATE EVENT TRIGGER pg_get_ddl_drop on sql_drop                              EXECUTE PROCEDURE striim.ddl_capture_command();
Step 3: Create the CDC app that handles Schema Evolution on Striim SaaS
There is an additional CDDL configuration in source and target which was not required in traditional CDC DML streaming app. For the CDDL configuration in the source database, click on ‘Show Advanced Setting’ as shown below.
Enable ‘SCHEMA EVOLUTION-CDDL CAPTURE’ and enter the name of the CDDL TRACKING TABLE that we created in Step 2. The CDDL ACTION property is ‘Process’.
For the Snowflake target under ‘Show Advanced Setting’, ‘Process’ is selected under CDDL ACTION. This ensures the ALTER TABLE changes in the source table are replicated into the target table in Snowflake.
Note: you must create tables in Snowflake yourself manually or use Striim’s schema creation wizard.
To transfer your schema and tables from postgres to snowflake using schema creation wizard, follow the steps shown below:
Step 1: Create a new app with Postgres Initial Load as source and Snowflake as target
Step 2: Follow the app wizard and select your schema and tables in your Postgres source
Step 3: Configure your Snowflake wizard as shown below
Step 4: Select Schema Migration to migrate your schema from Postgres to Snowflake
Step 4: Run the App and check the message logs and target table for any DDL changes.
For this tutorial, I have used a sample table ‘data1’ containing two columns ‘Name’ and ‘Salary’. When a new column ‘Sex’ is added, it is streamed and the target table in snowflake is updated.
Enable ‘SCHEMA EVOLUTION-CDDL CAPTURE’ and enter the name of the CDDL TRACKING TABLE that we created in Step 2. The CDDL ACTION property is ‘Process’.
For the Snowflake target under ‘Show Advanced Setting’, ‘Process’ is selected under CDDL ACTION. This ensures the ALTER TABLE changes in the source table are replicated into the target table in Snowflake.
When we add a new table ‘data3’ into the schema, DDL Operation is ignored but the message log notifies the user about the new change. The metadata from the message log can be used to set alert for different types of DDL operations
Static Tables
There are four types of action labels for CDDL supported source and target adapters. Striim can also handle data replication sources that contain tables with static schema. The four actions that can be executed on capturing CDDLs are:
Process: This is the default action behavior that parses the DDL query and streams into the target table
Ignore: The DDL events will be captured and stored into internal metadata repository but will not be sent to the downstream consumers
Quiesce: When a DDL event is captured on the interested tables, source adapters will issue the Quiesce command and DDL operation will not be sent to downstream consumers. This action label is specific to Source Adapters only.
Halt: On receiving DDL action from upstream, the adapters will halt the app. This action is important when we want to halt the application when DDL is executed on static tables.
Here is an example showing a striim app with one static table. Since there are multiple tables in the source, we specify the action label ‘HALT’ on the target adapter.
You can also create a separate app for static tables that reads from the same source stream. This would not halt the data streams for other tables while a DDL is executed on static tables. Configure a separate app with the same source stream as follows. The source app is still running while the app containing the target app with a static table is halted.
Setting Up Striim app to capture Schema Evolution
Step 1: Create Replication Slot and Replication User on Postgres
Follow this recipe to create a Replication Slot and user for Change Data Capture. The replication user reads change data from your source database and replicates it to the target in real-time.
Step 2: Setup CDDL Capture Procedure and CDDL Tracking Table
Follow the recipe to configure PostgreSQL CDDL Capture Procedure and CDDL Tracking Table. You can find the sql queries in our github repository
Step 3: Create CDC app on Striim server
Create the CDC app that handles Schema Evolution on Striim SaaS as shown in the recipe
Step 4: Deploy and Run the Striim app
Run the App and check the message logs and target table for any DDL changes.
Wrapping Up: Start your Free Trial Today
Our tutorial showed you how to handle schema evolution in PostgreSQL database and stream the CDC to Snowflake target, a leading cloud data warehouse through Striim SaaS. By constantly moving your data into Snowflake, you could track the schema changes as well as build analytics or machine learning models, all with minimal impact to your current systems. You could also start ingesting and normalizing more datasets with Striim to fully take advantage of your data.
As always, feel free to reach out to our integration experts to schedule a demo, or try Striim for free here.
Tools you need
Striim
Striim’s unified data integration and streaming platform connects clouds, data and applications.
PostgreSQL
PostgreSQL is an open-source relational database management system.
Snowflake
Snowflake is a cloud-native relational data warehouse that offers flexible and scalable architecture for storage, compute and cloud services.


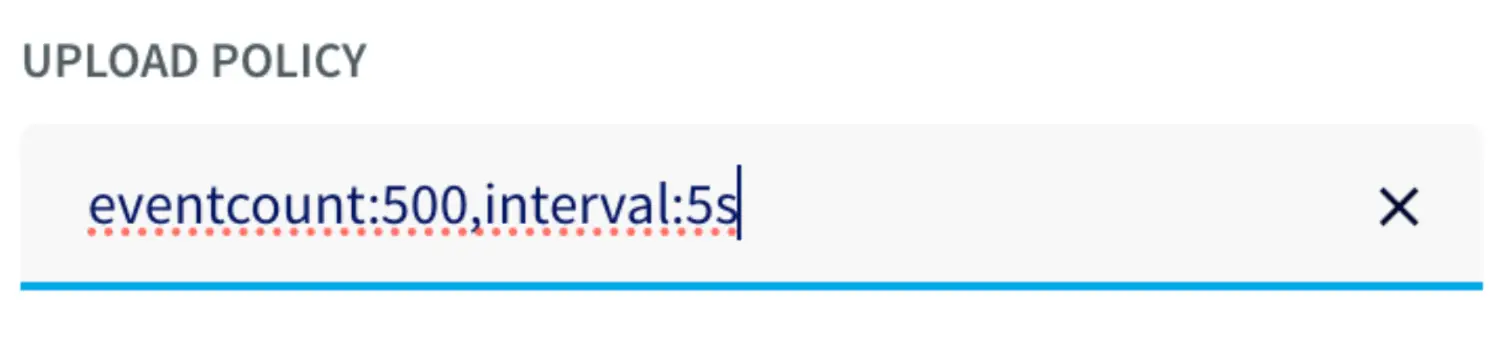
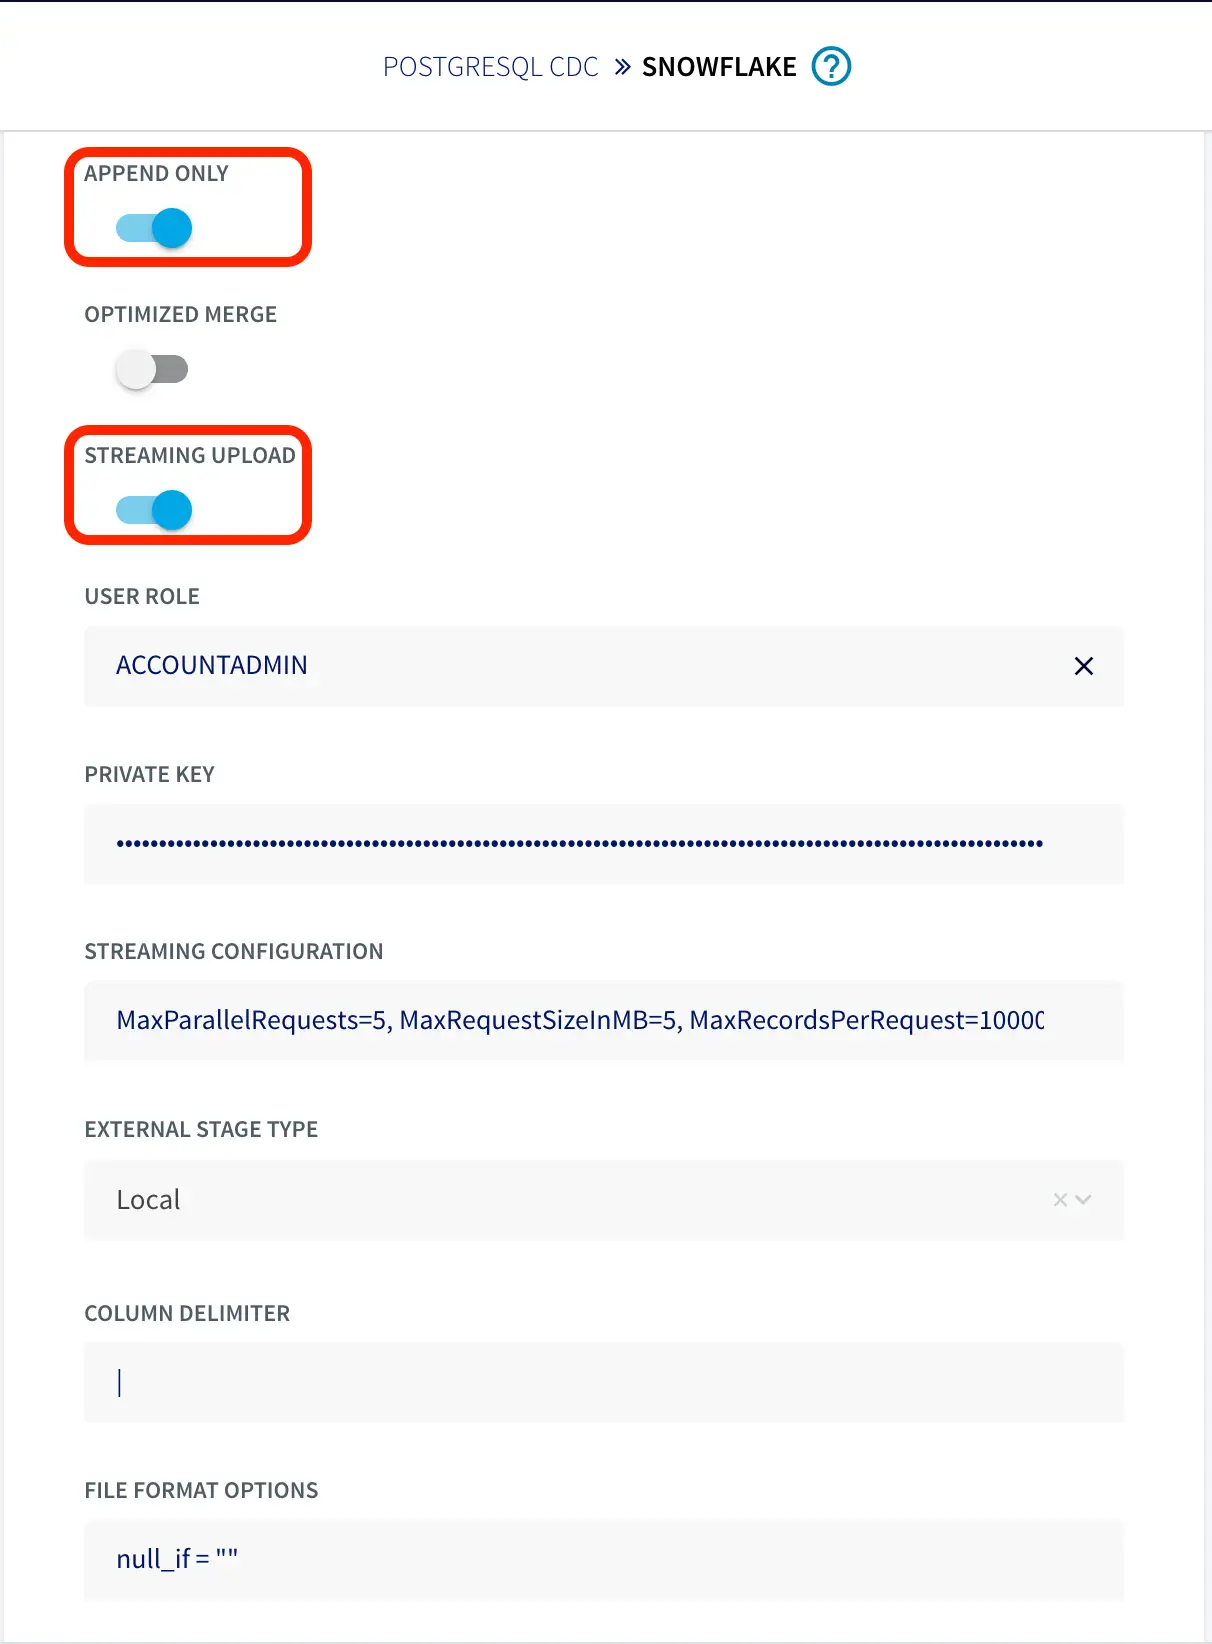


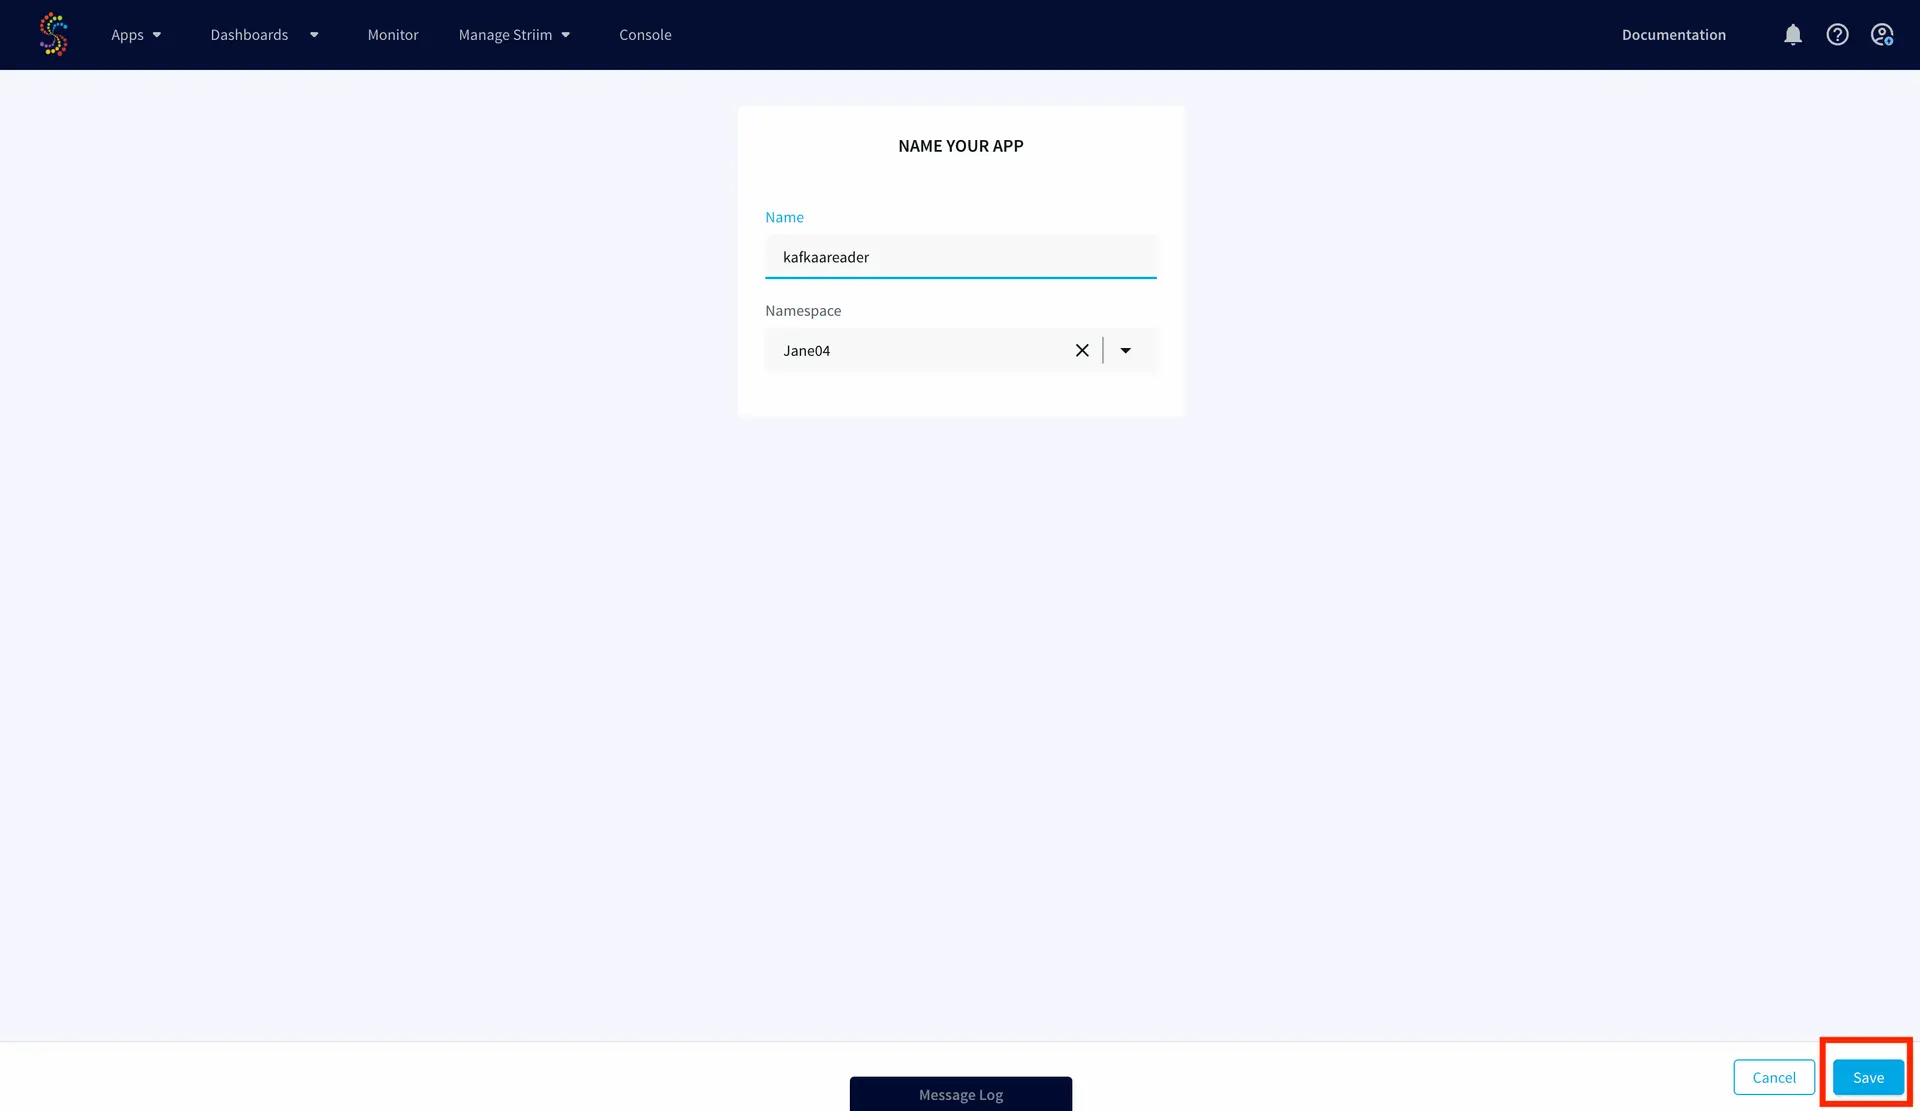
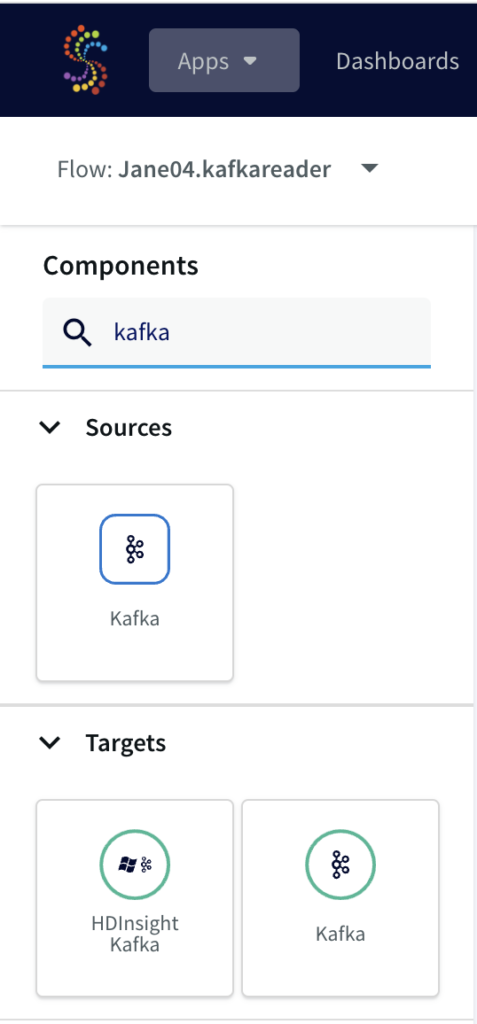
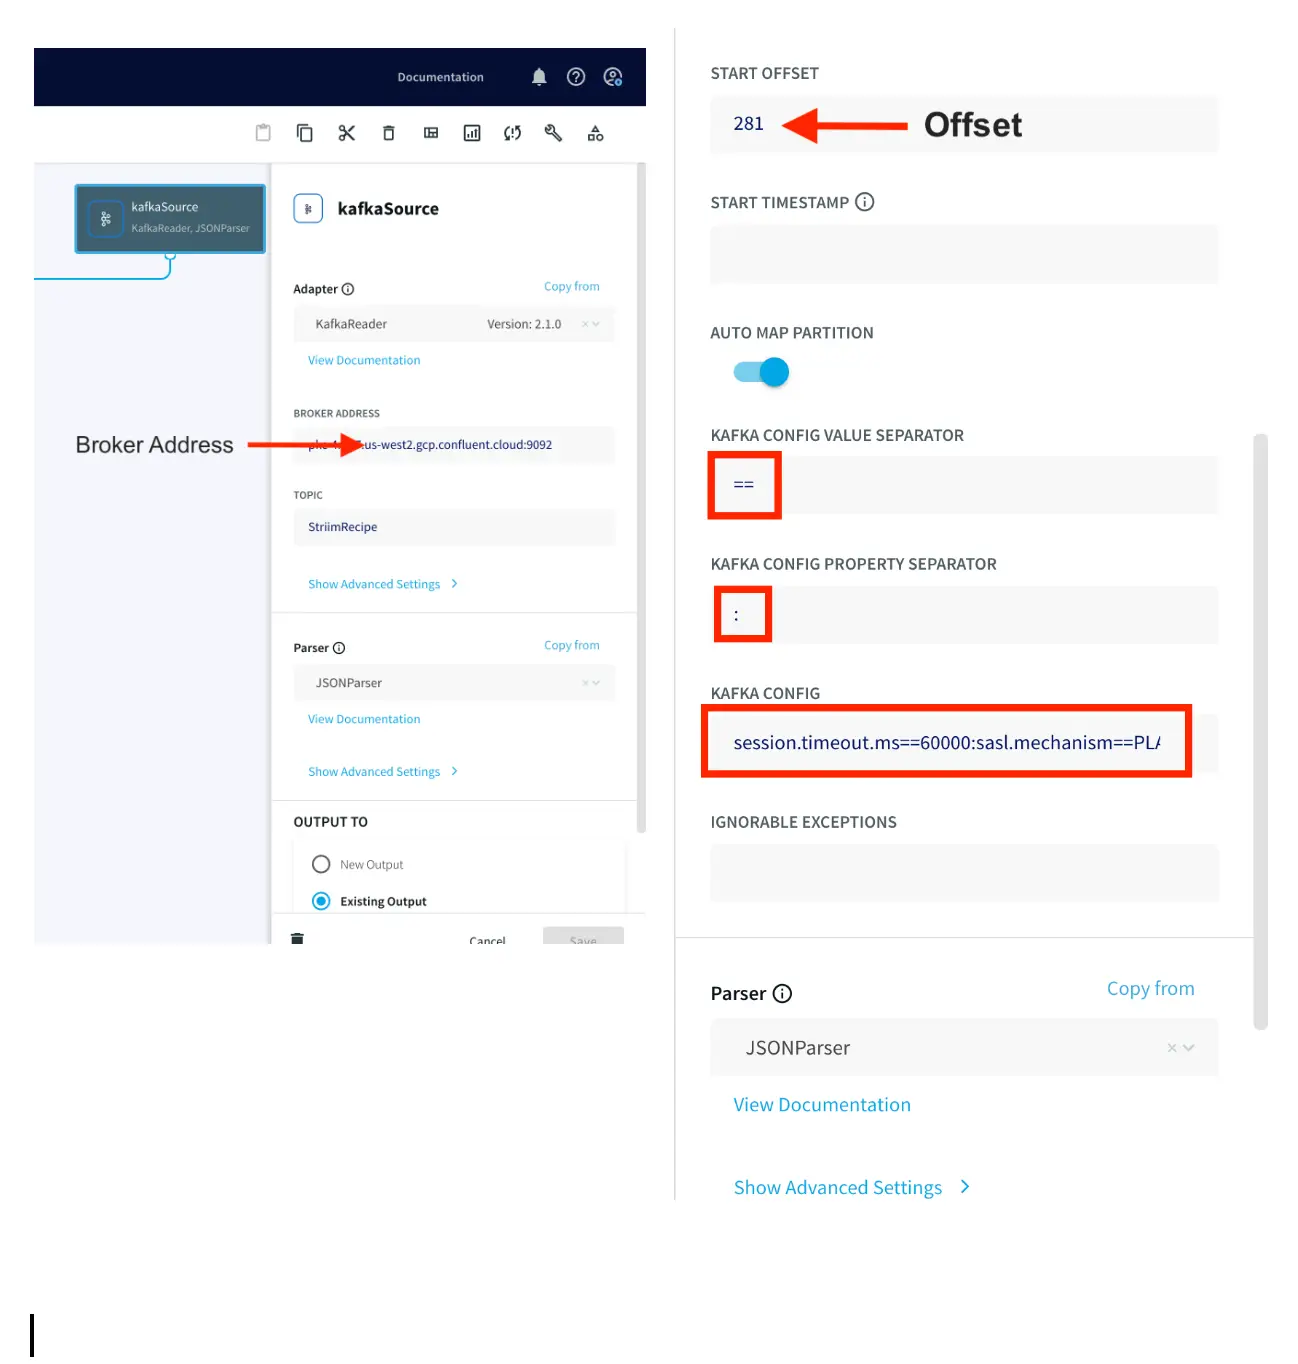
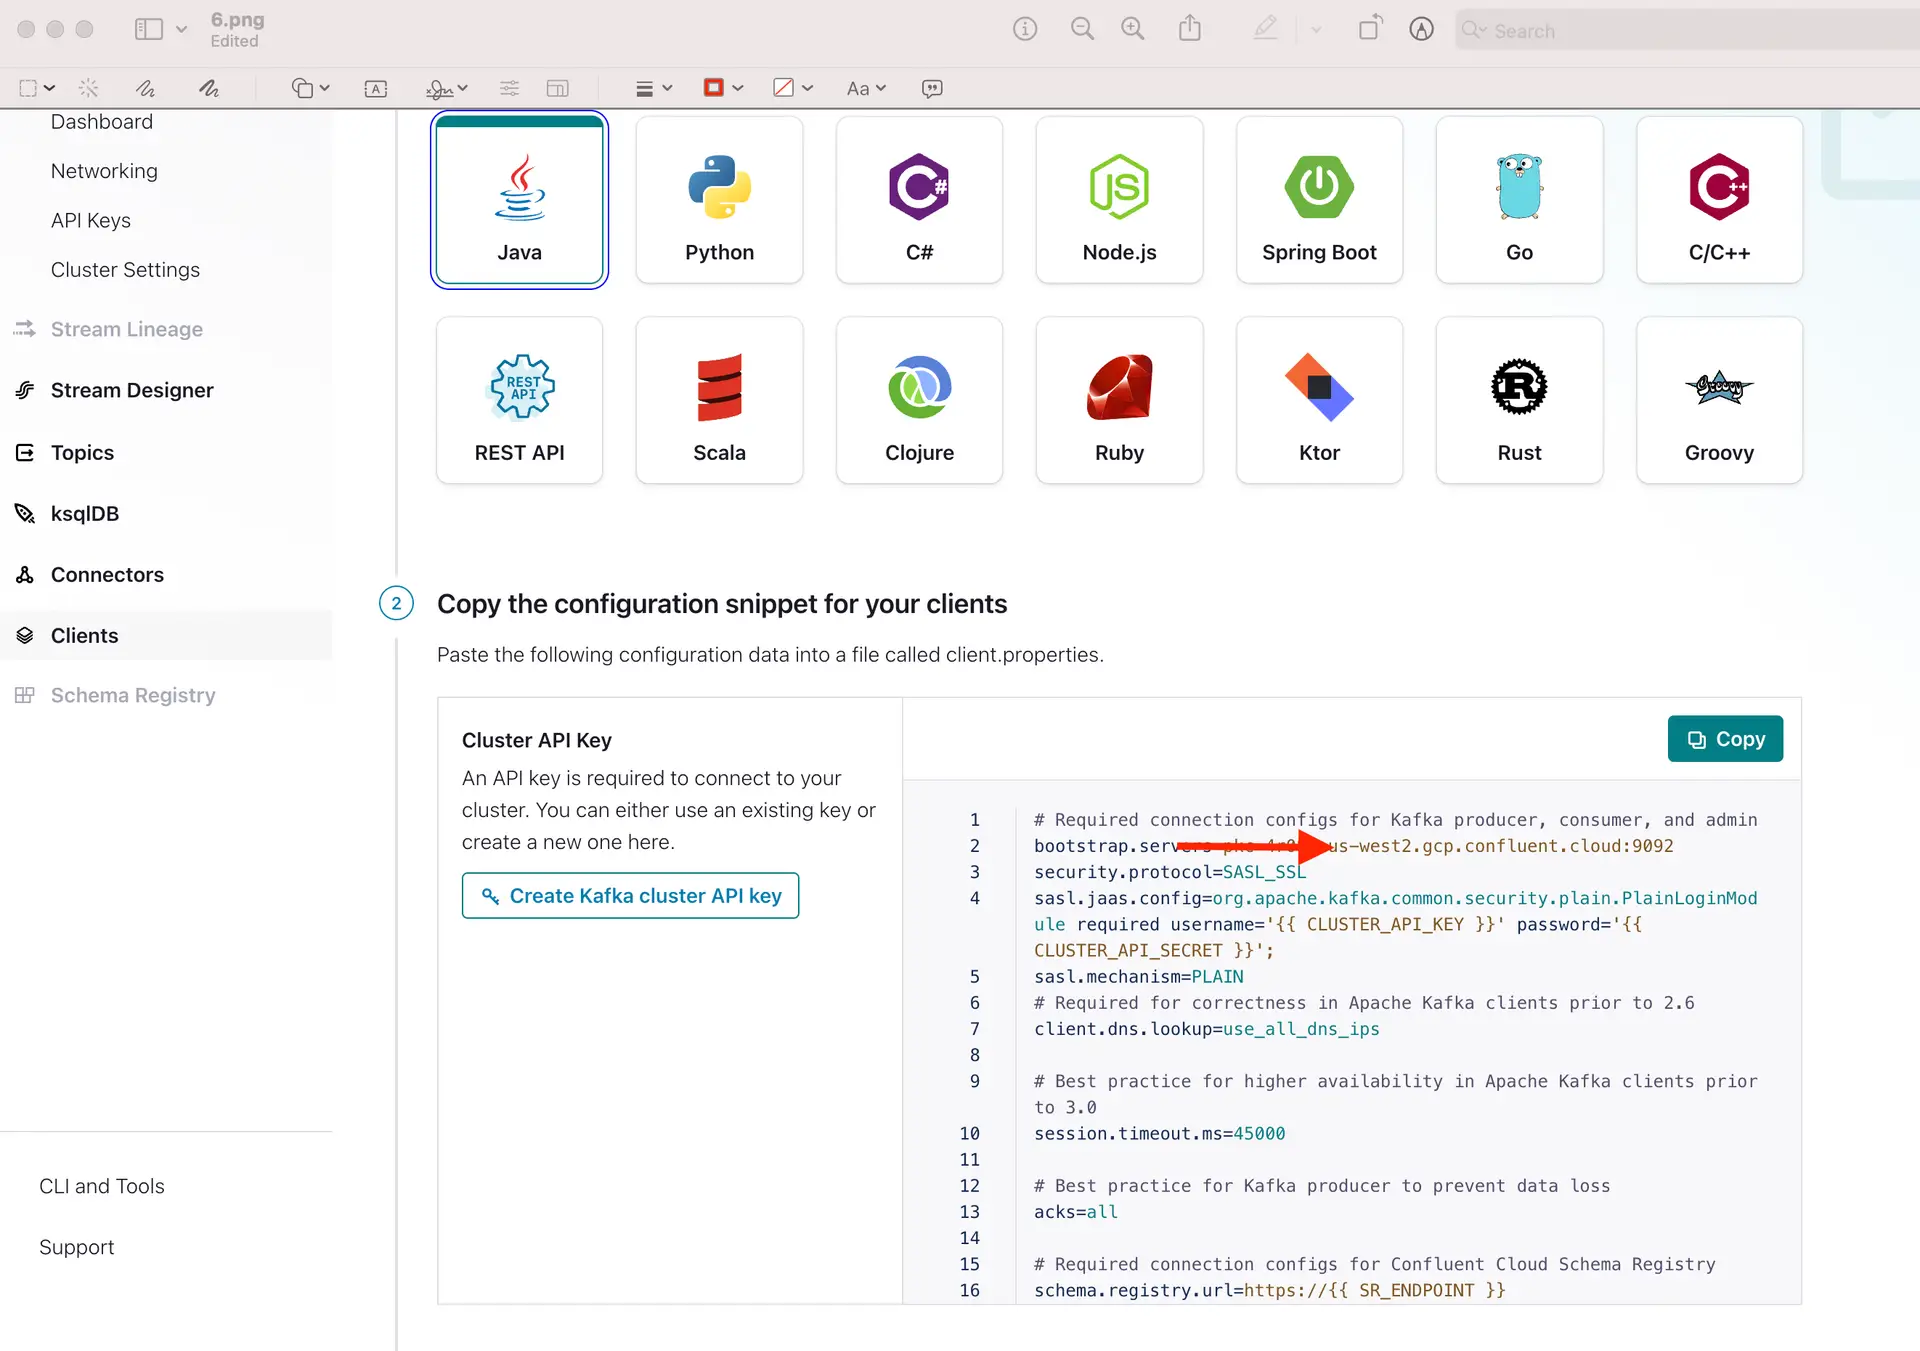

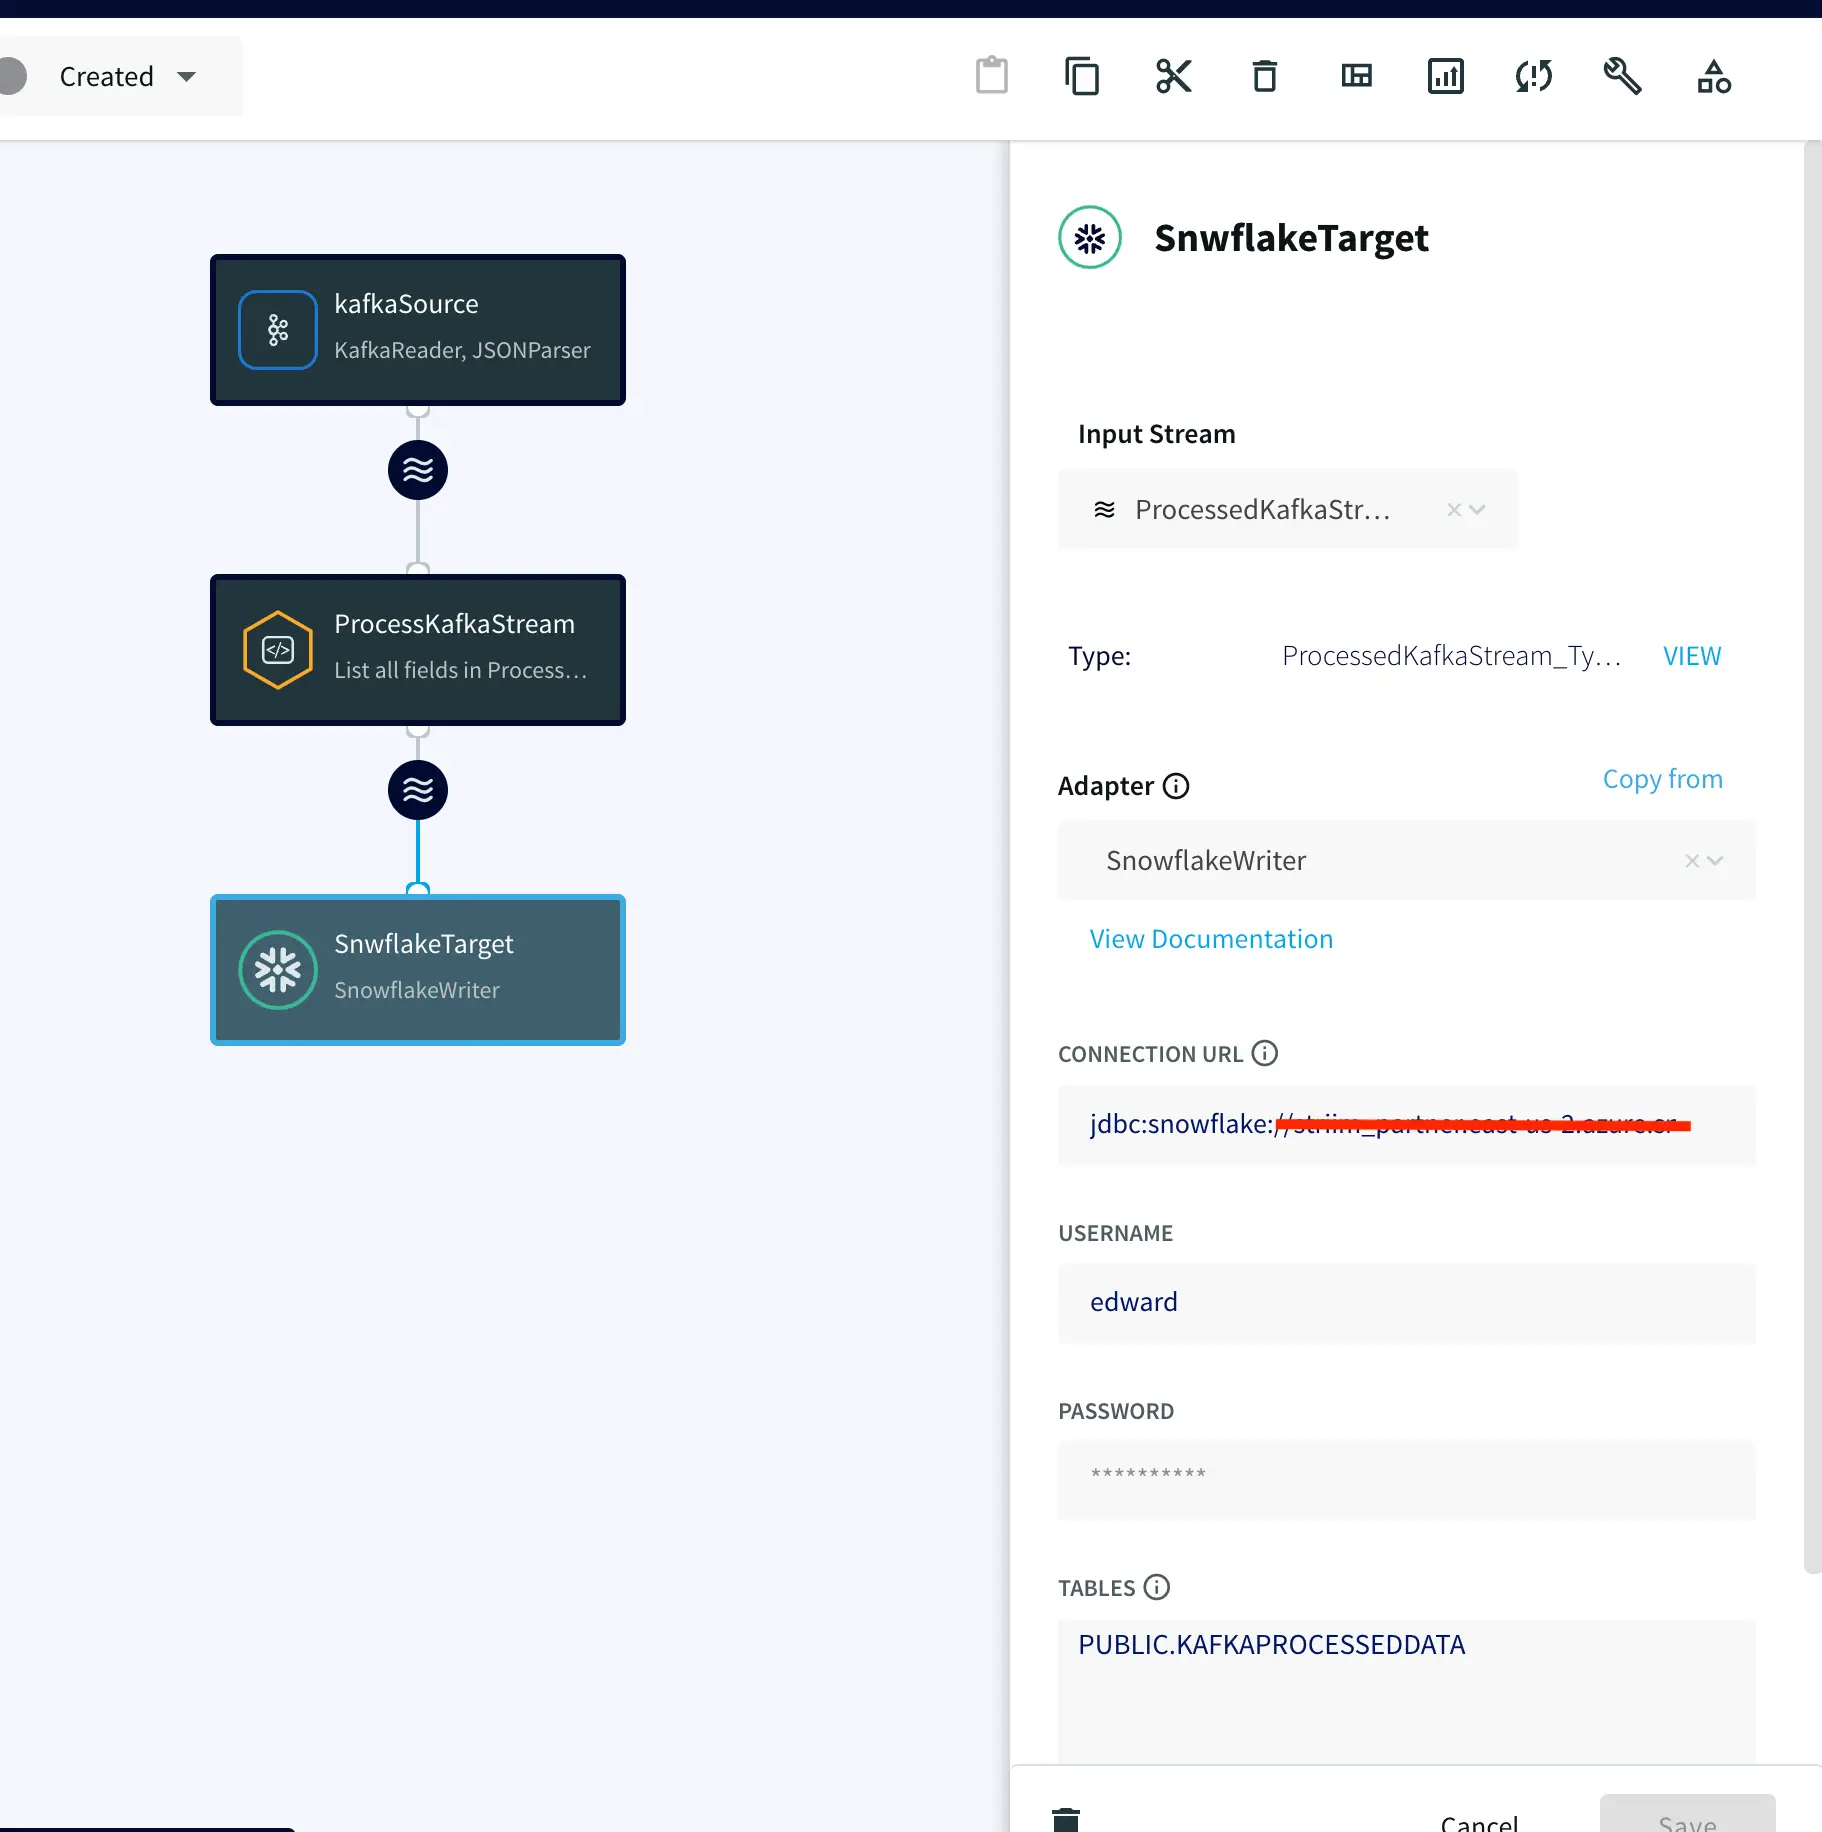
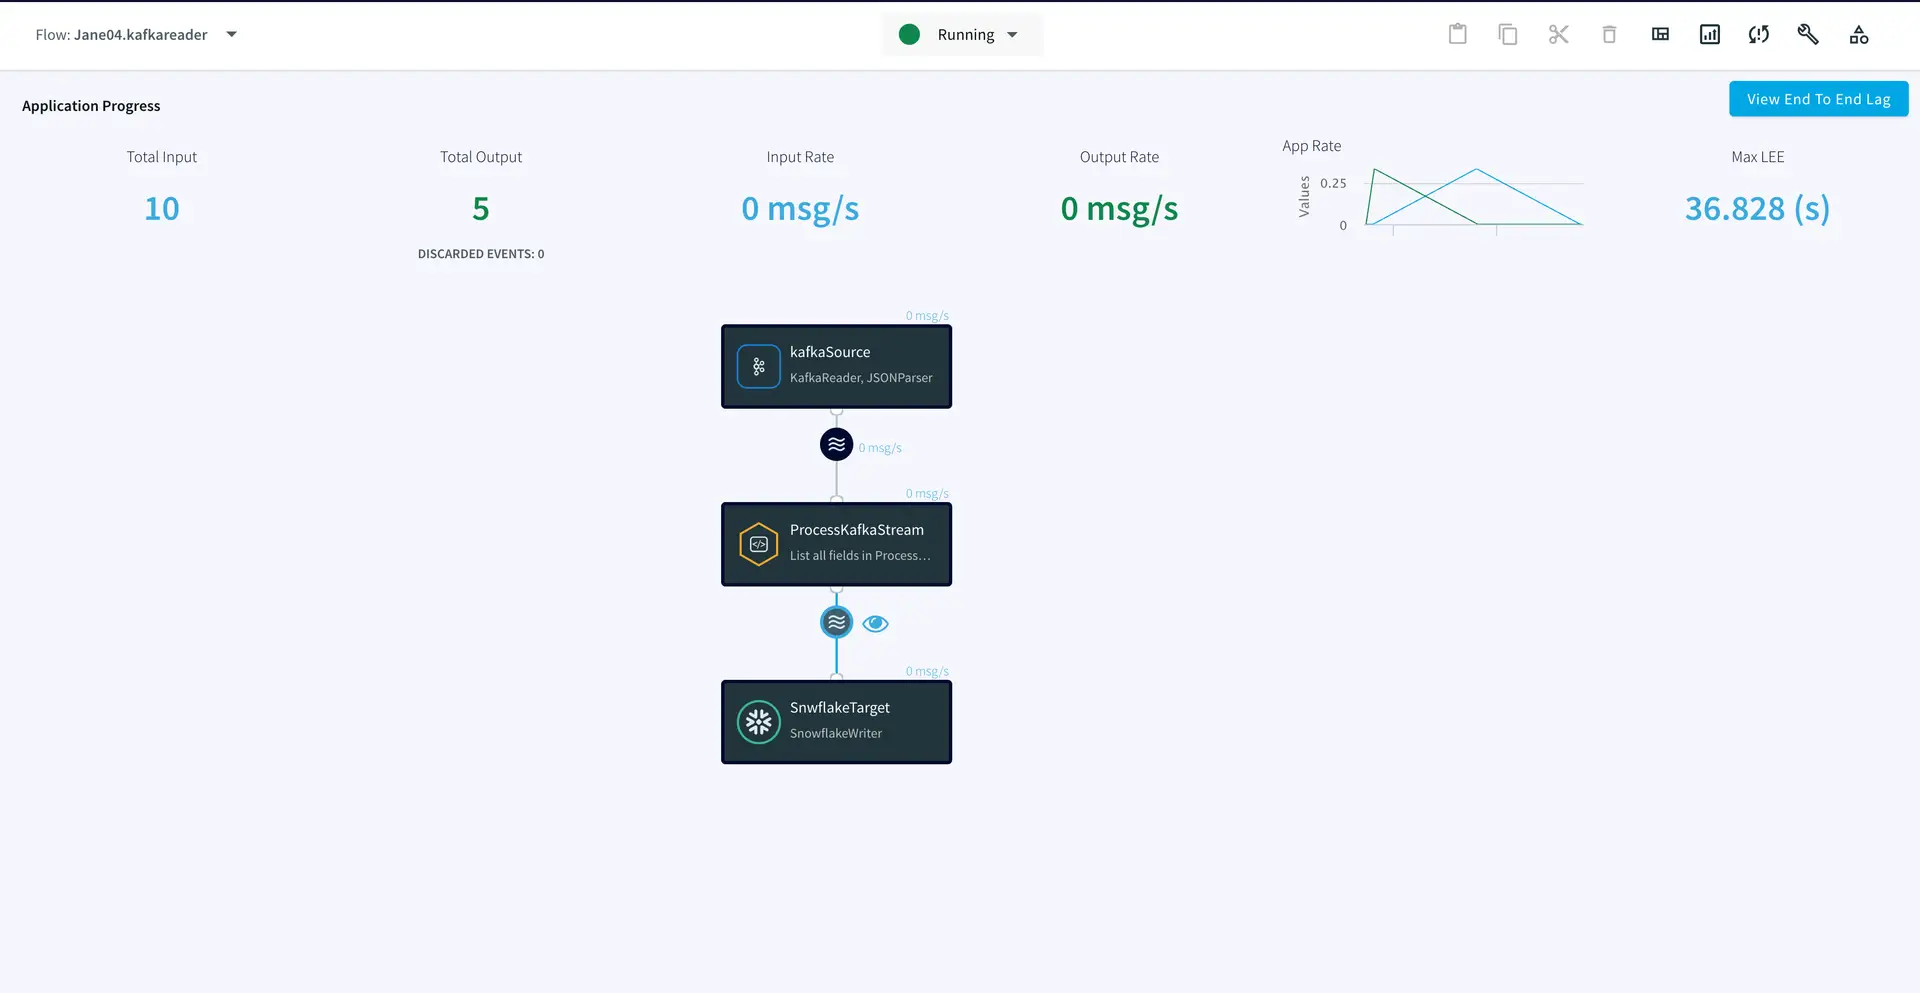
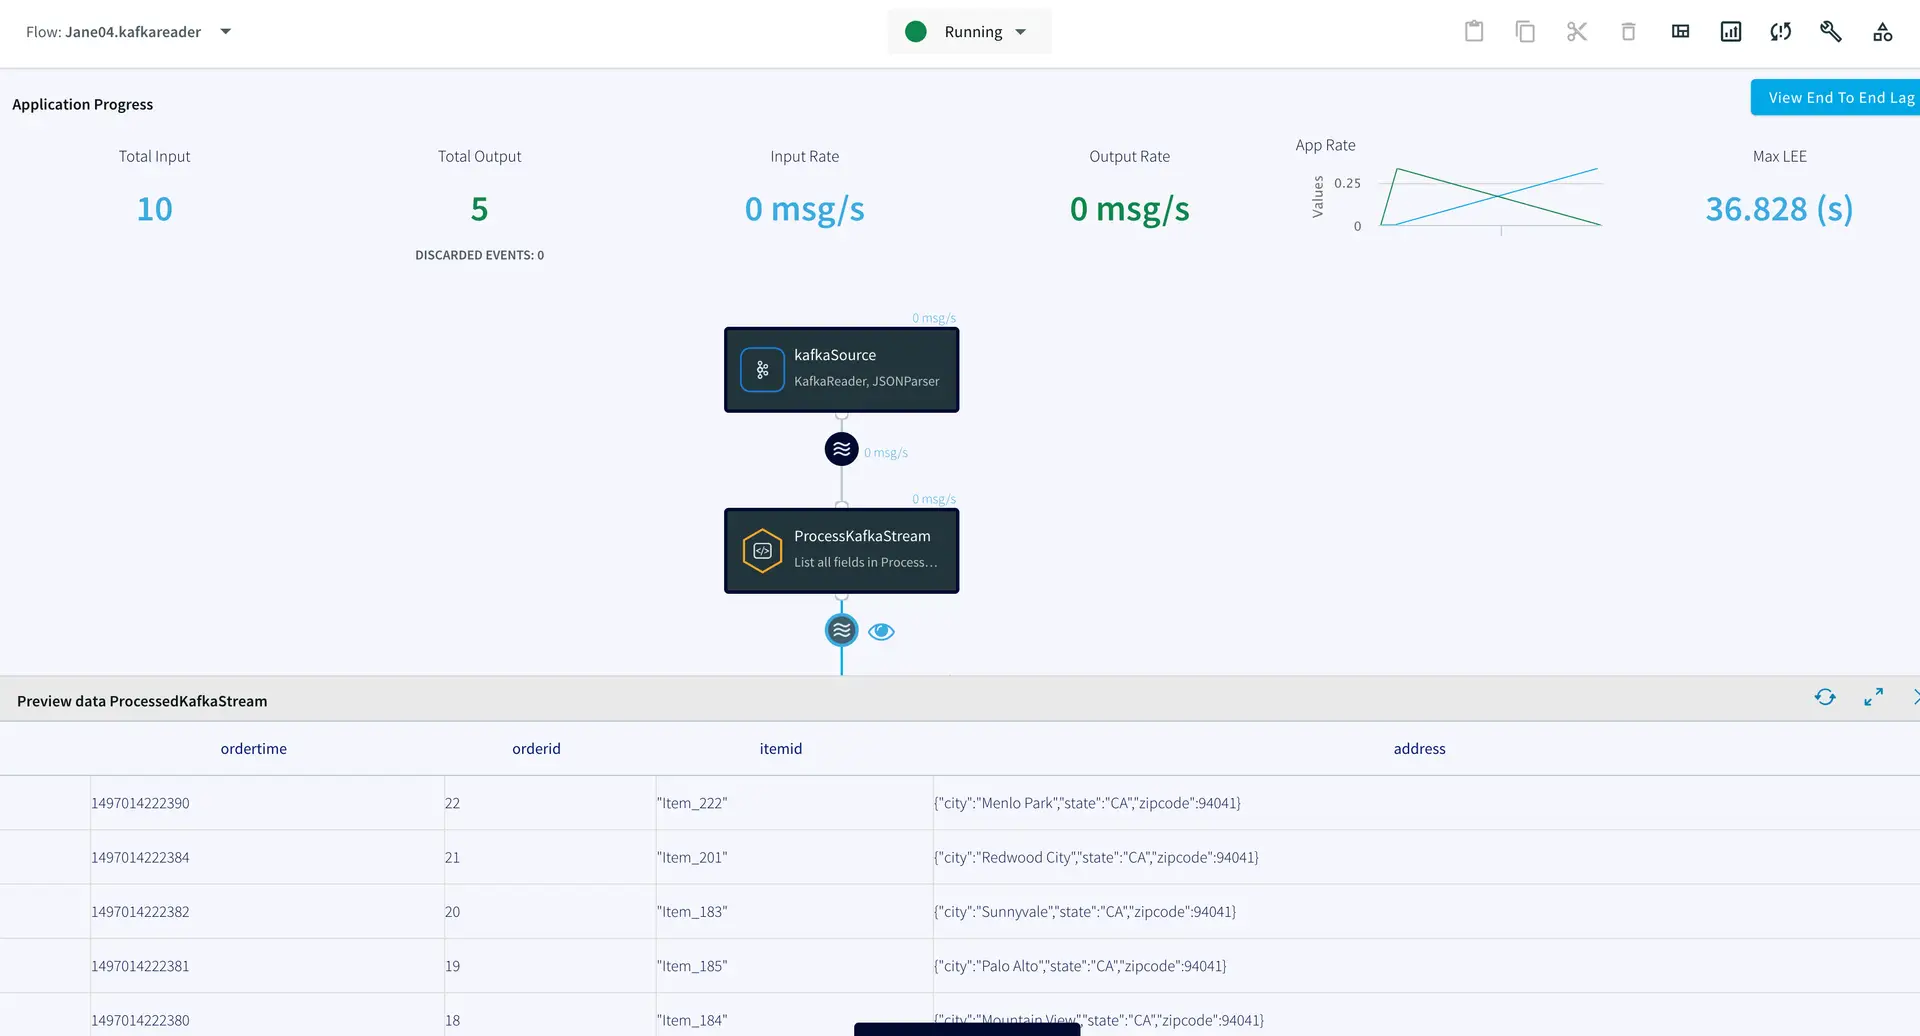
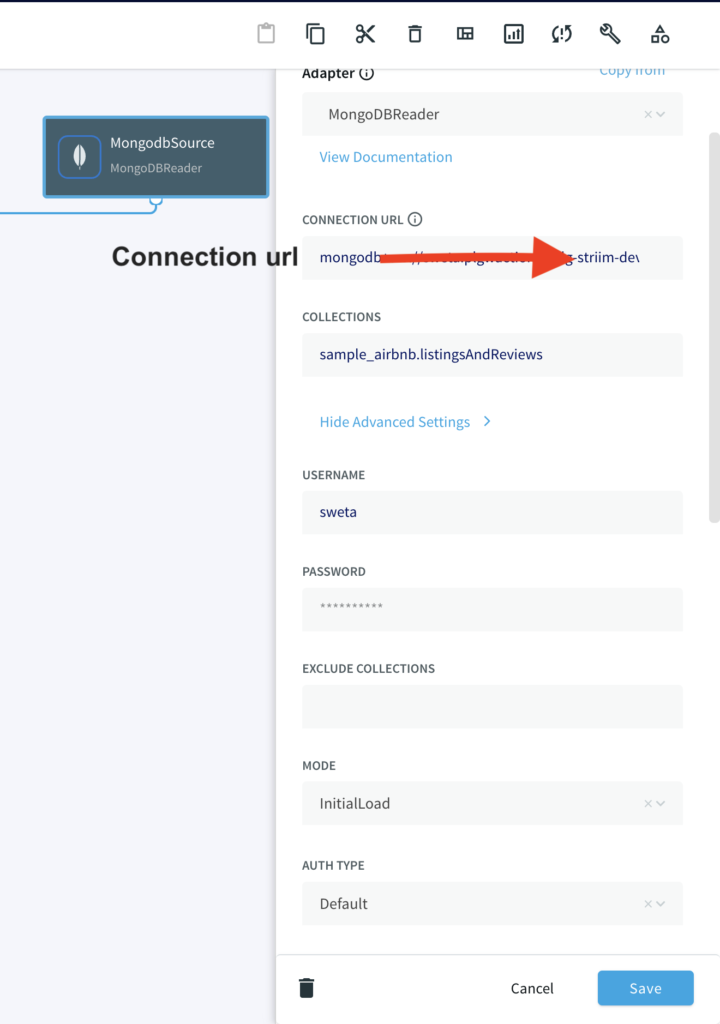
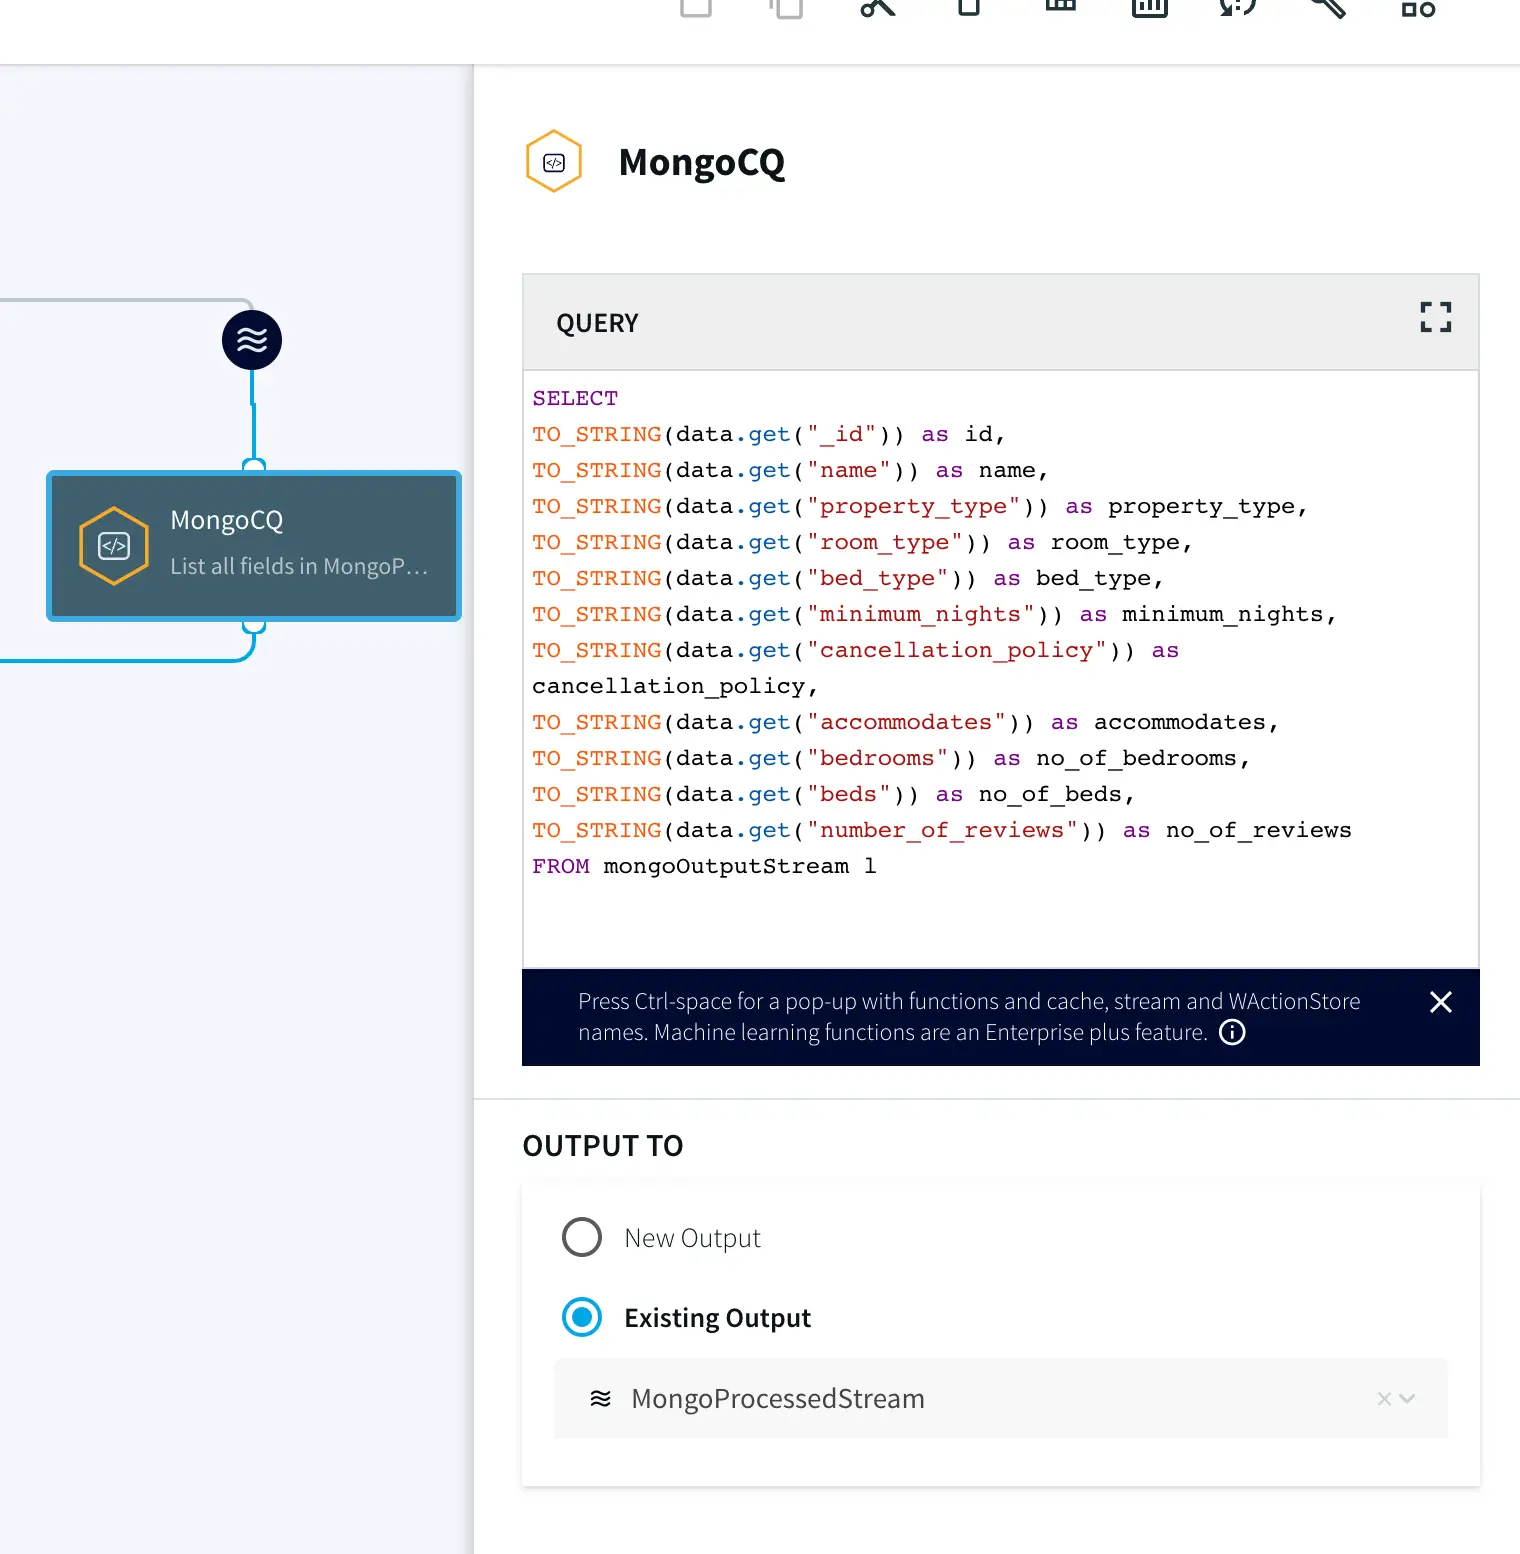
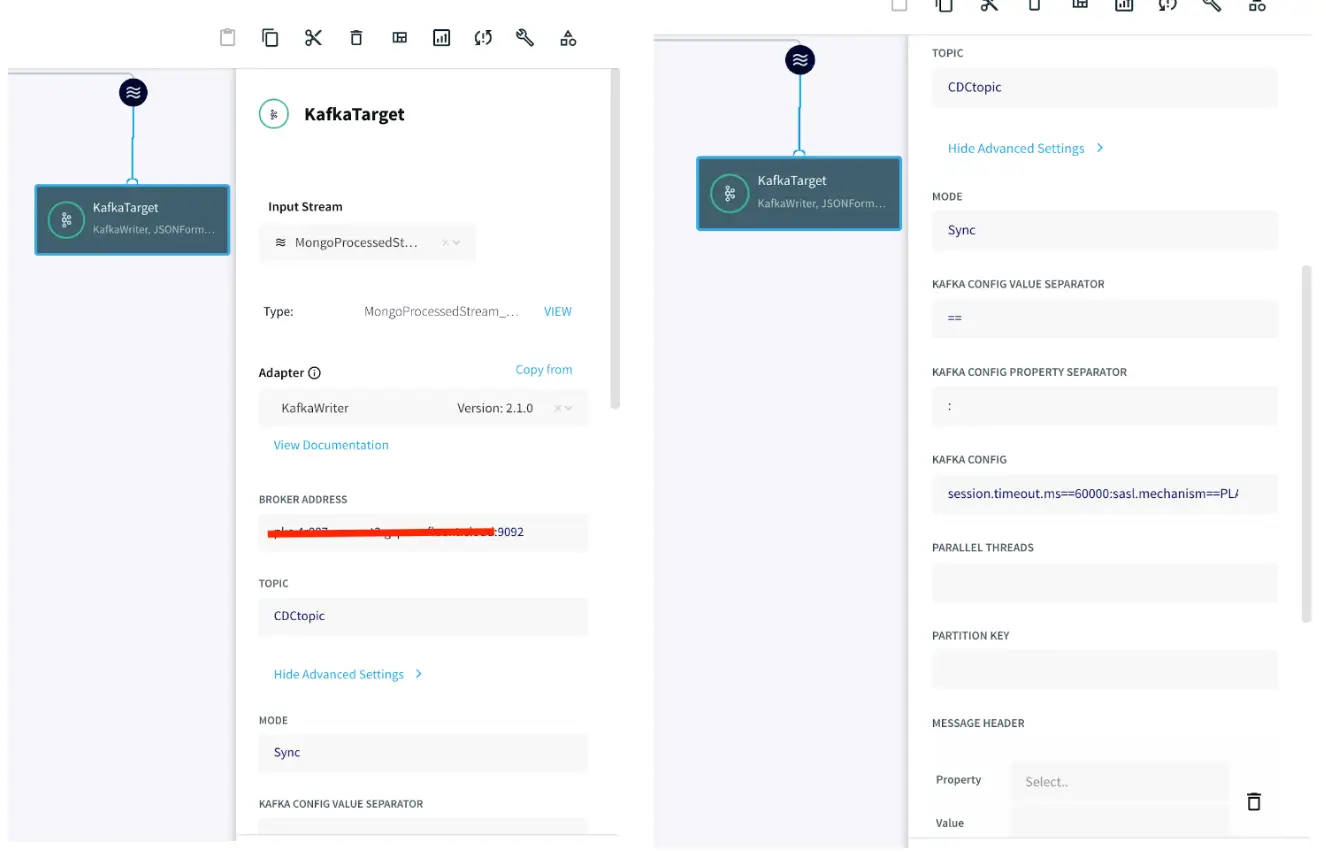
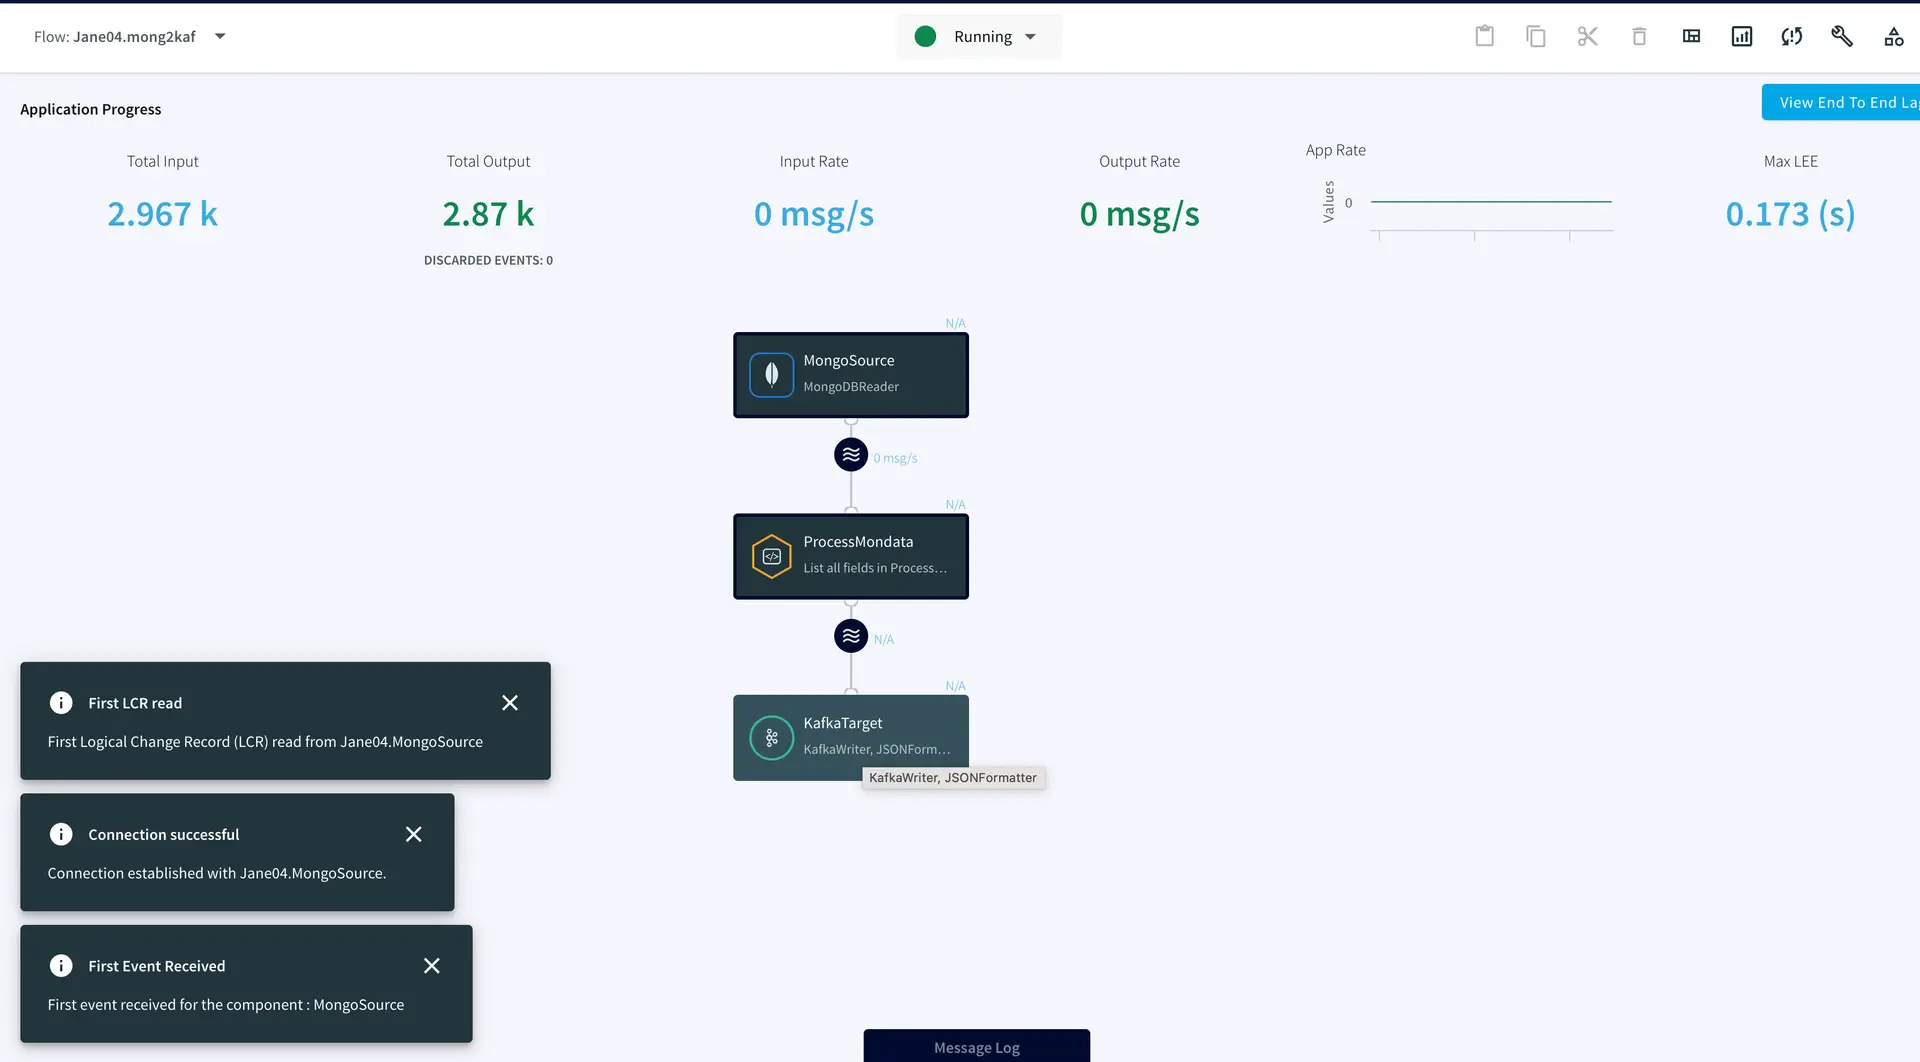
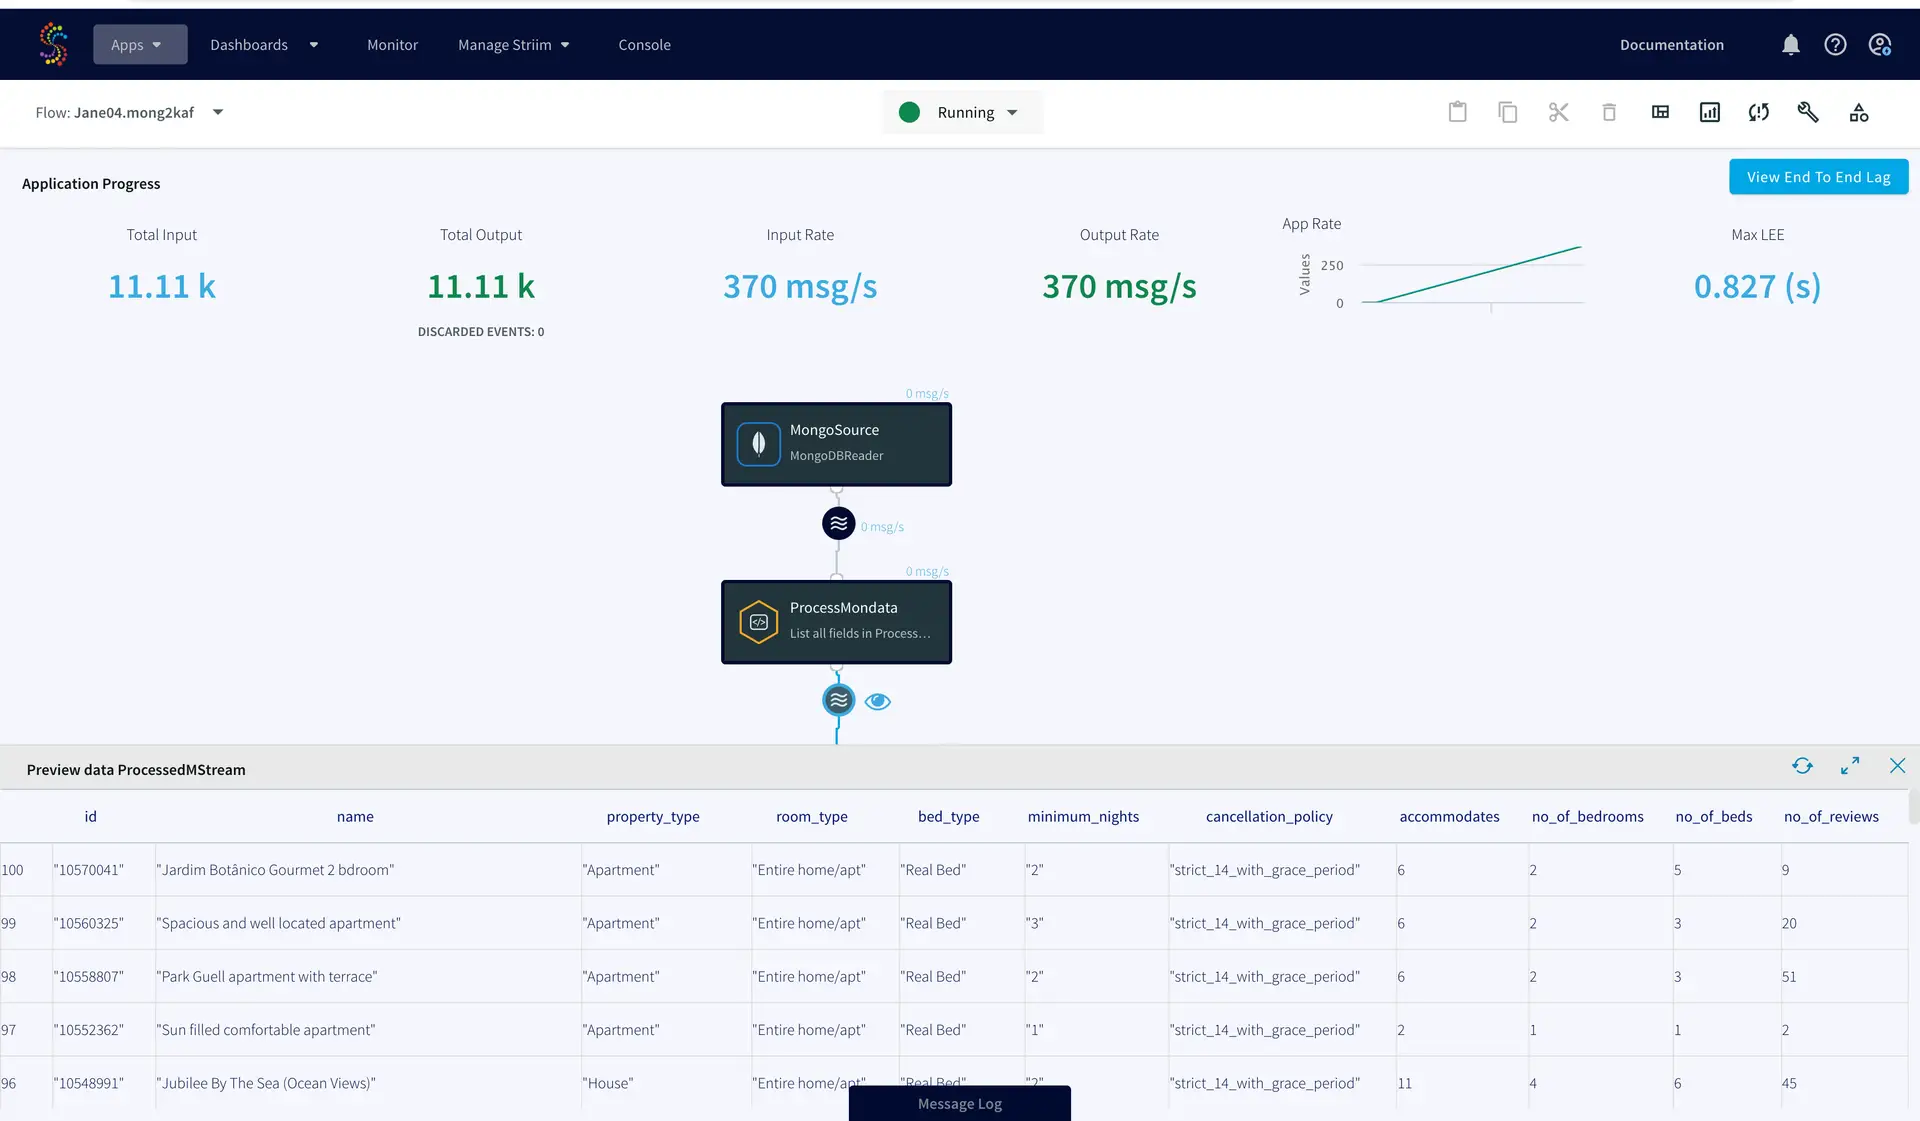
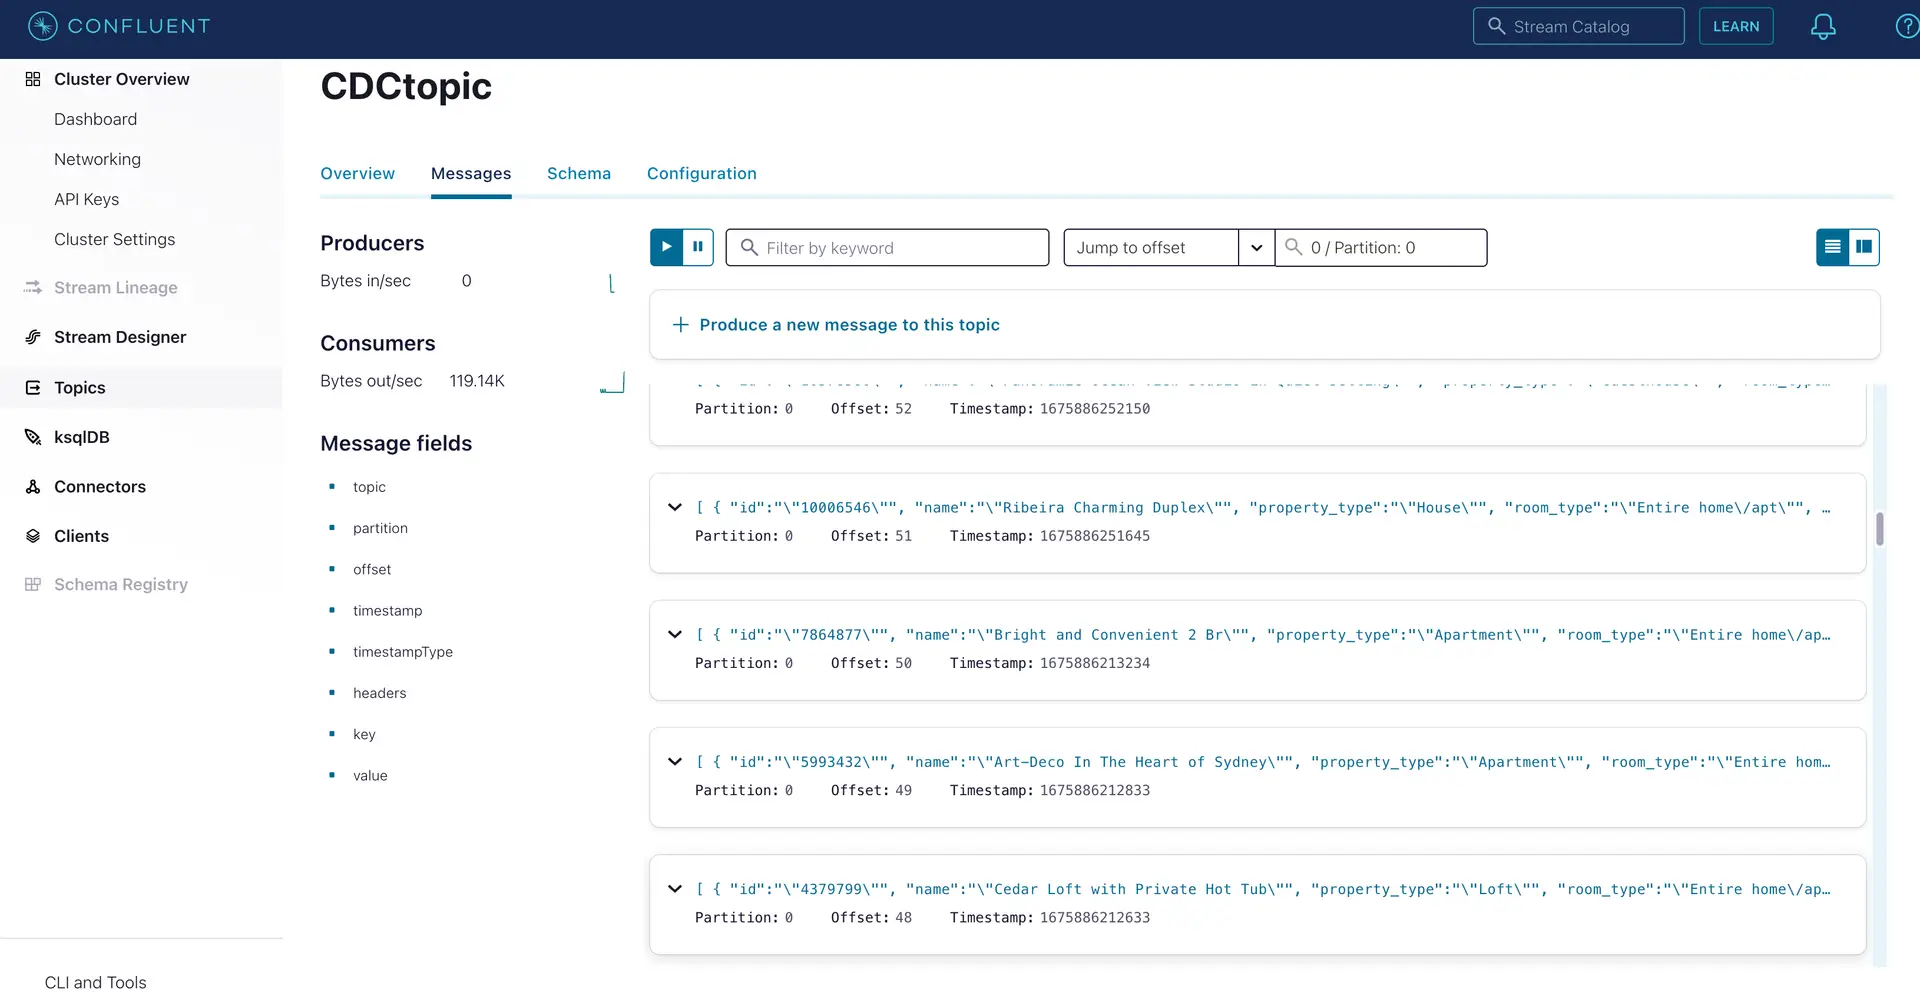


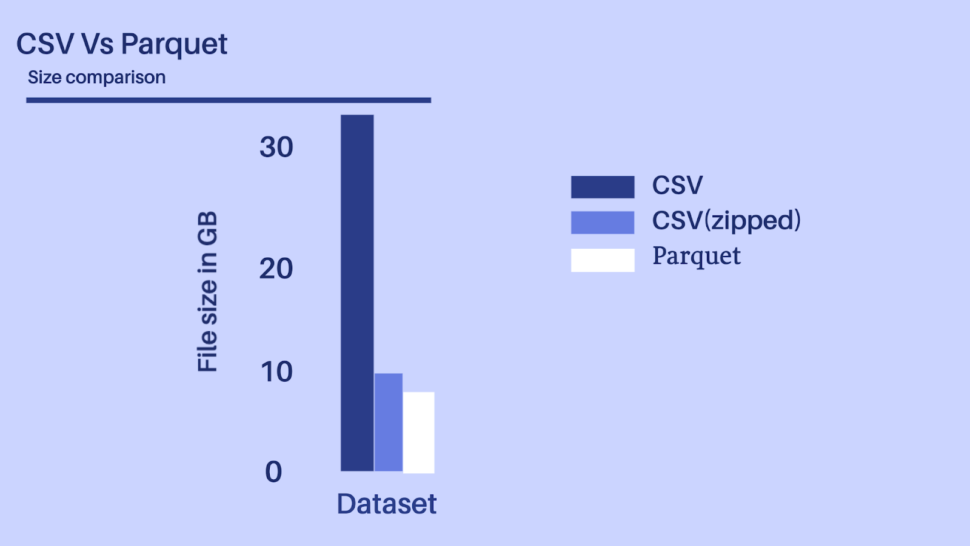


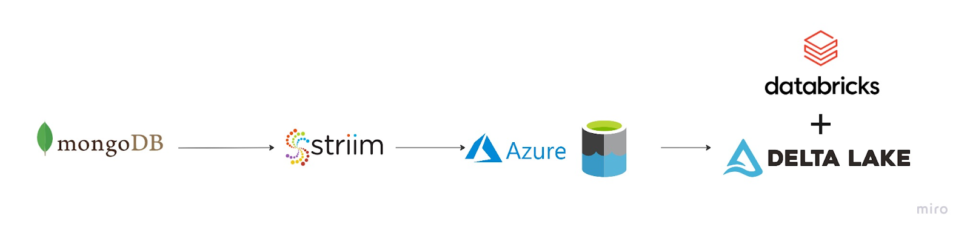
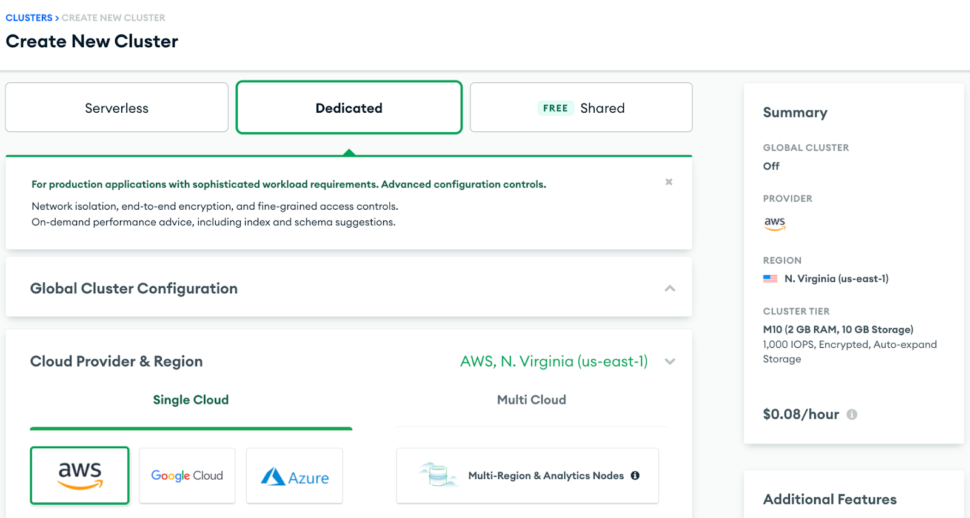

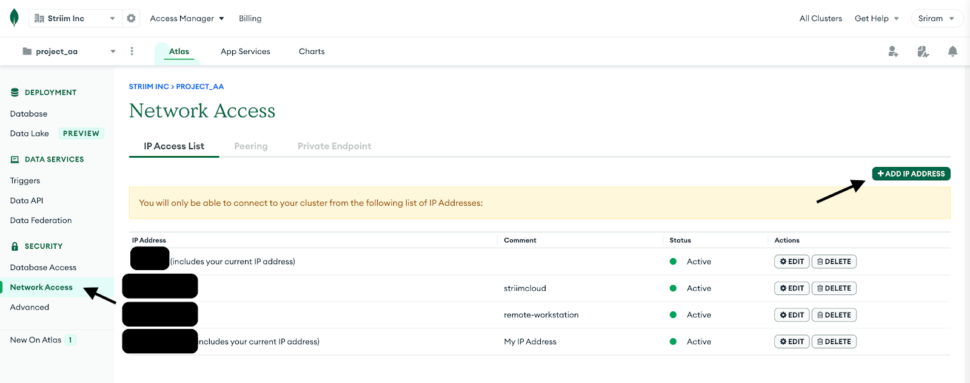
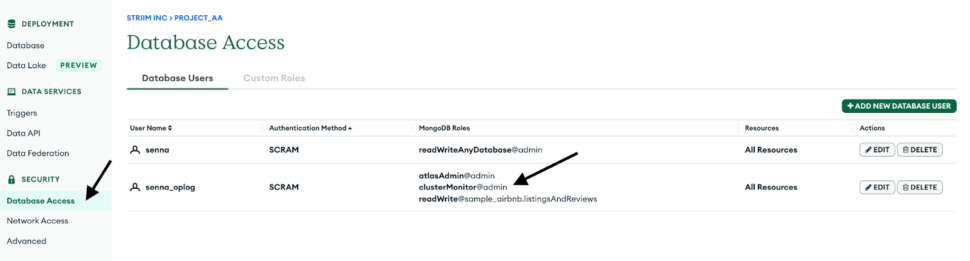
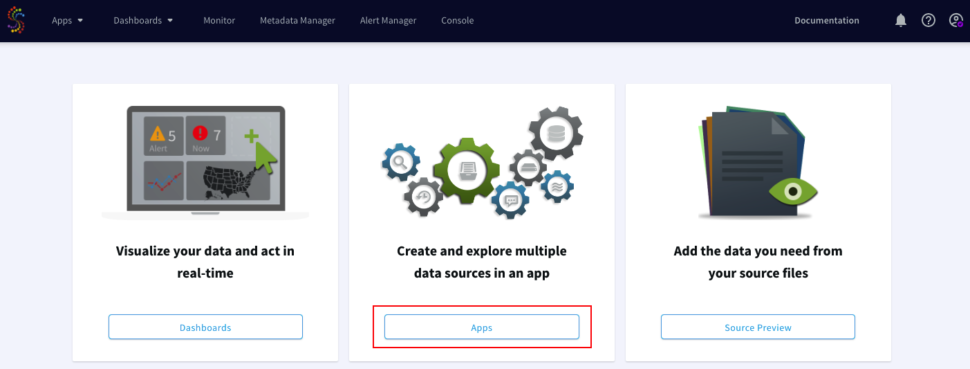

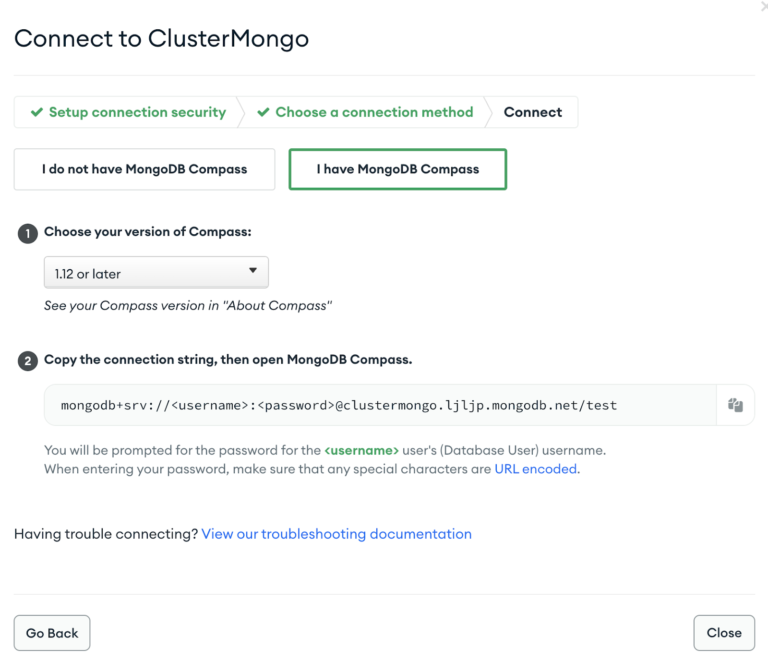


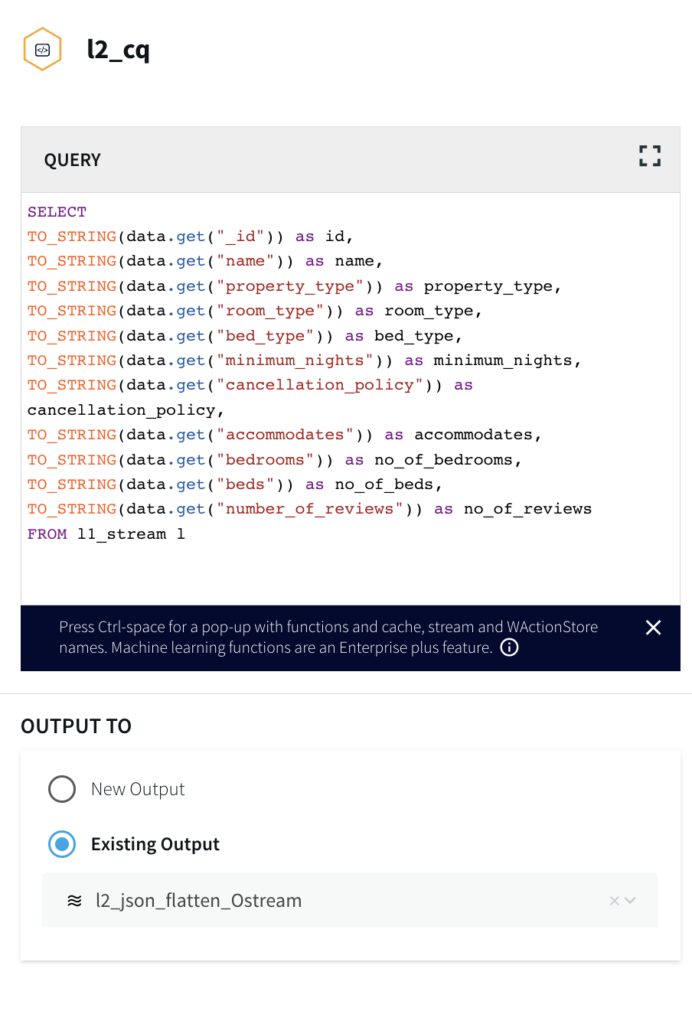


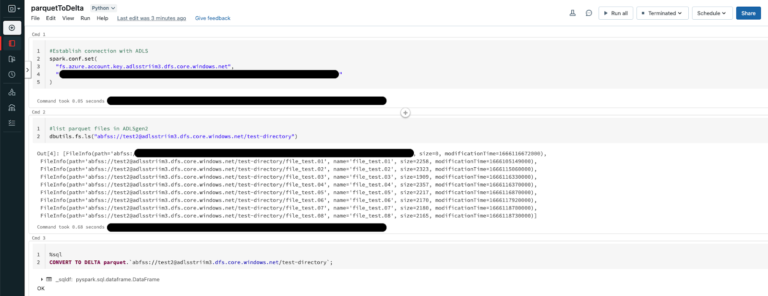


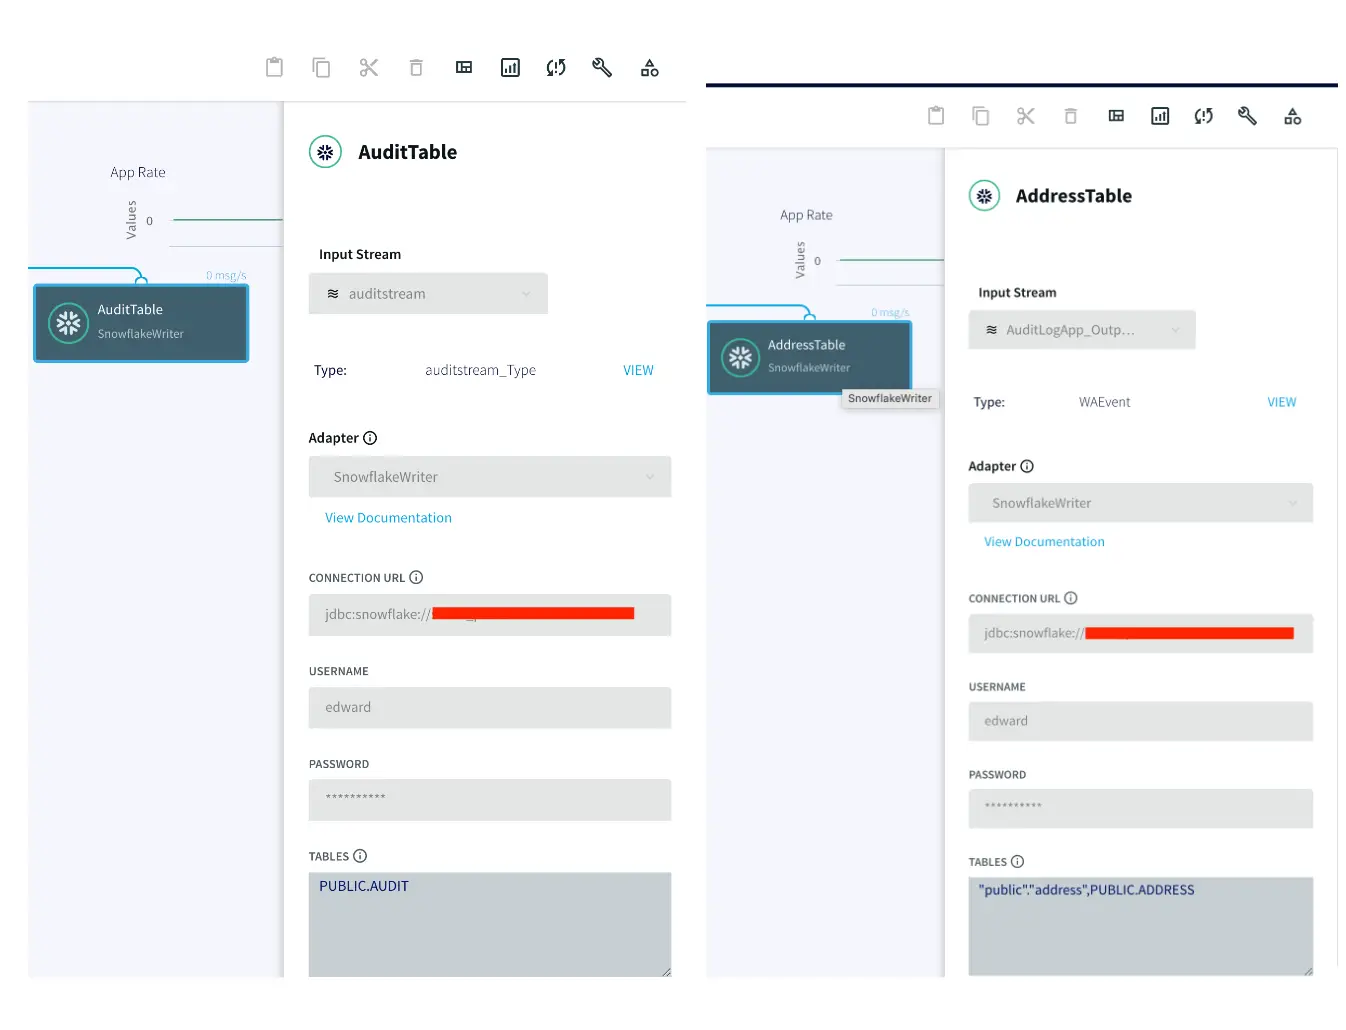
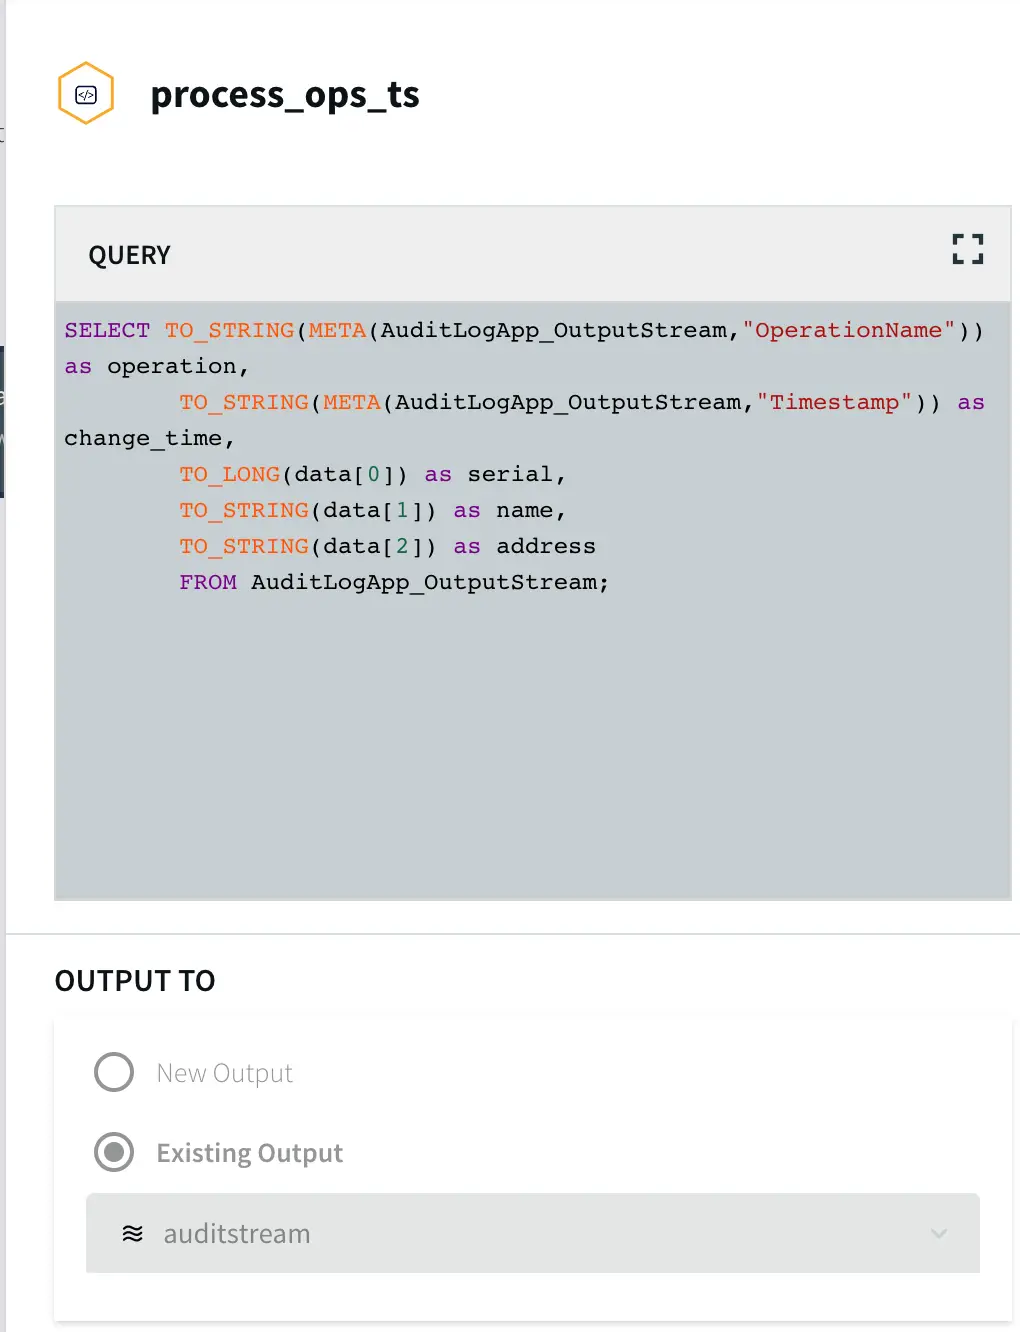
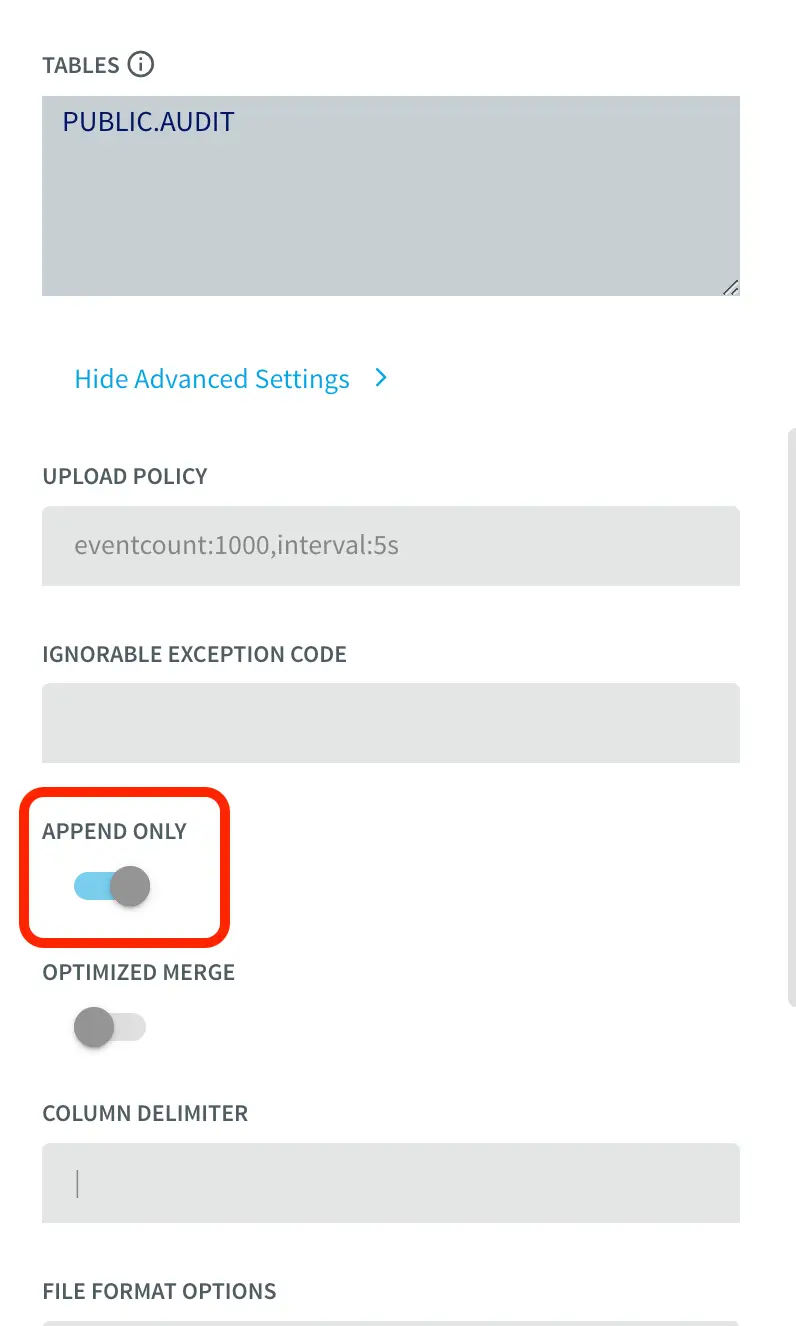


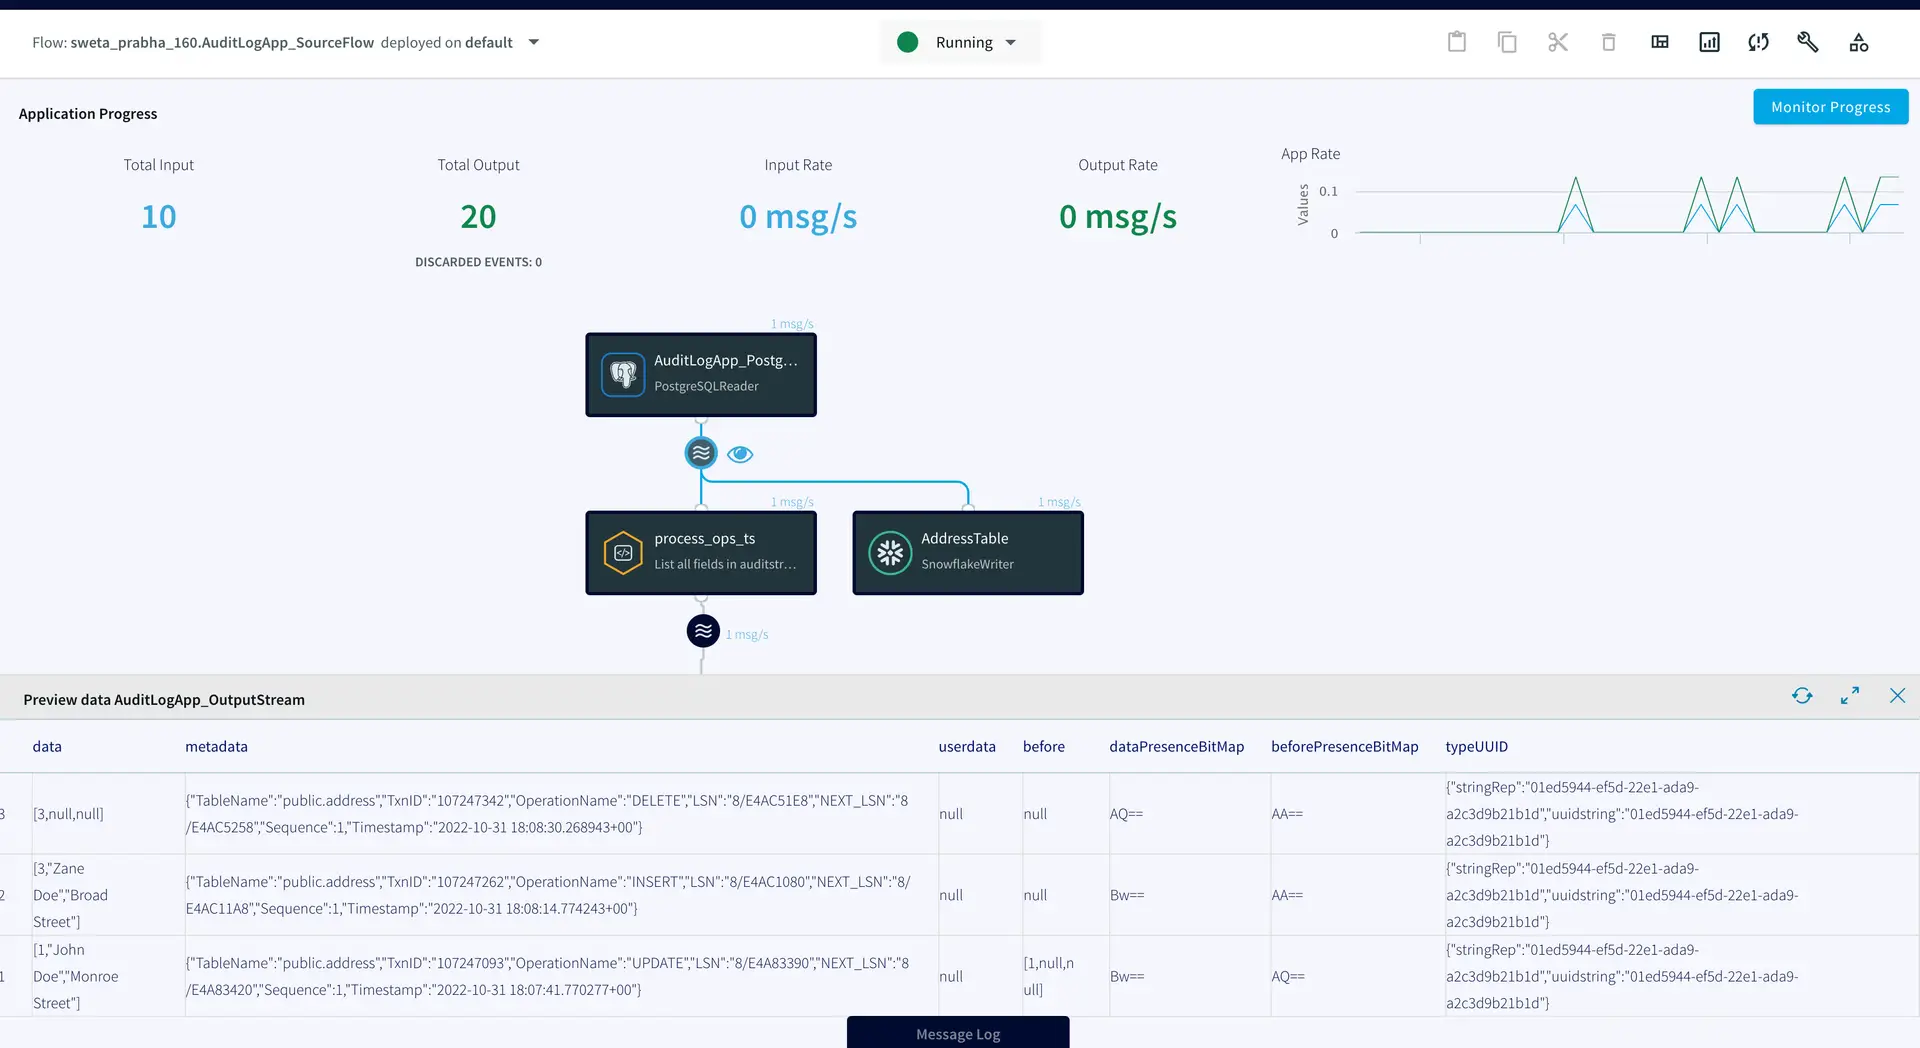

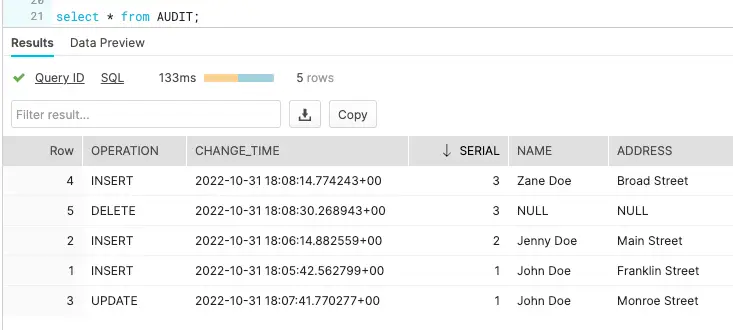

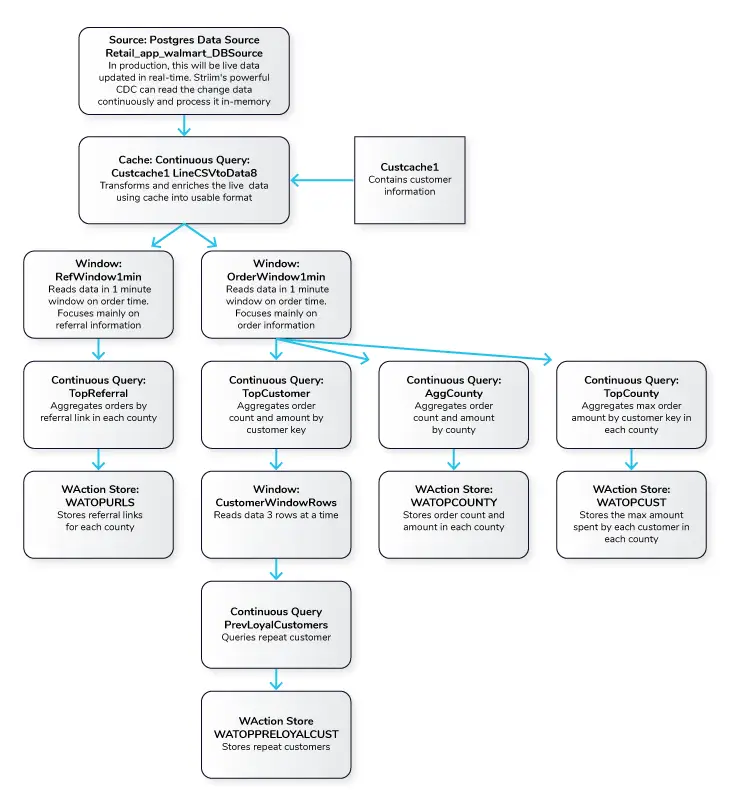
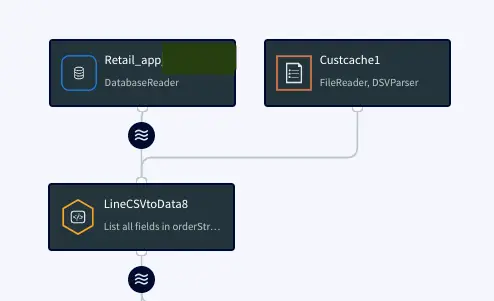
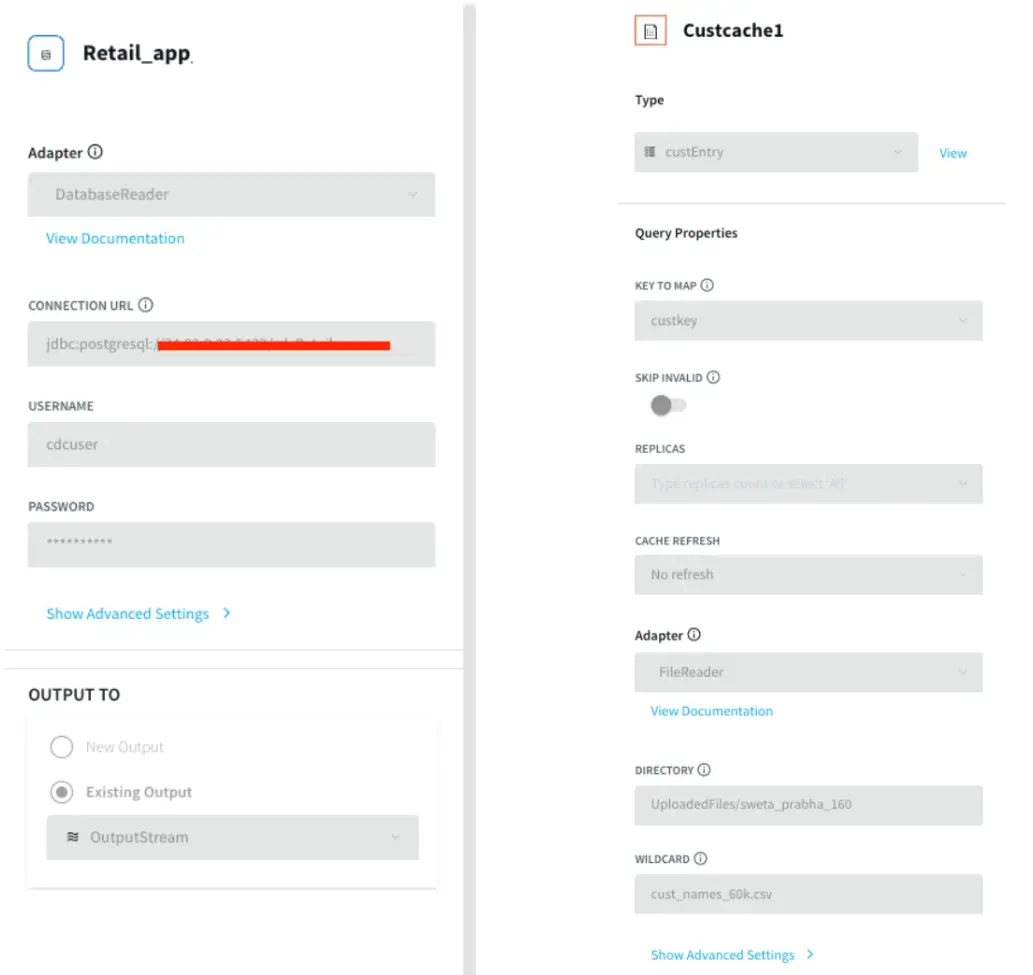
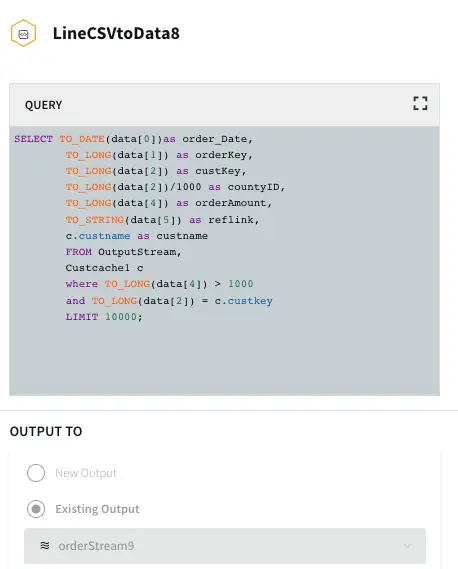
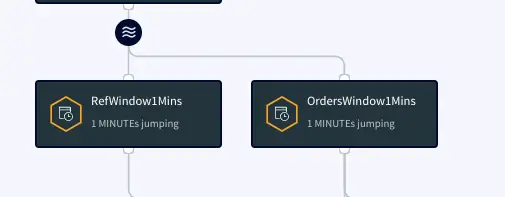
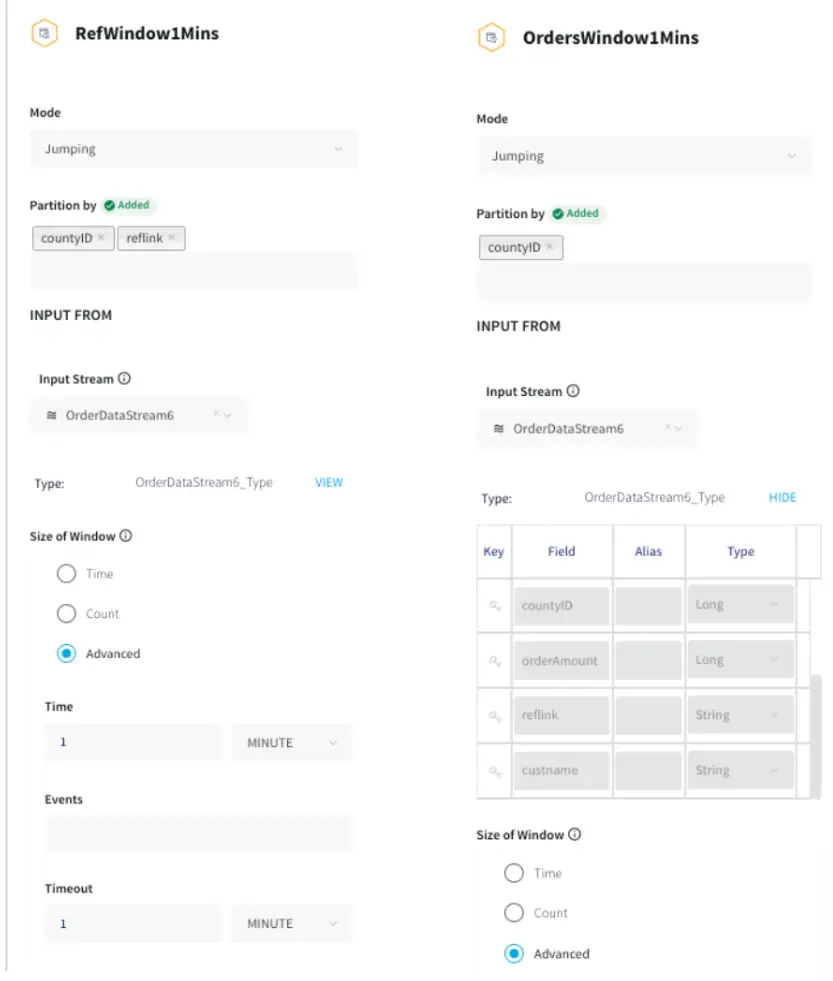
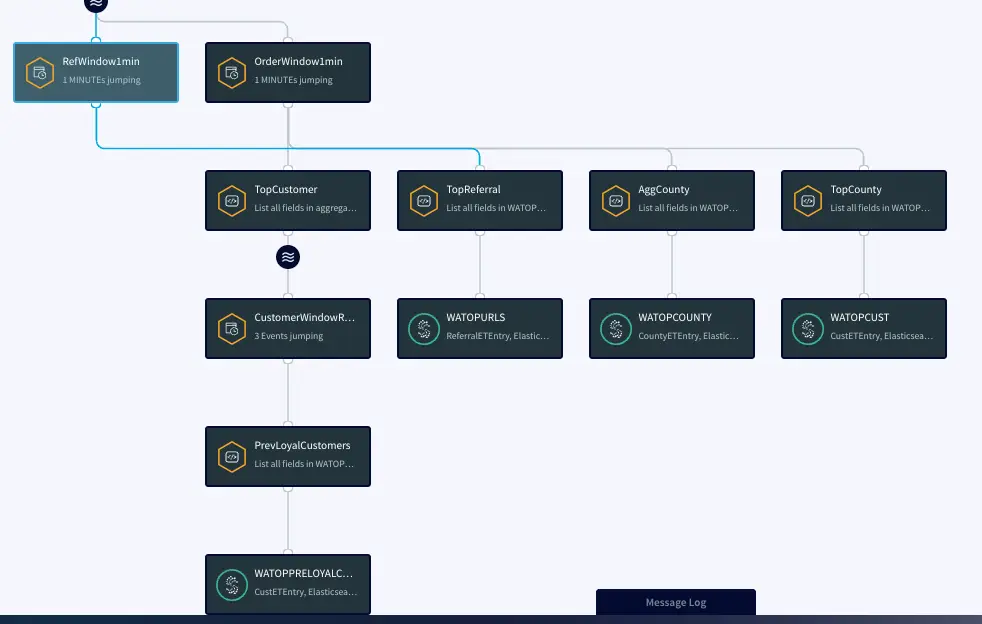
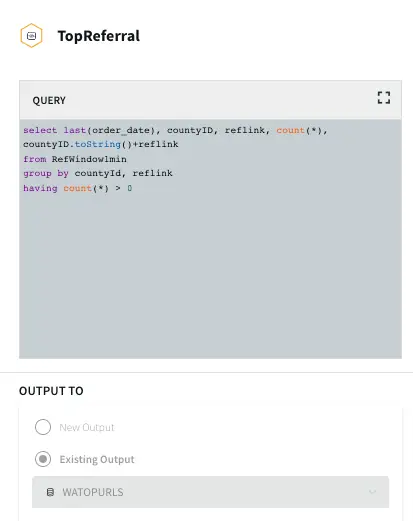
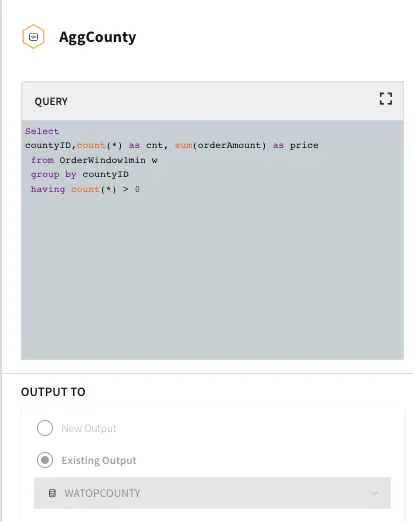
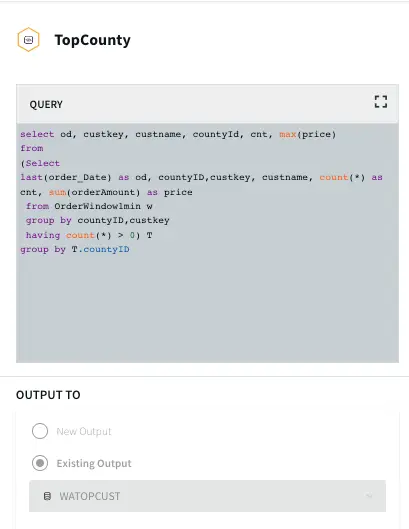

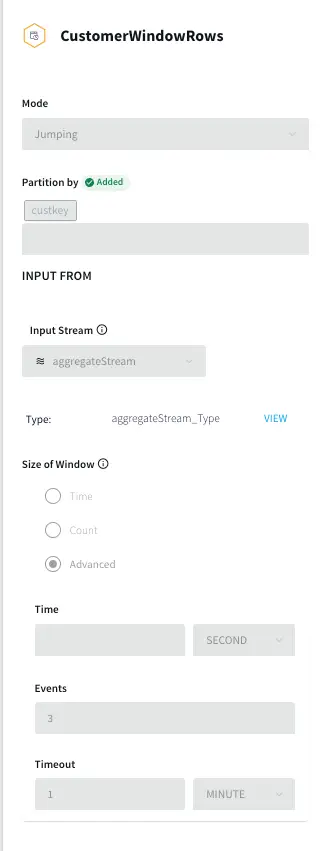
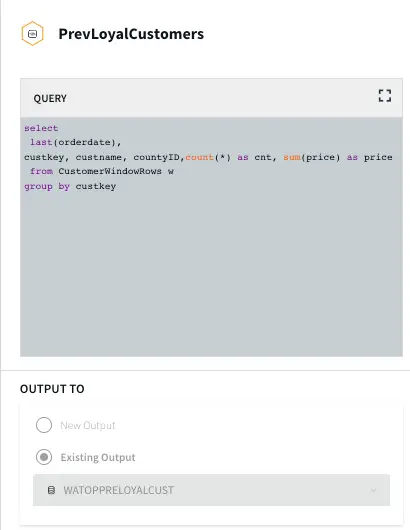
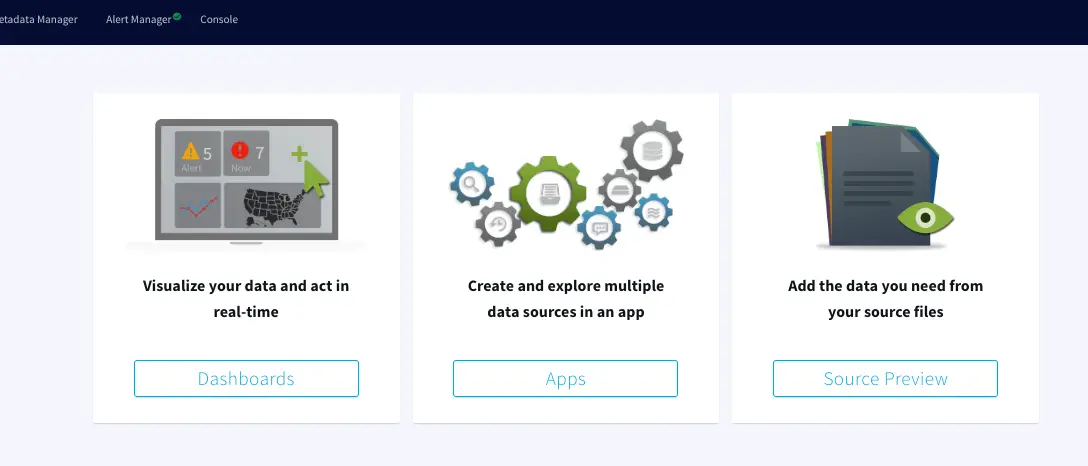
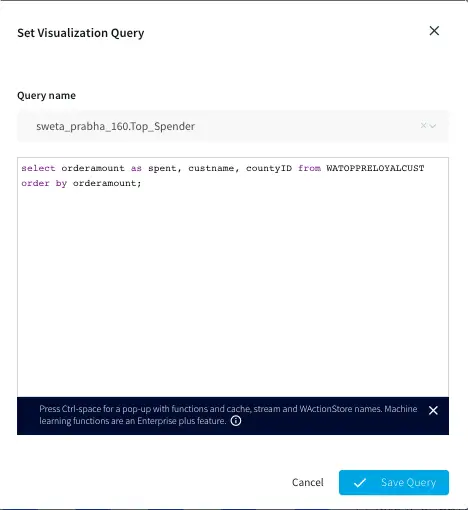
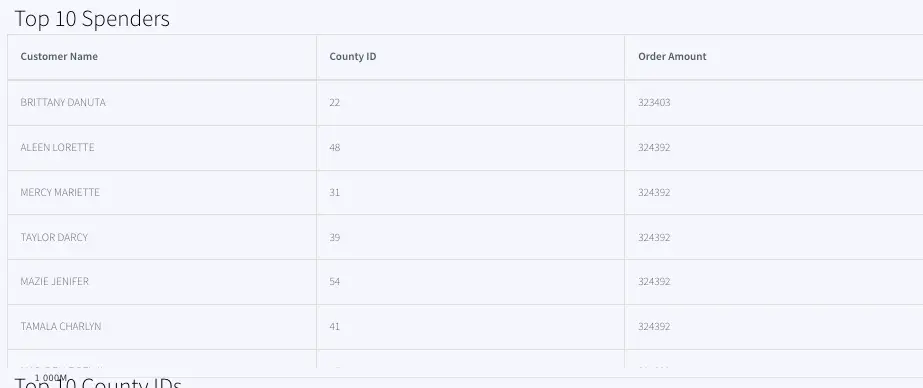
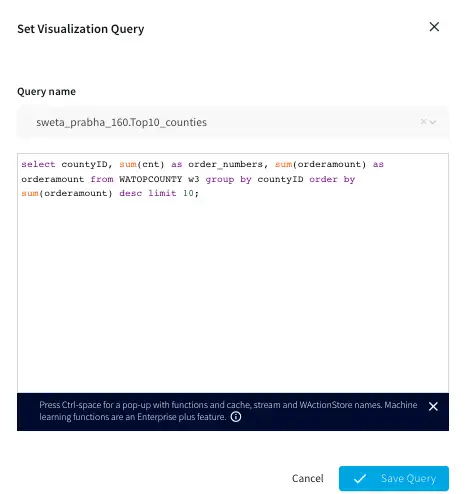
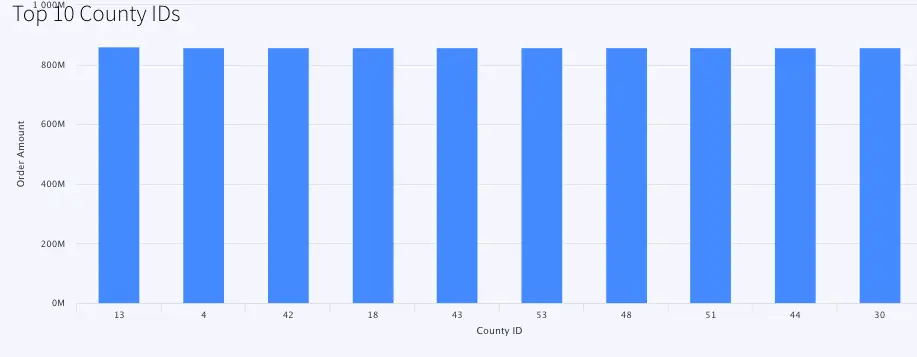
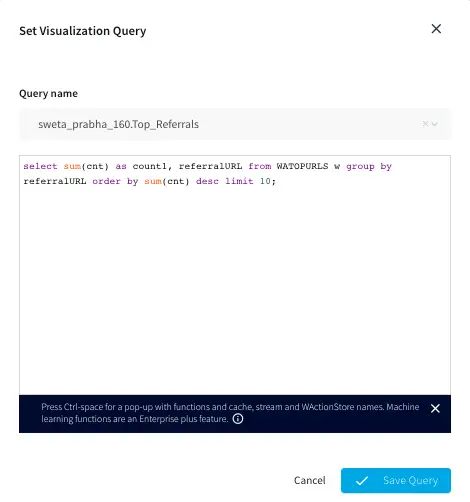
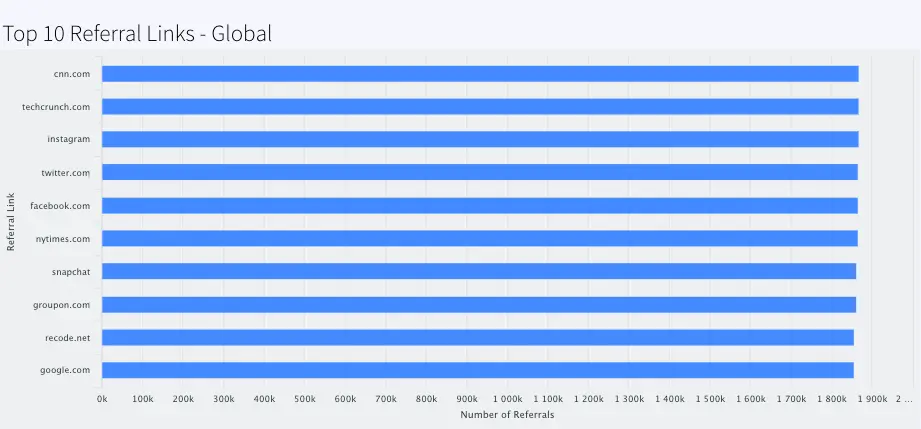
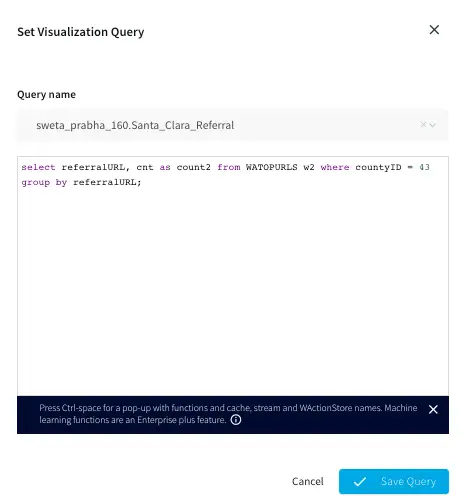
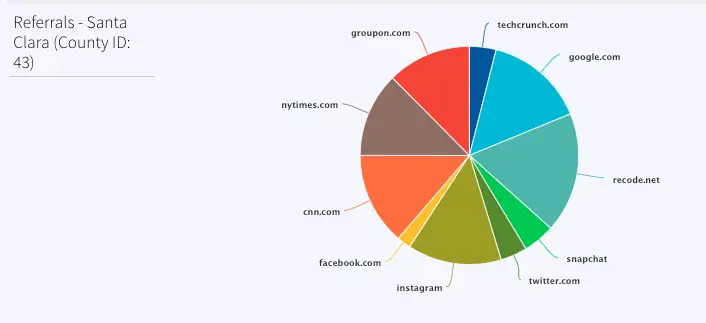
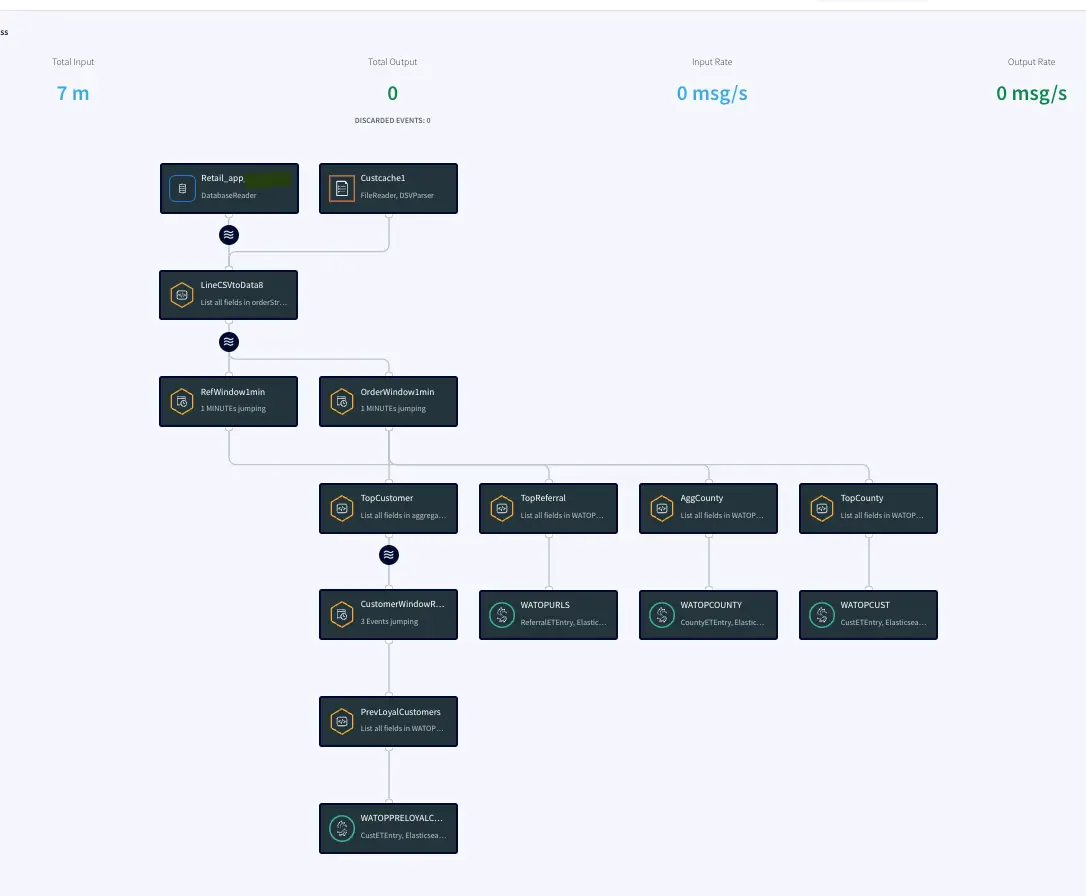
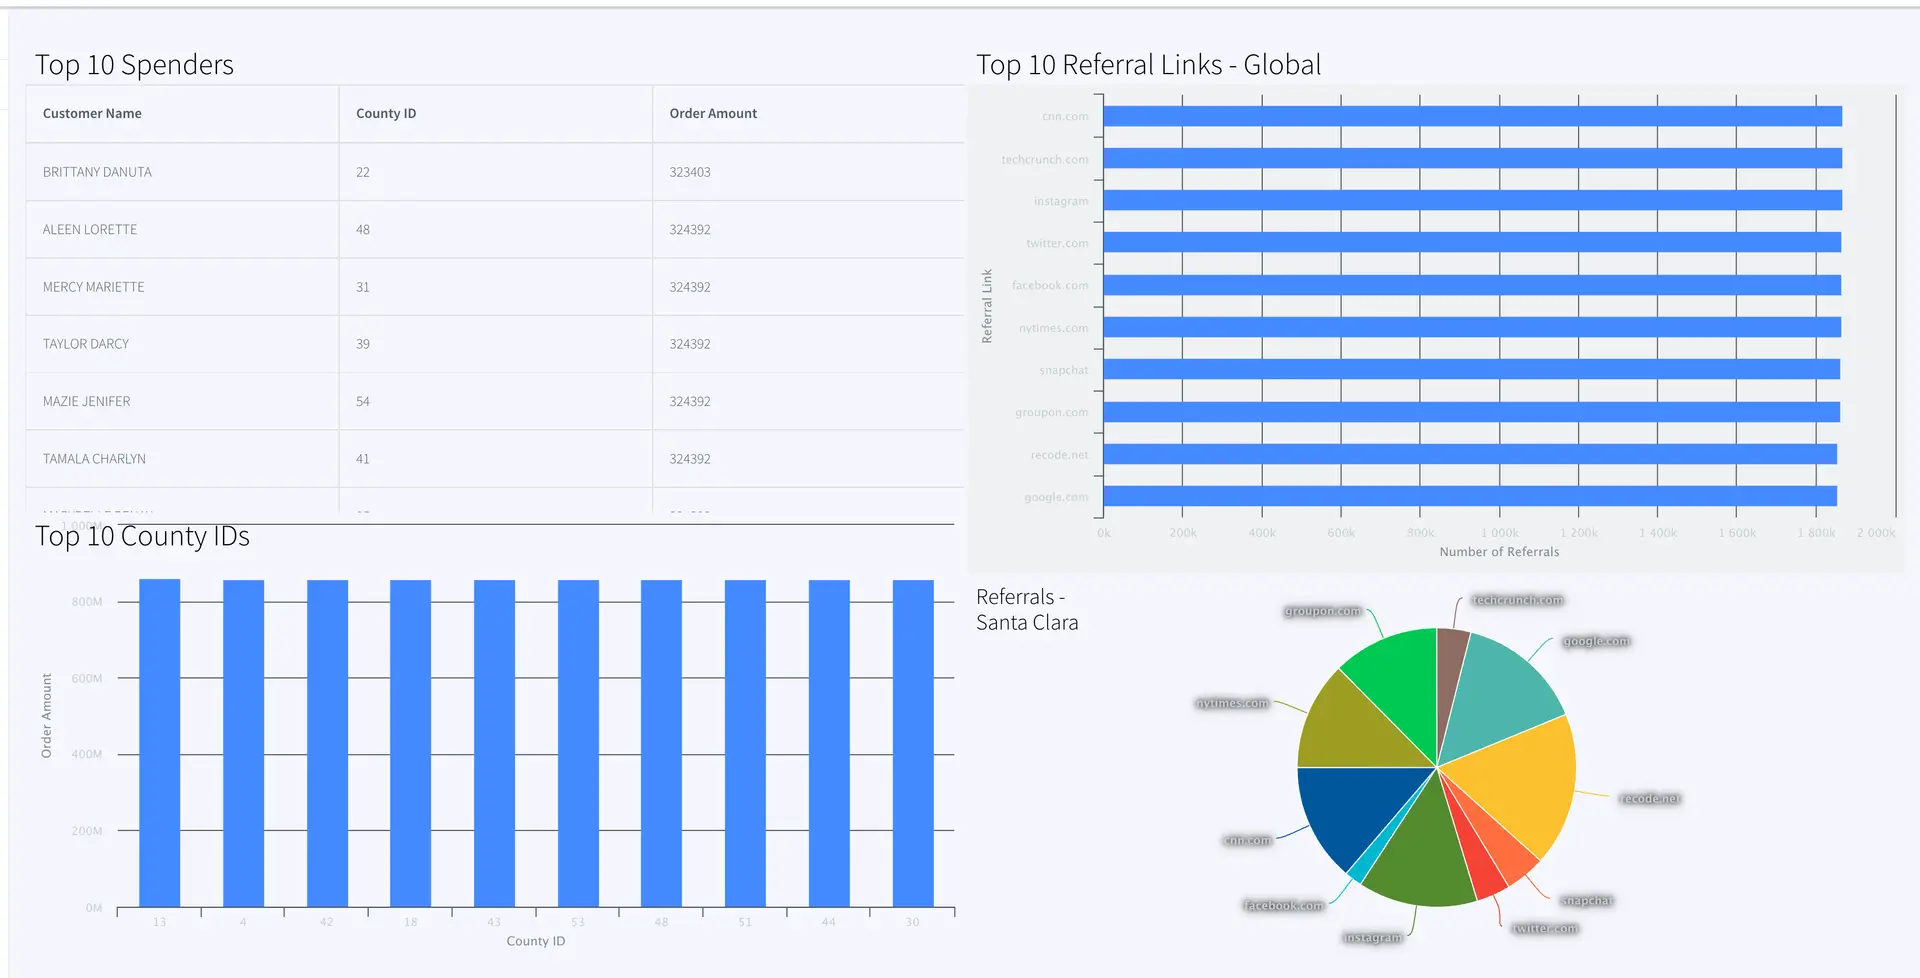


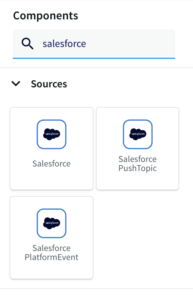


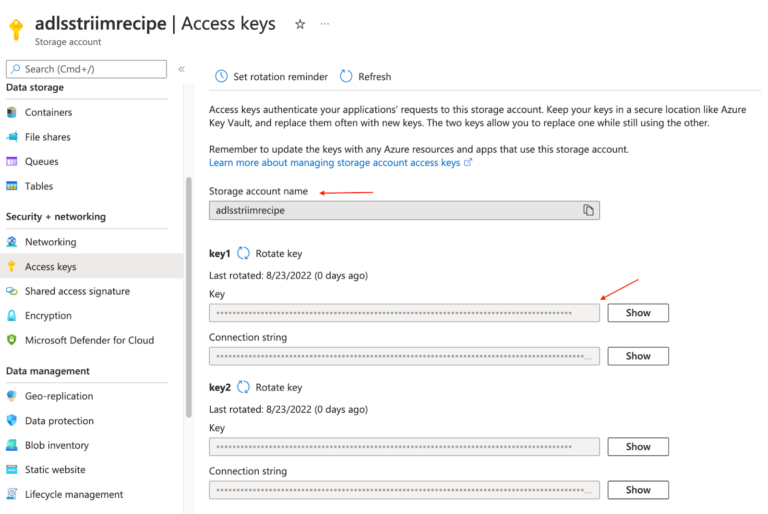


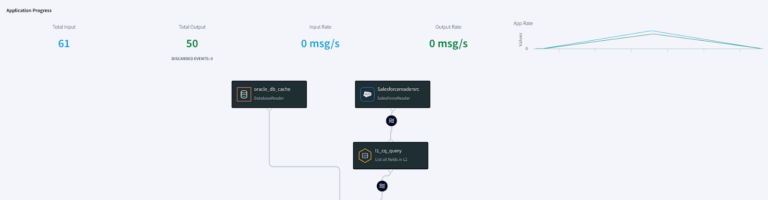
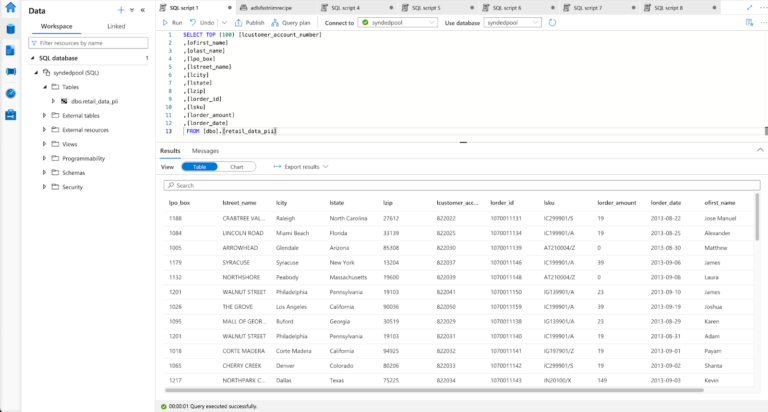
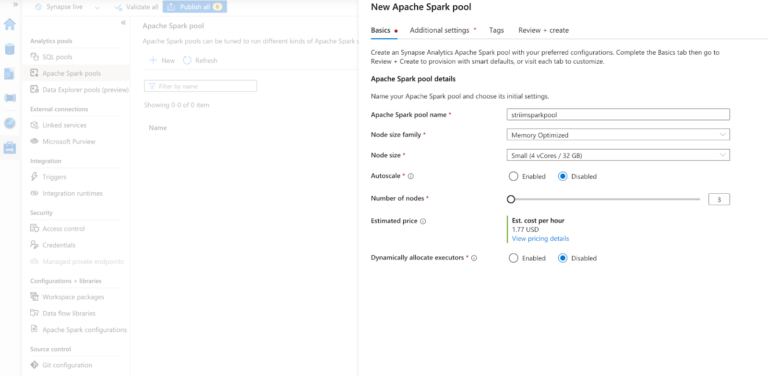
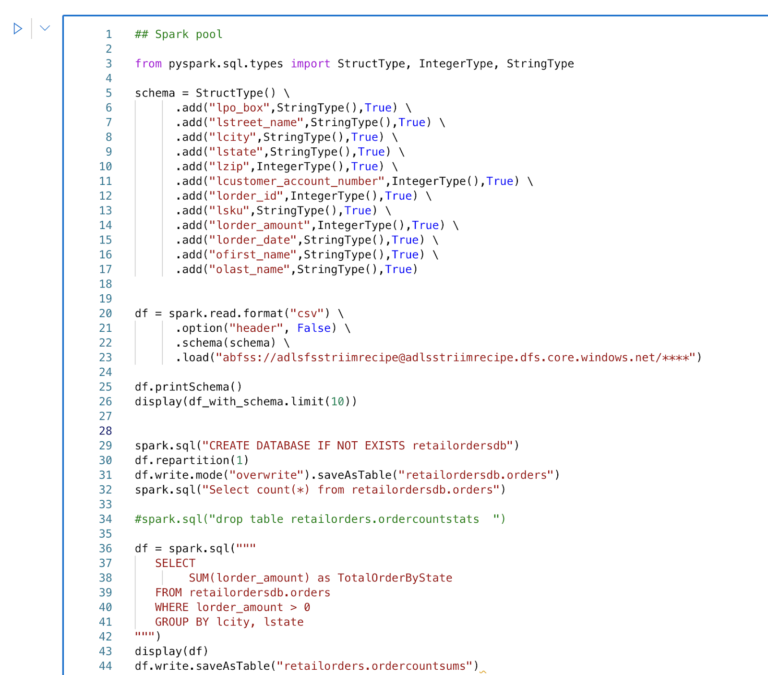


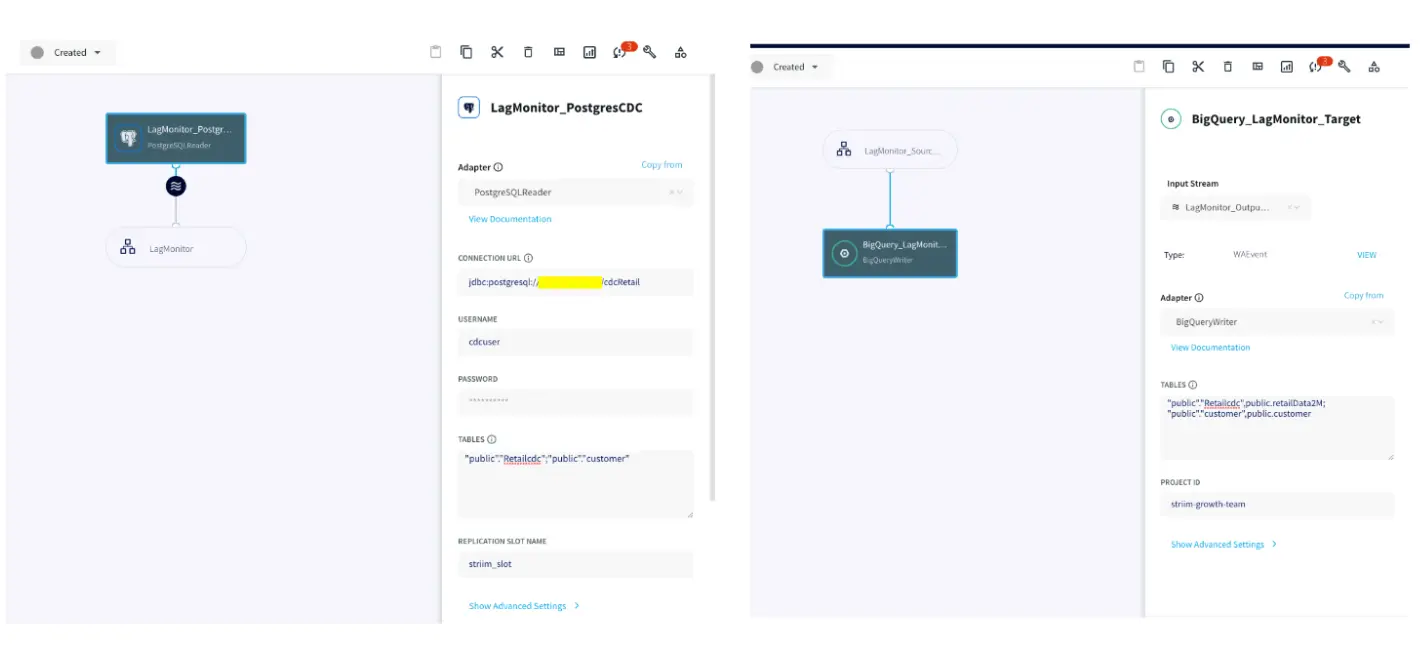
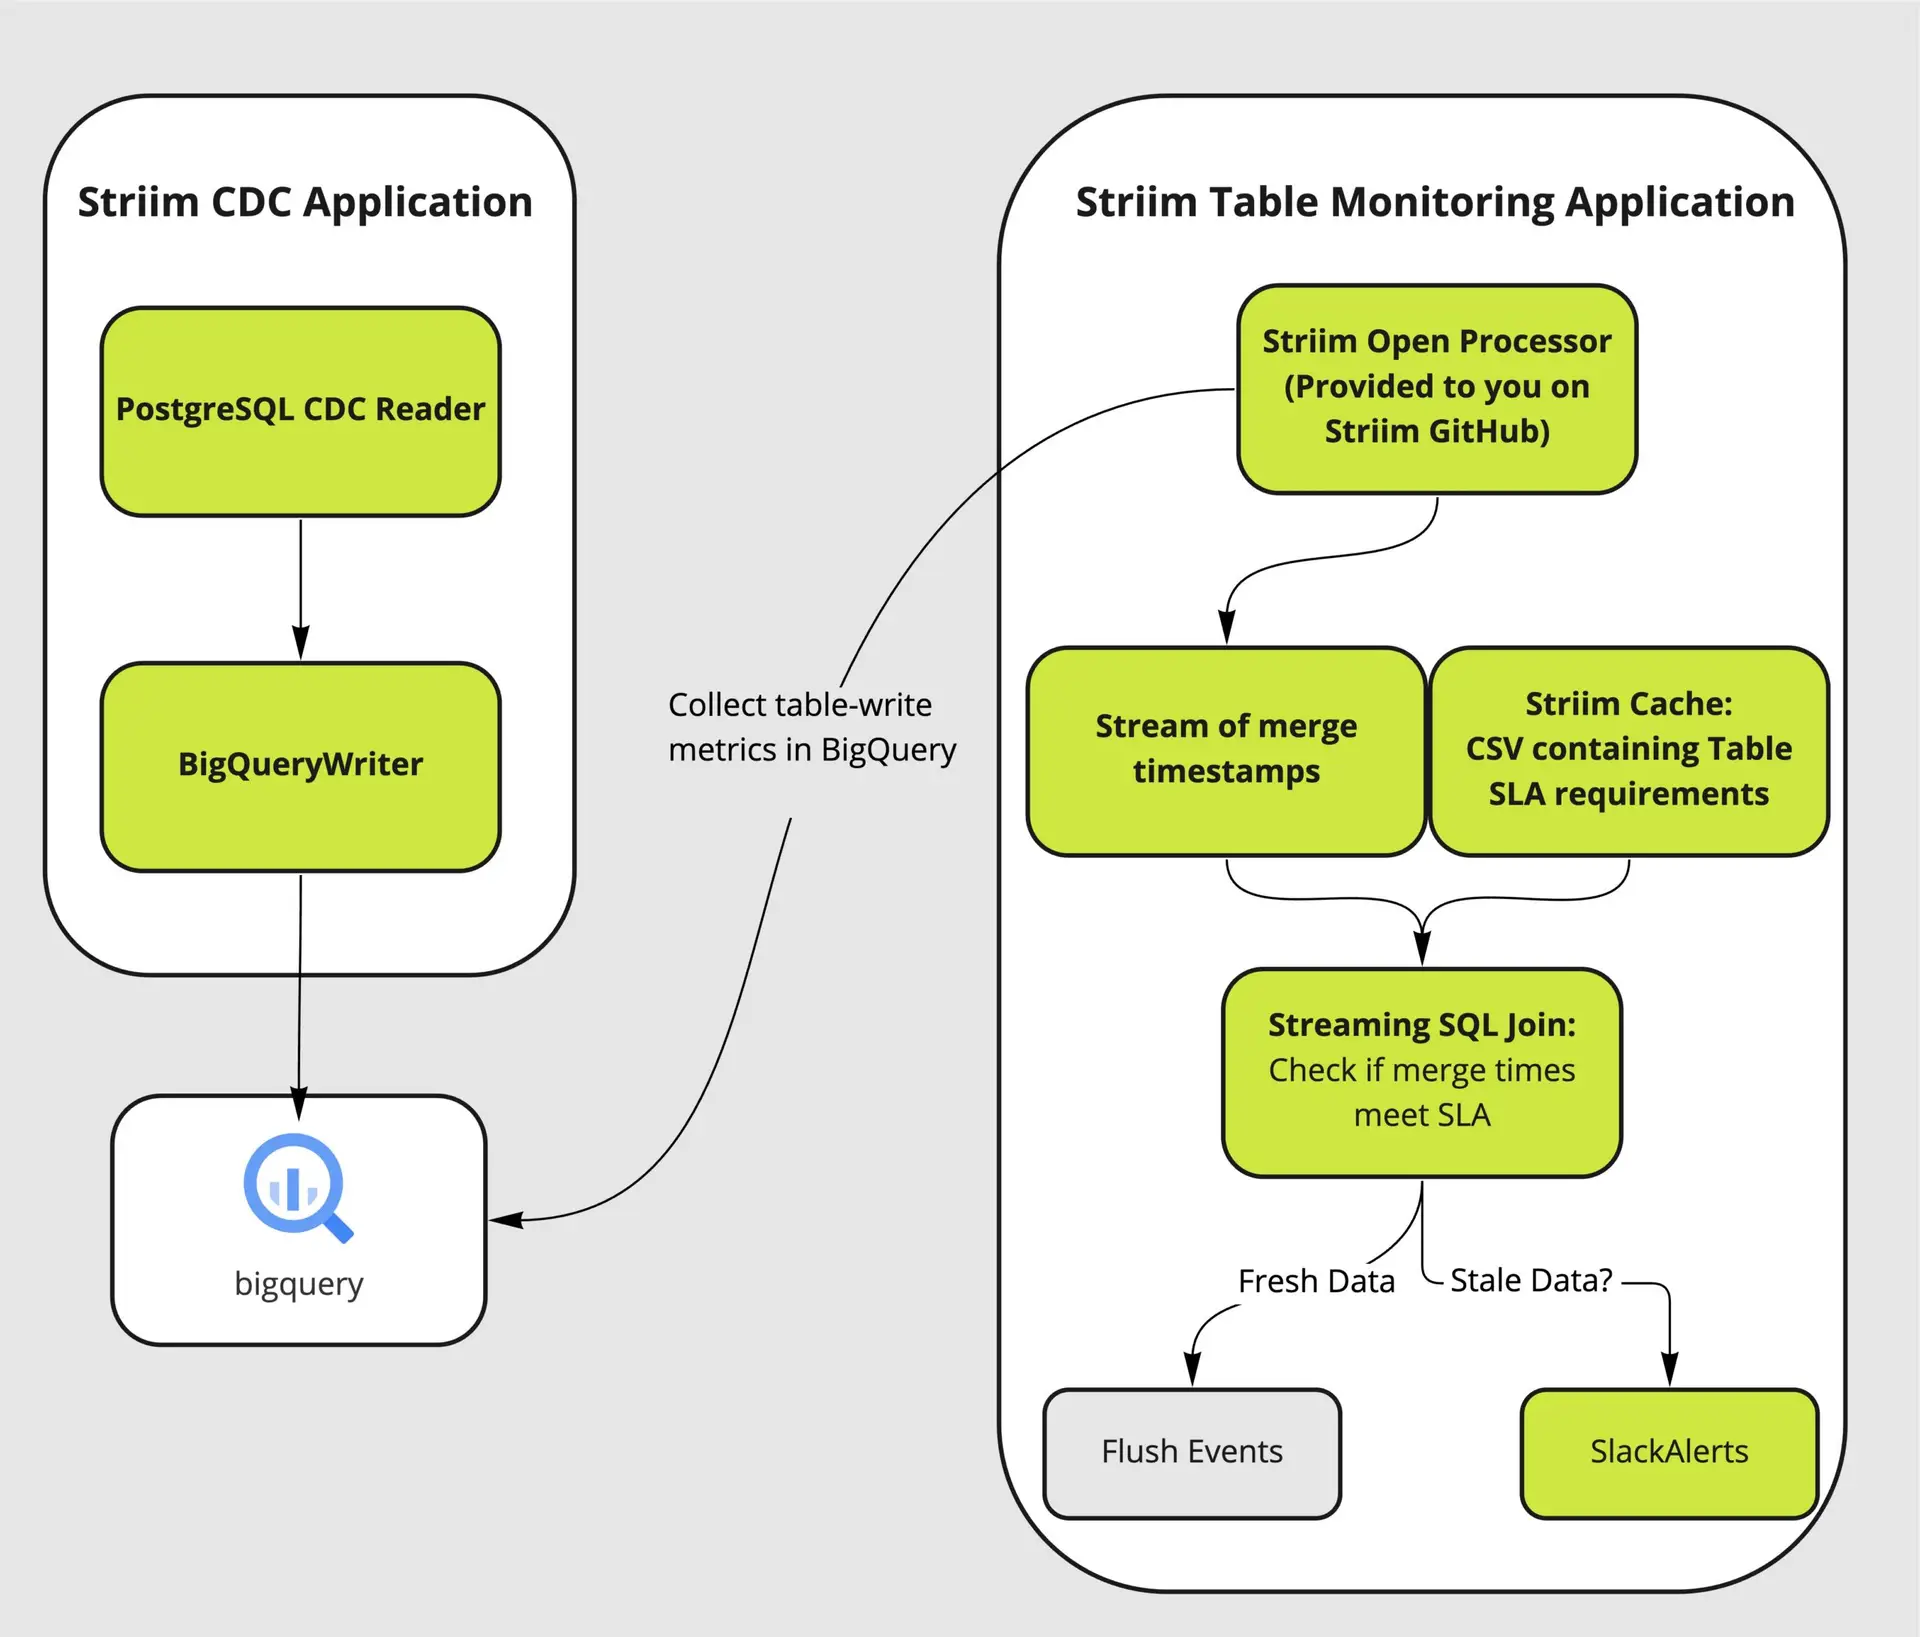
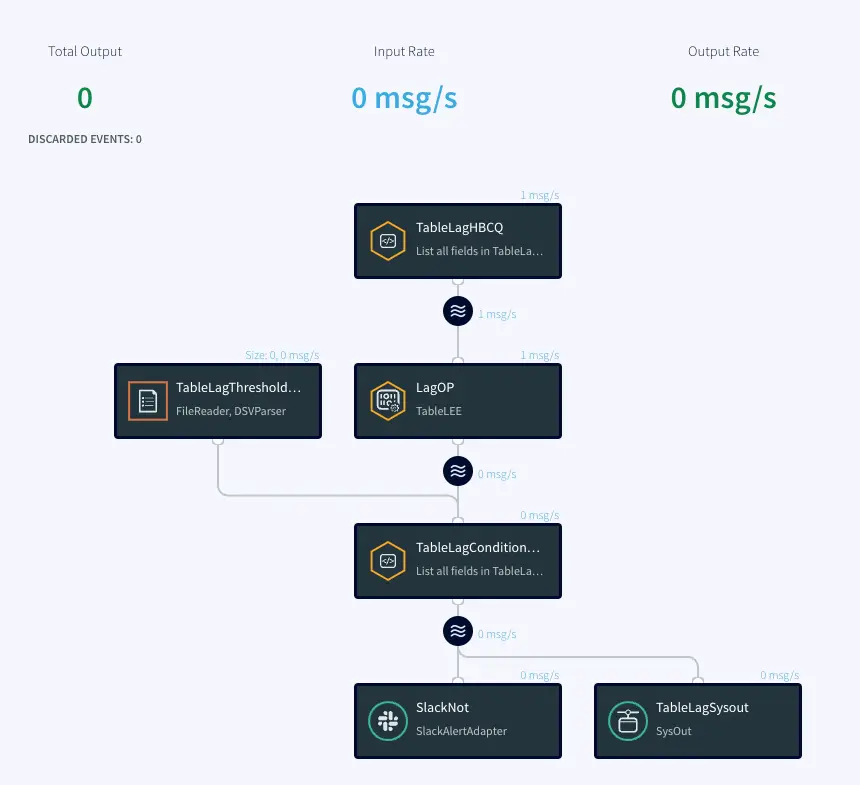
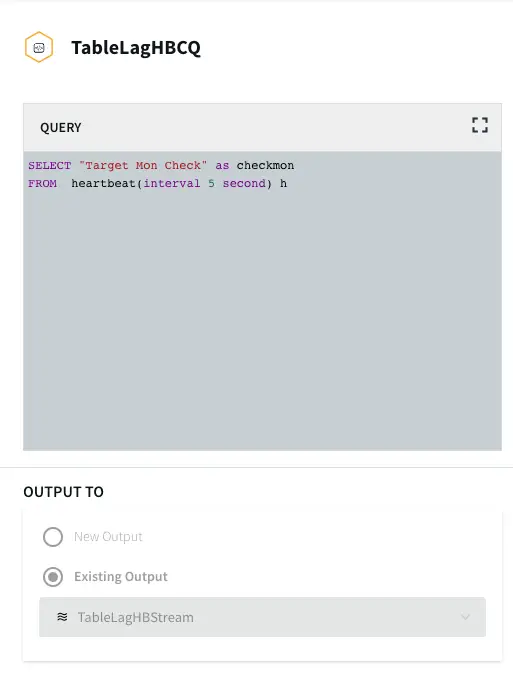
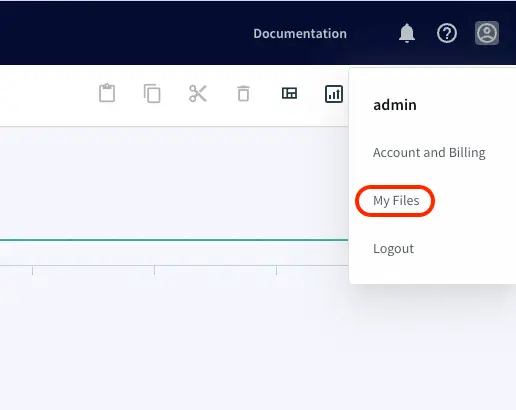
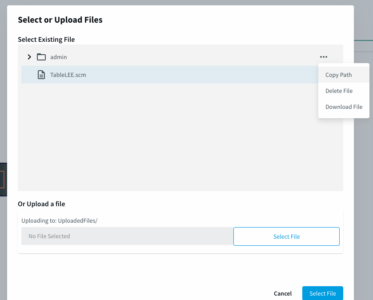
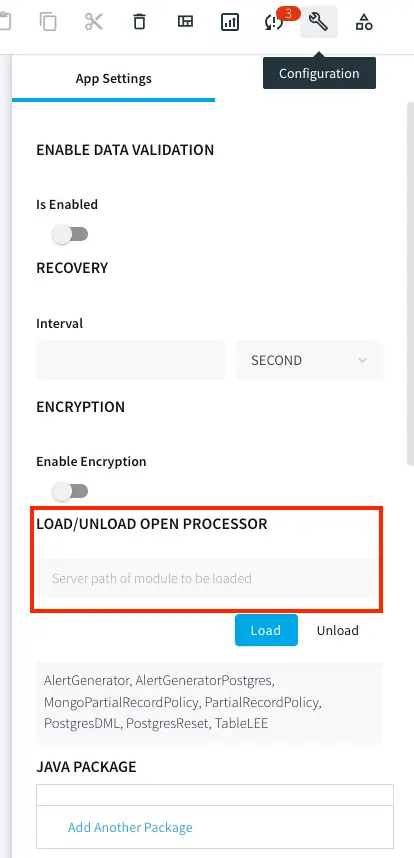
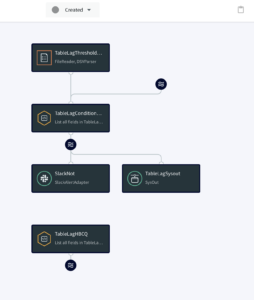
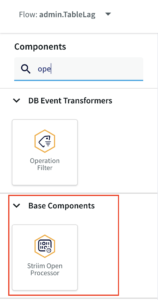
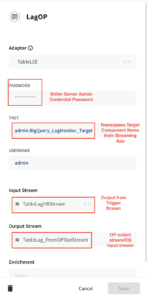

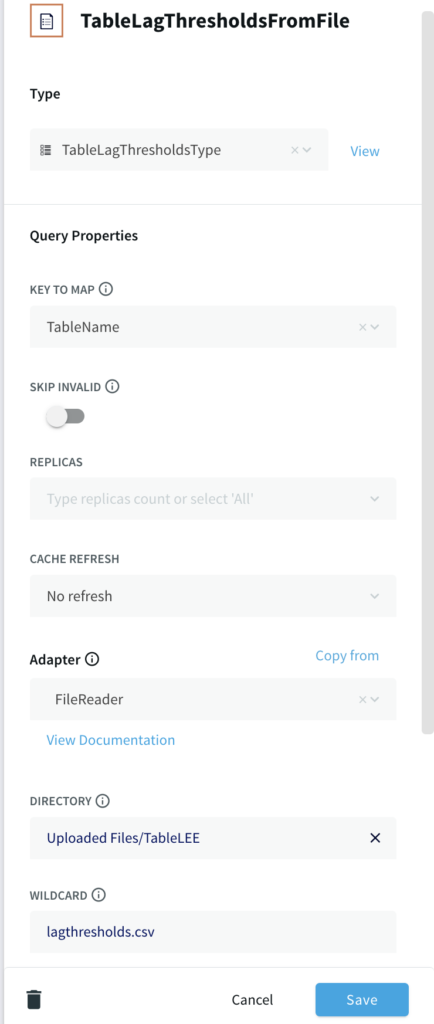
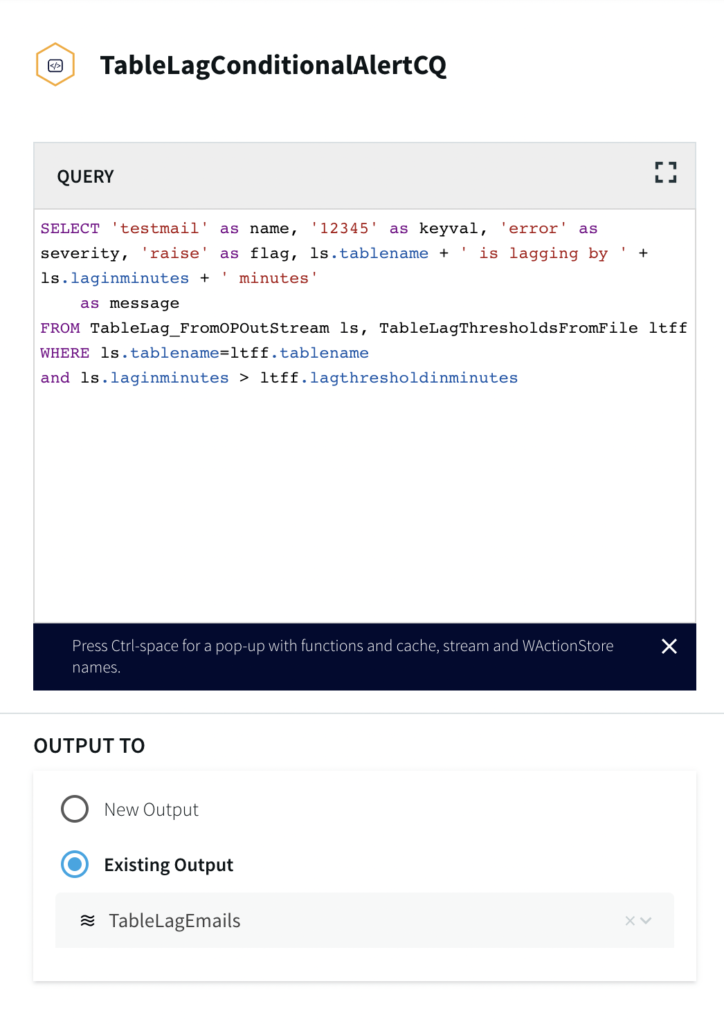

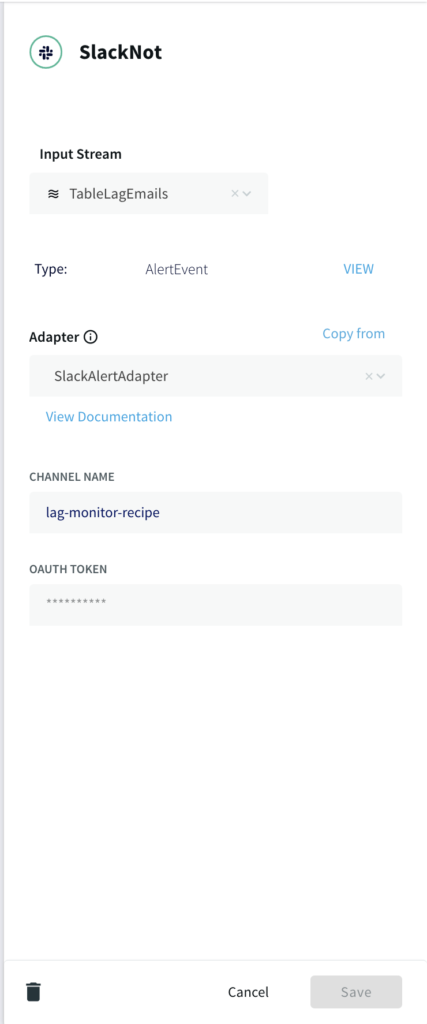
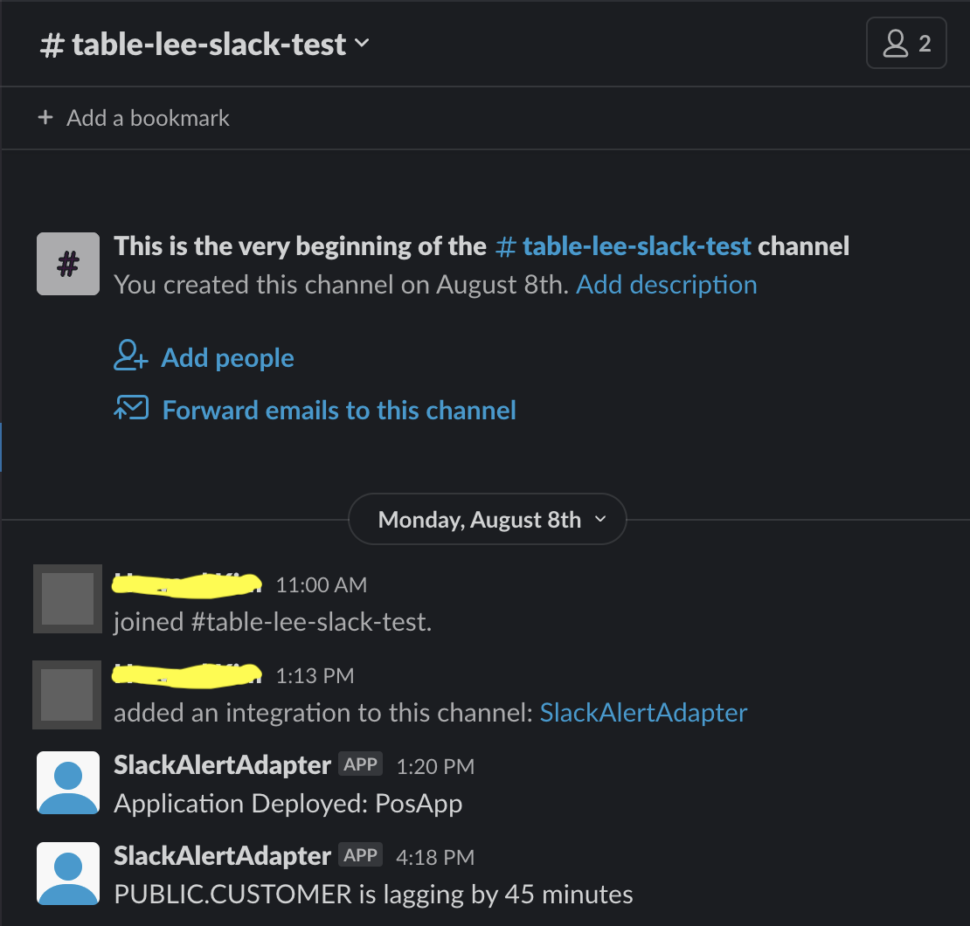
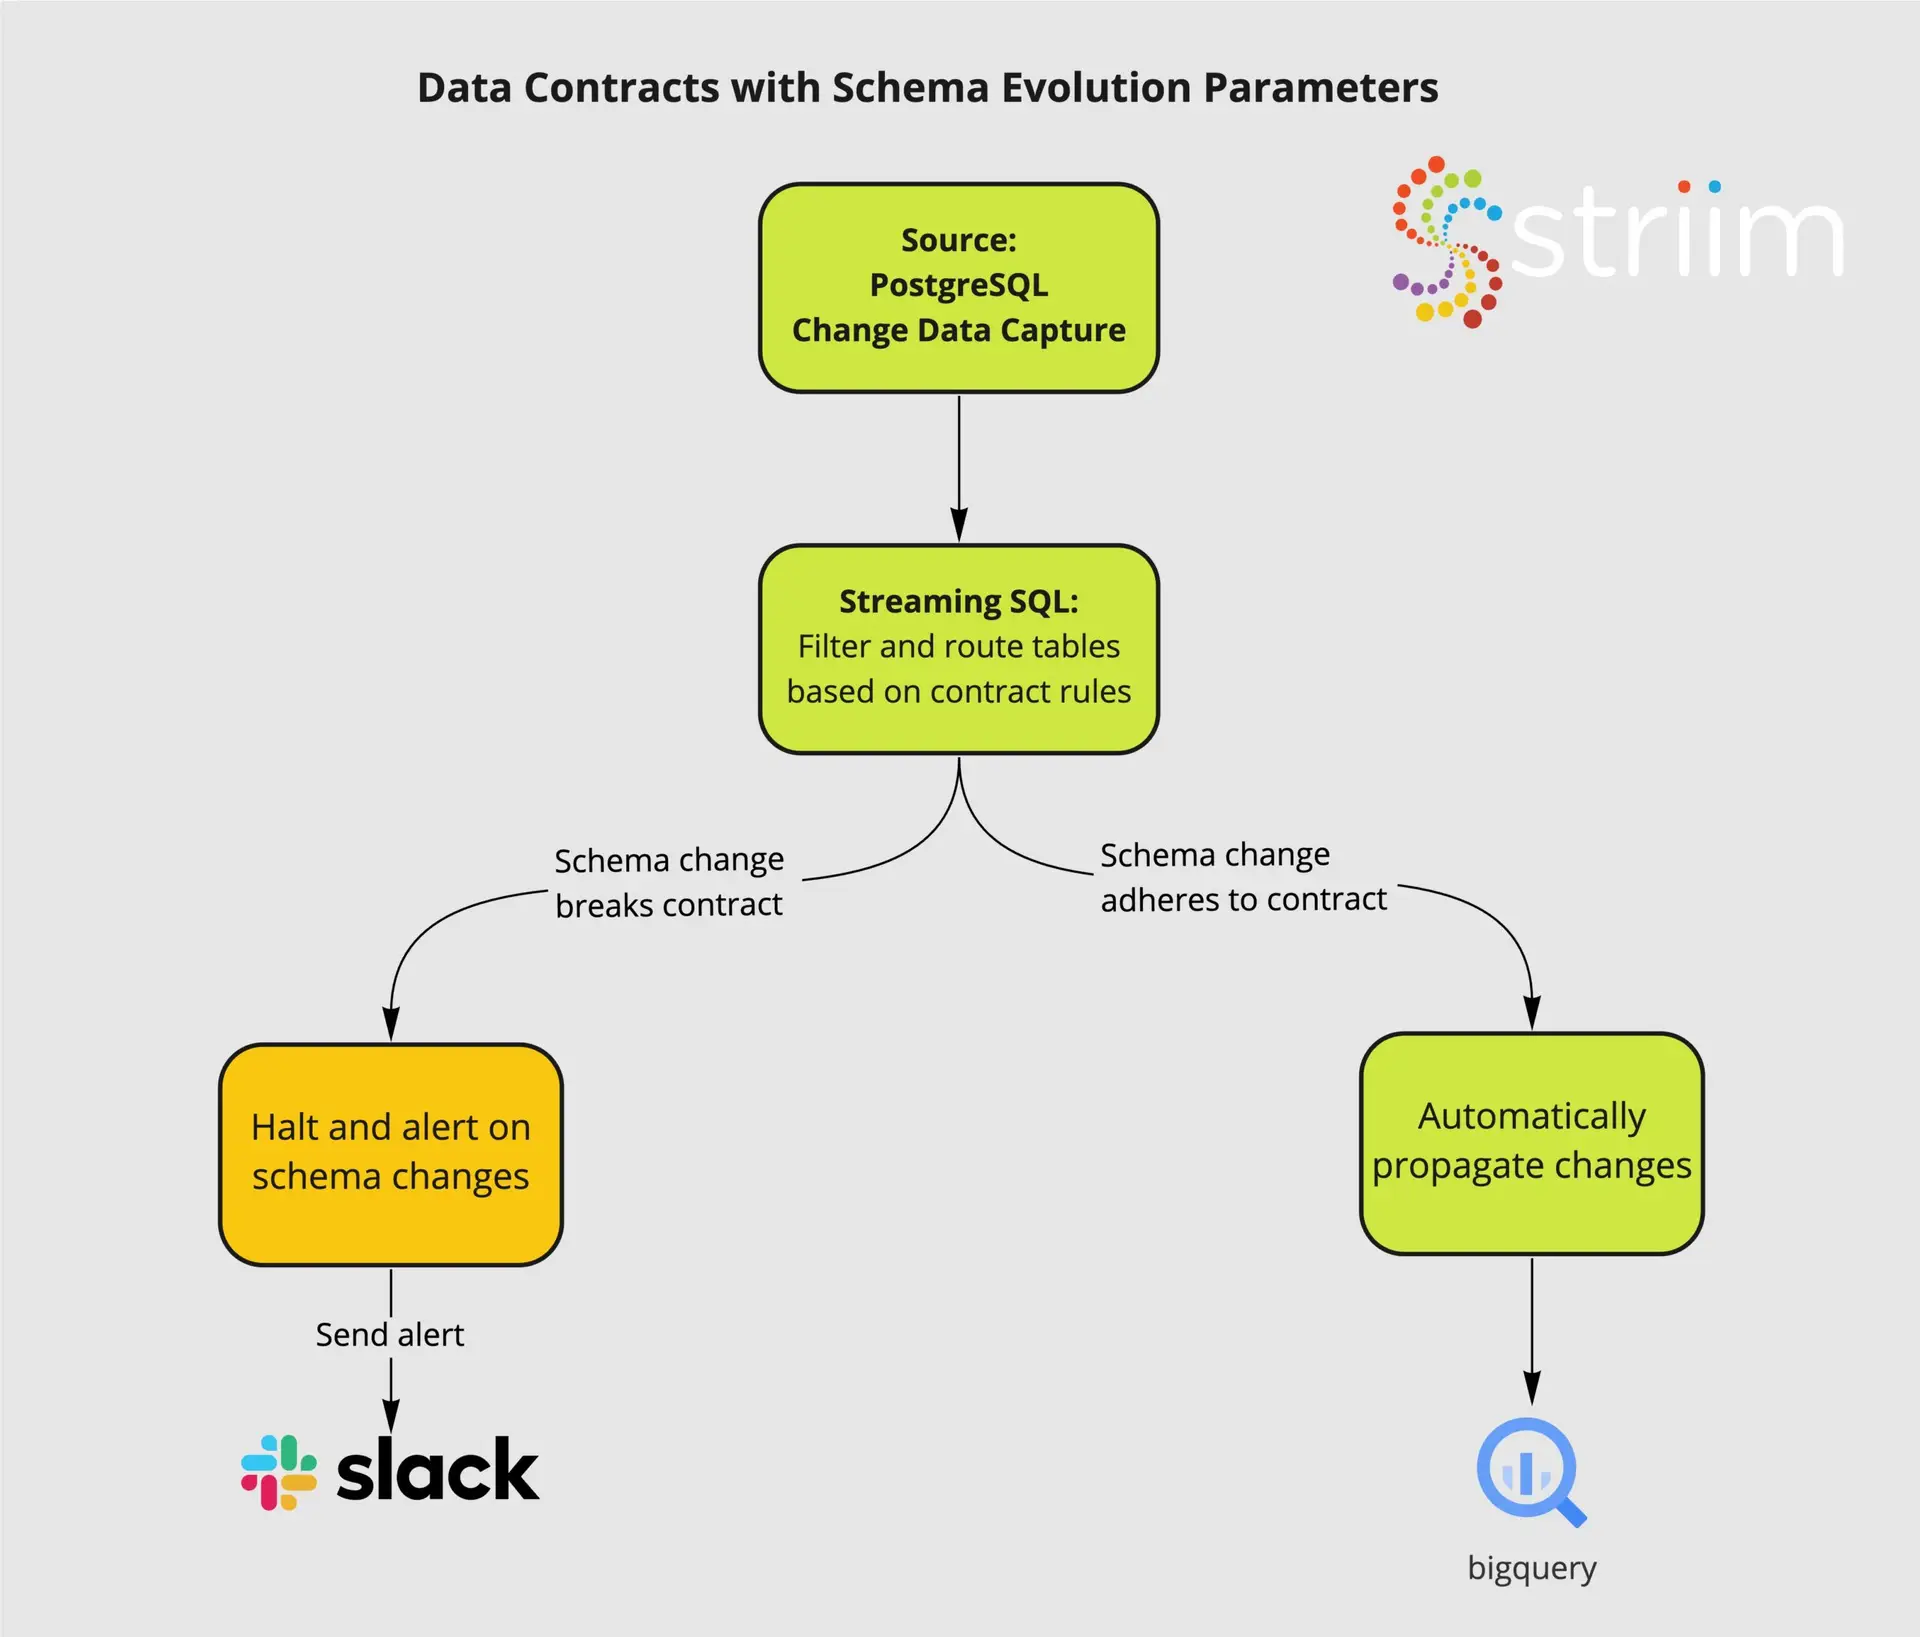
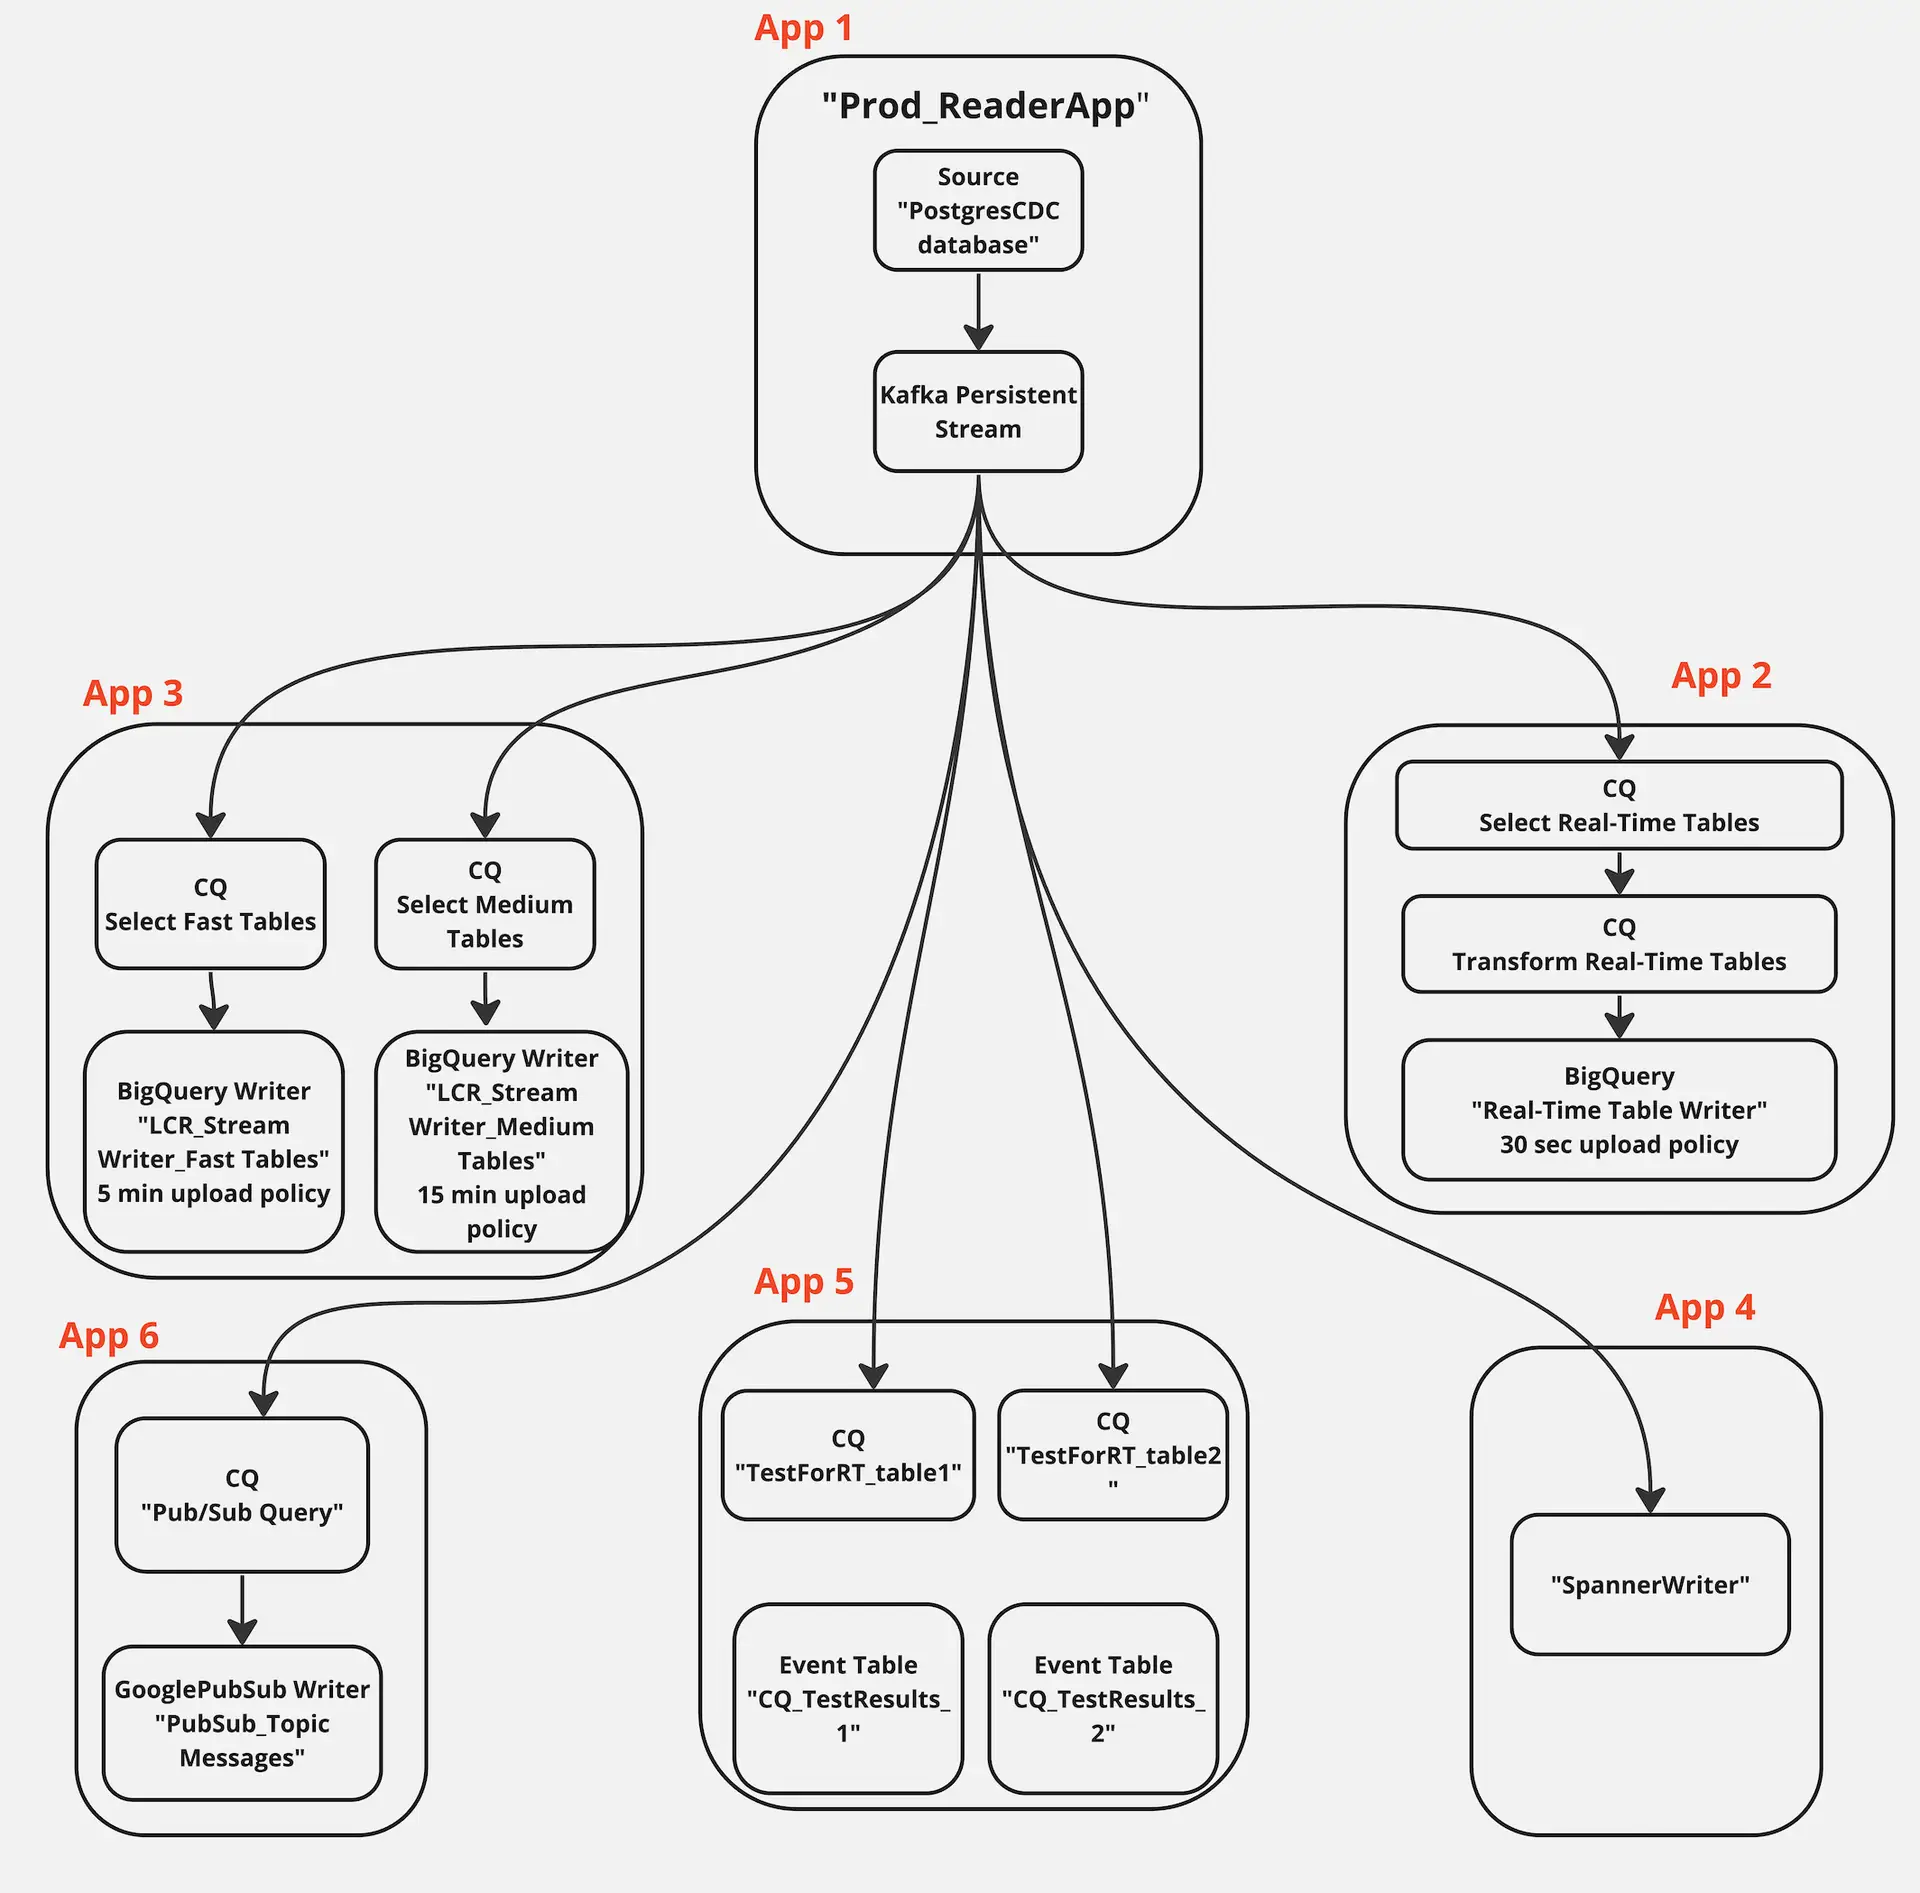
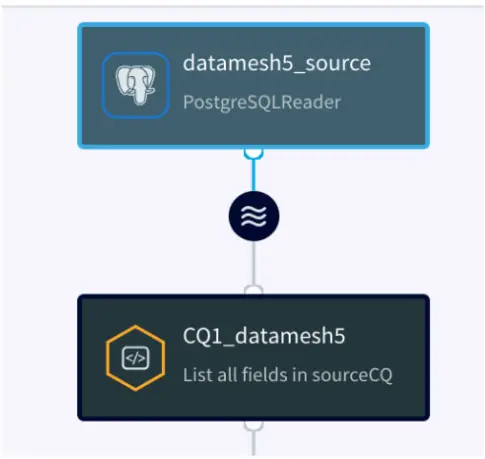
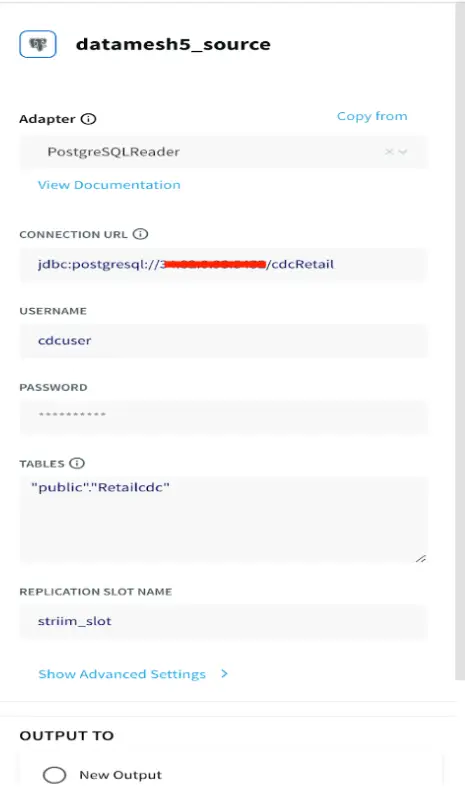
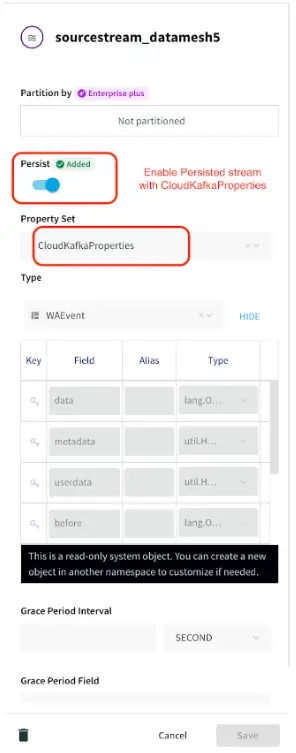
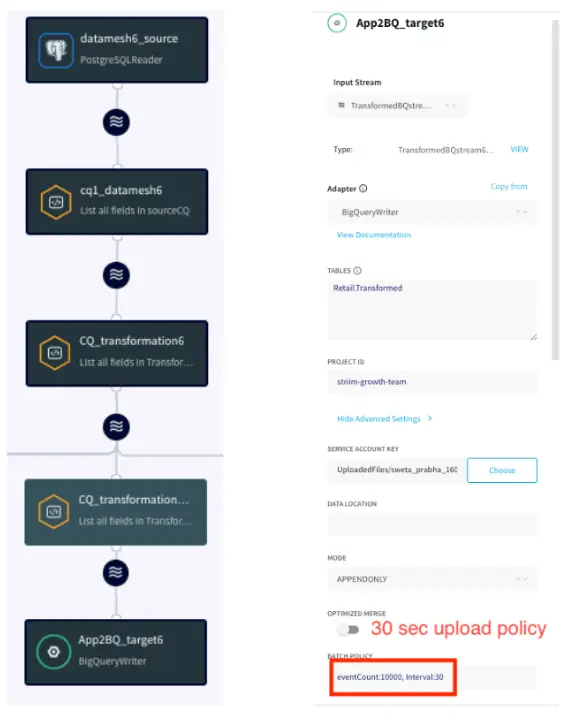
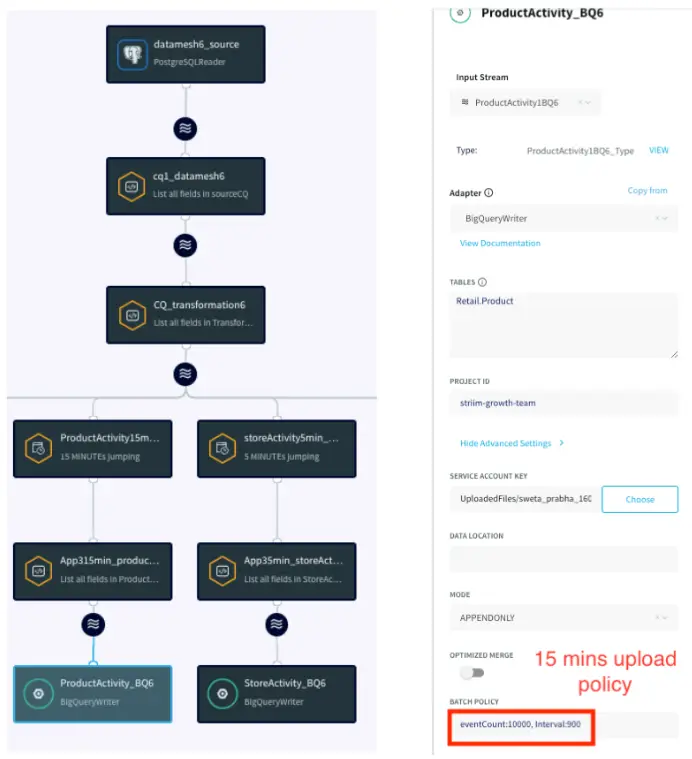
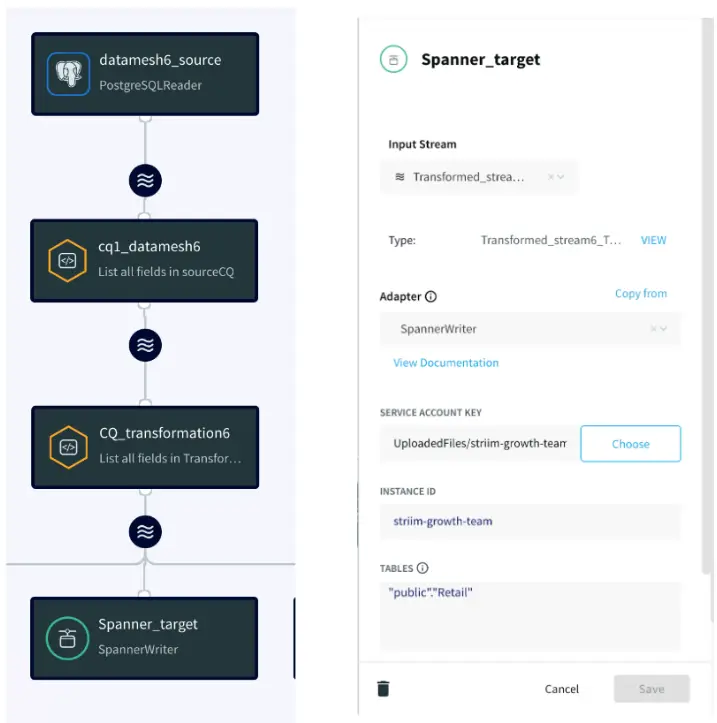
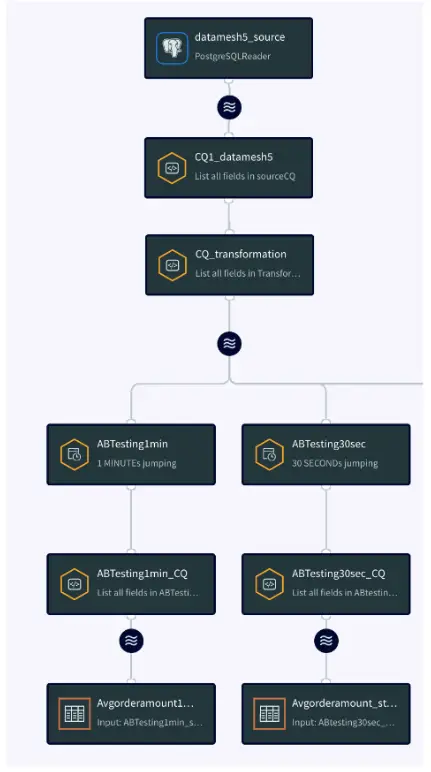
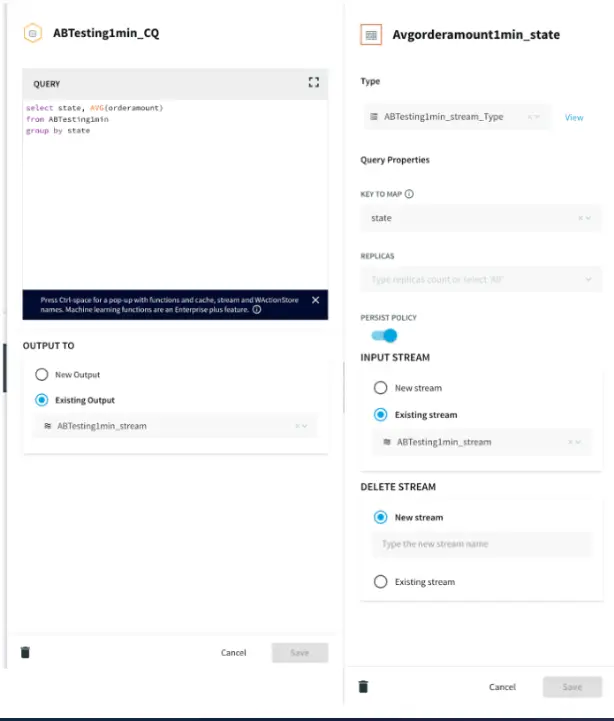
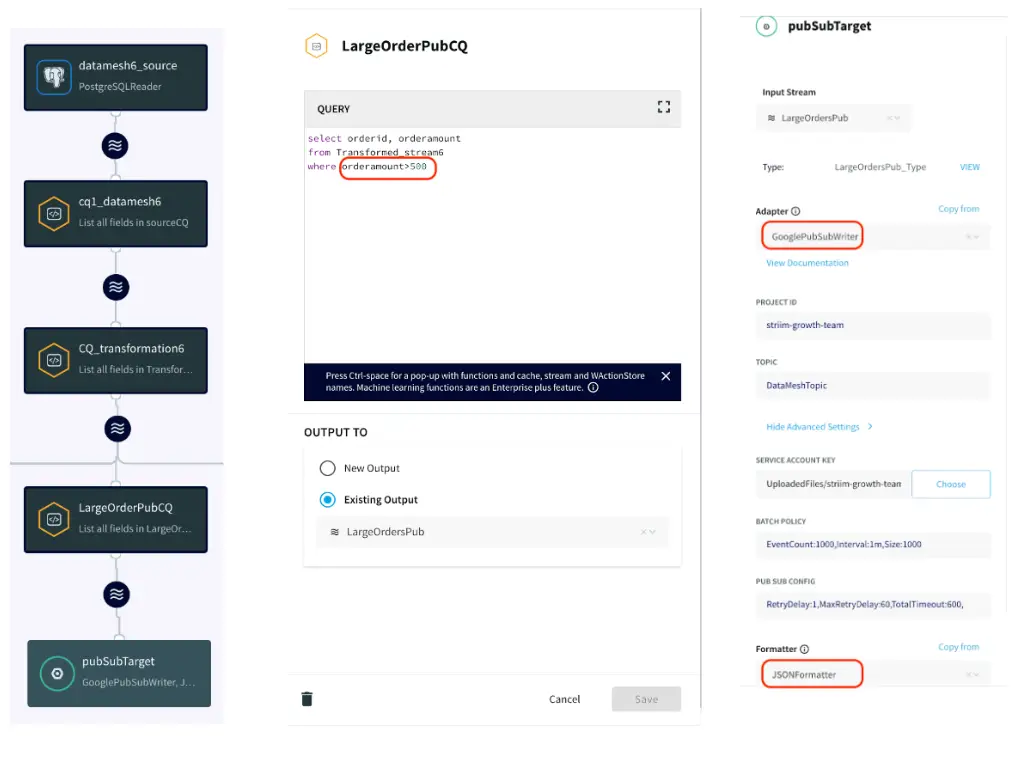
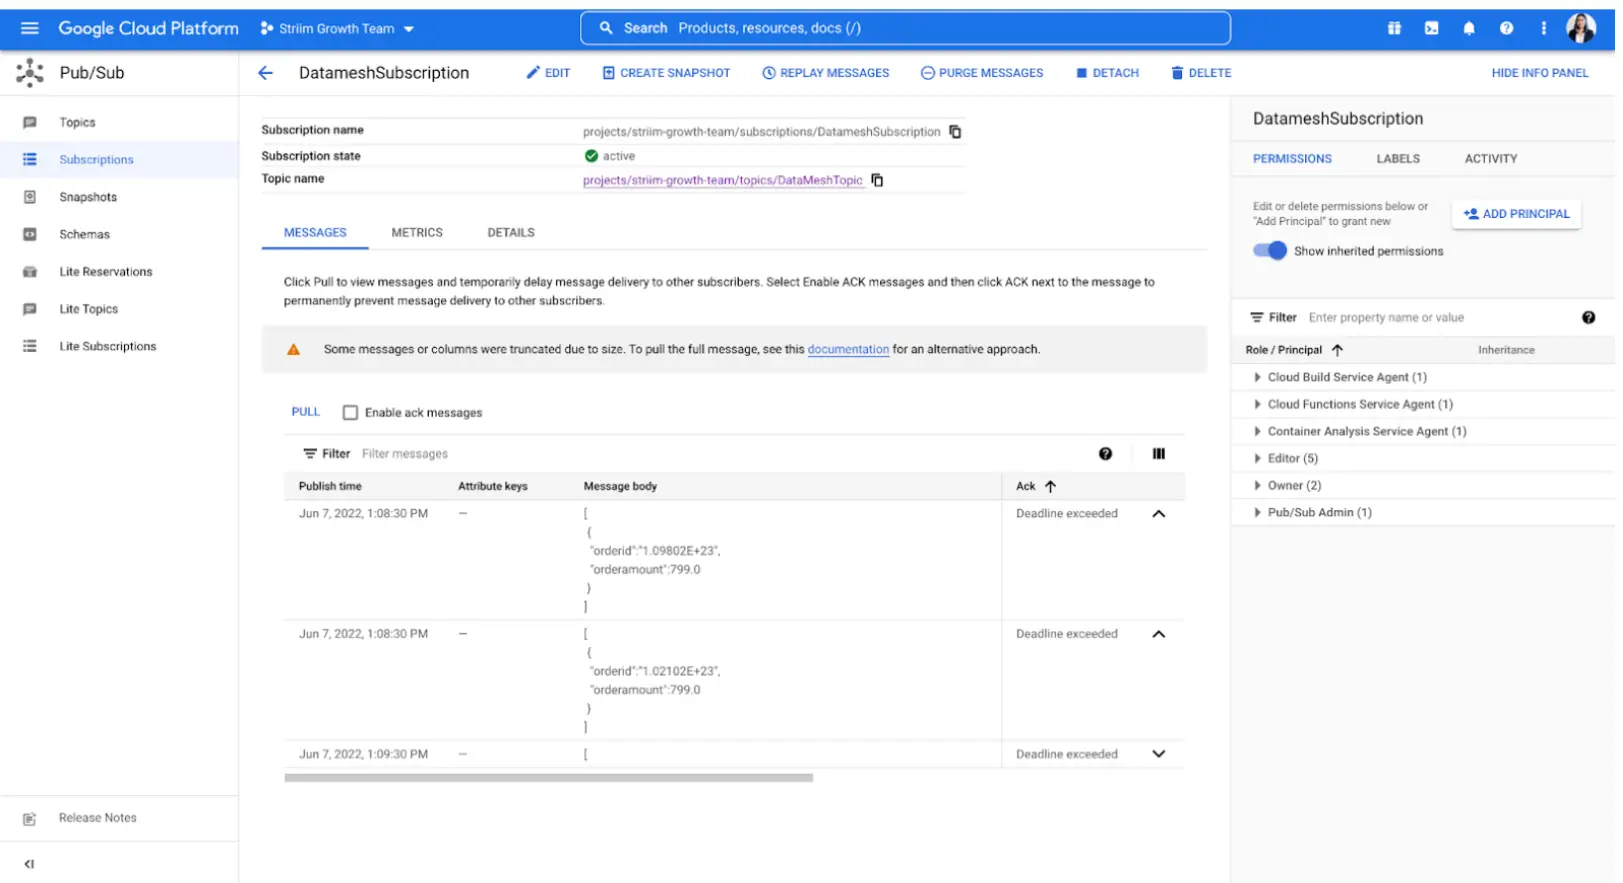
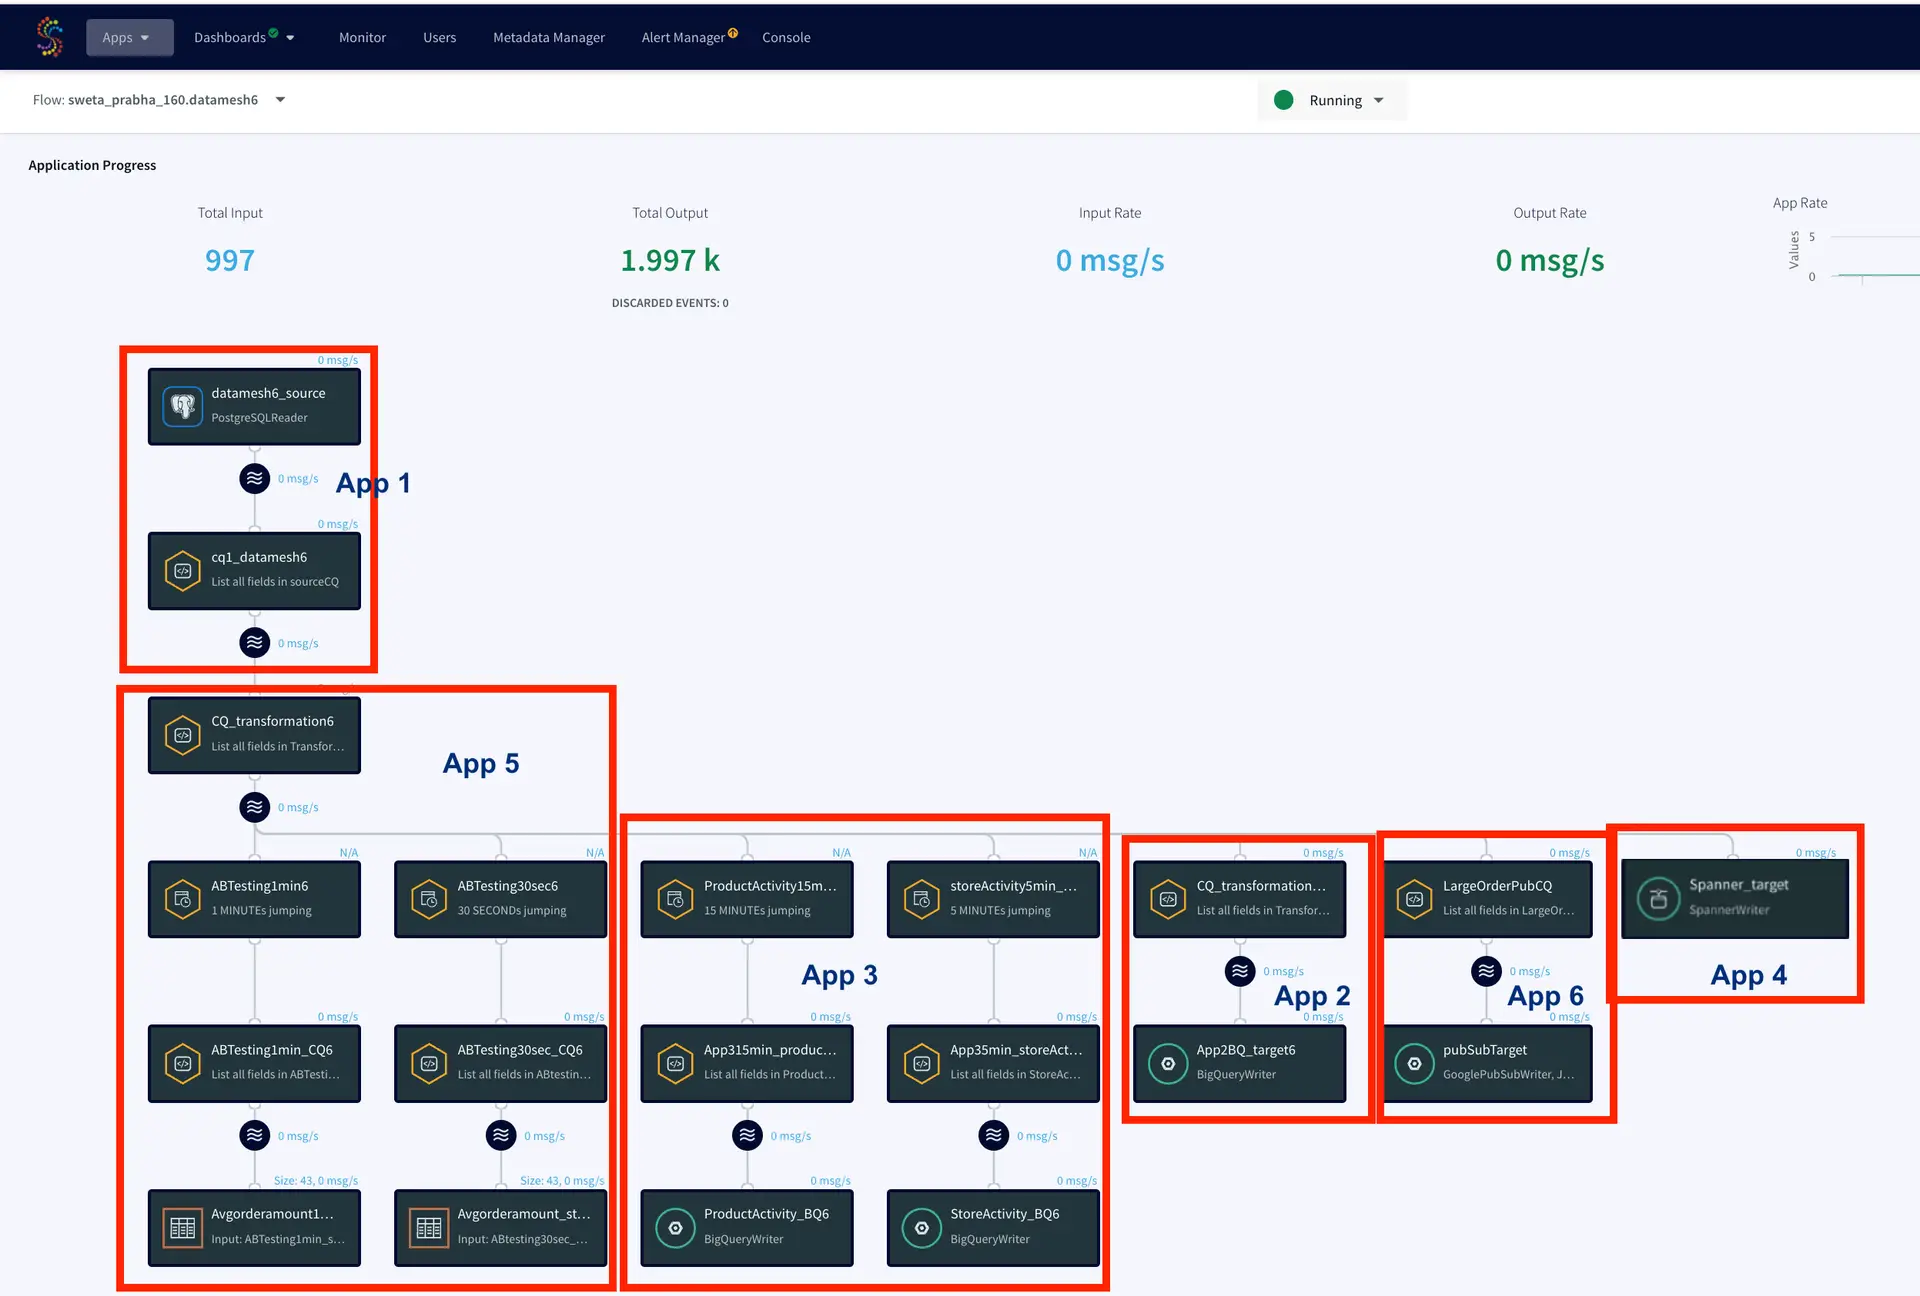


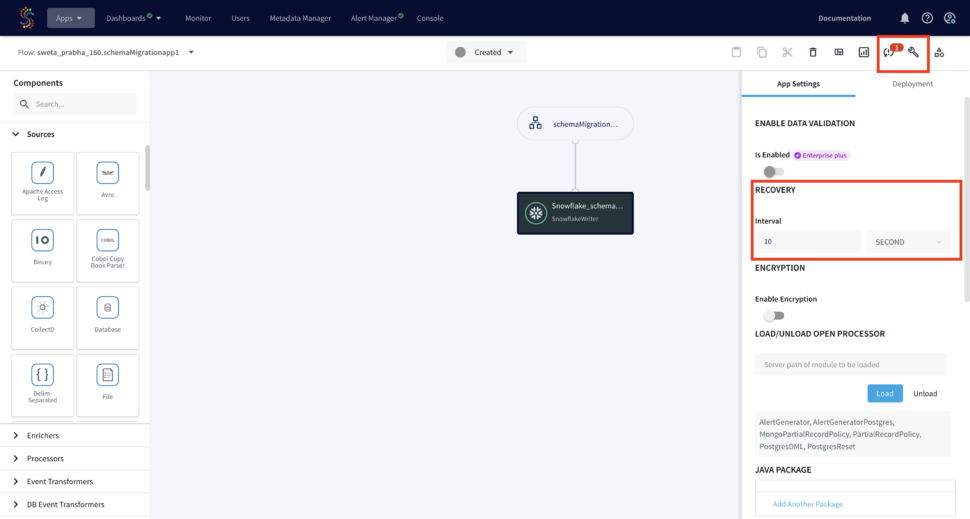


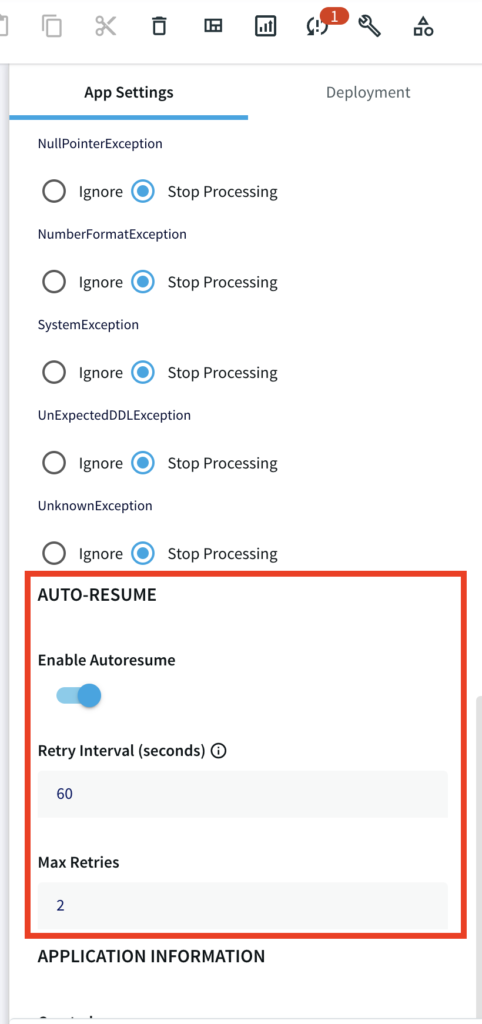

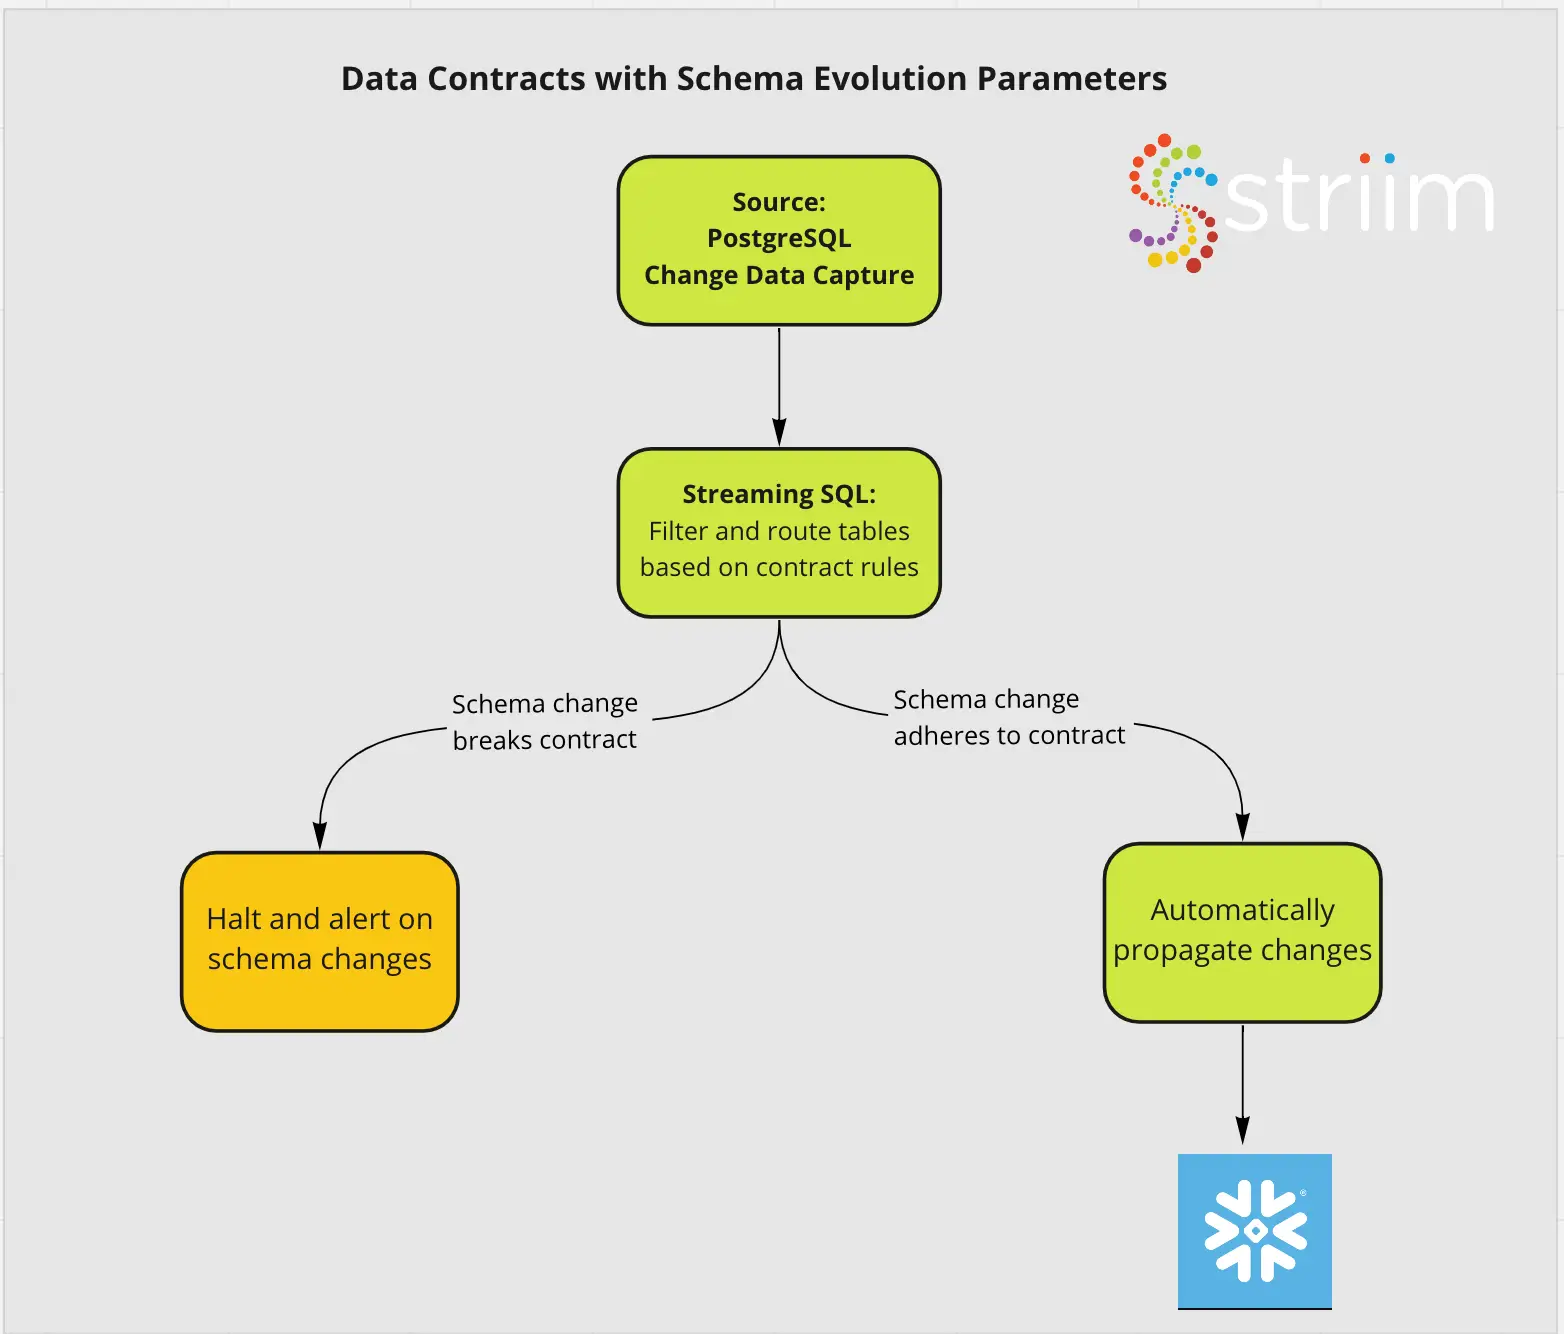


 Enable ‘SCHEMA EVOLUTION-CDDL CAPTURE’ and enter the name of the CDDL TRACKING TABLE that we created in Step 2. The CDDL ACTION property is ‘Process’.